-
-
-
Please click here to view instructions on re-registering your iComfort thermostat.
-
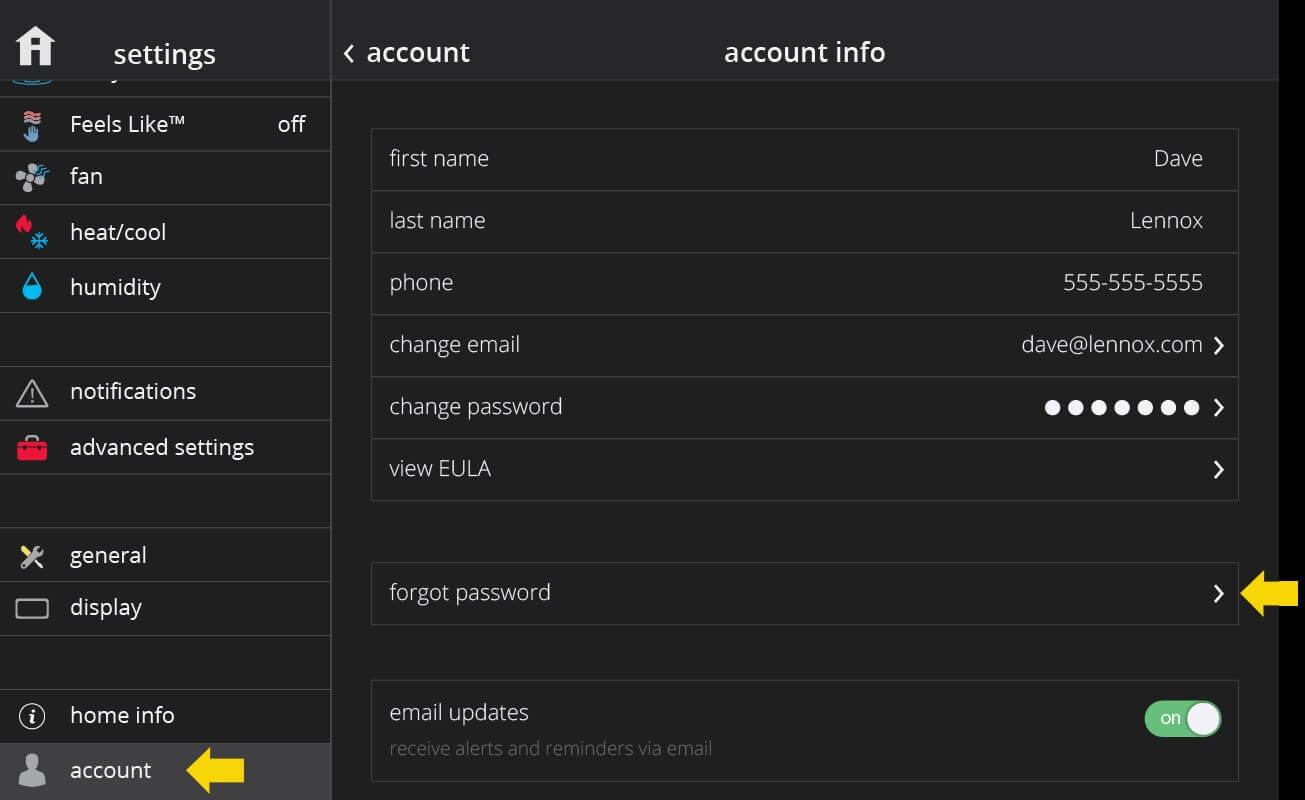
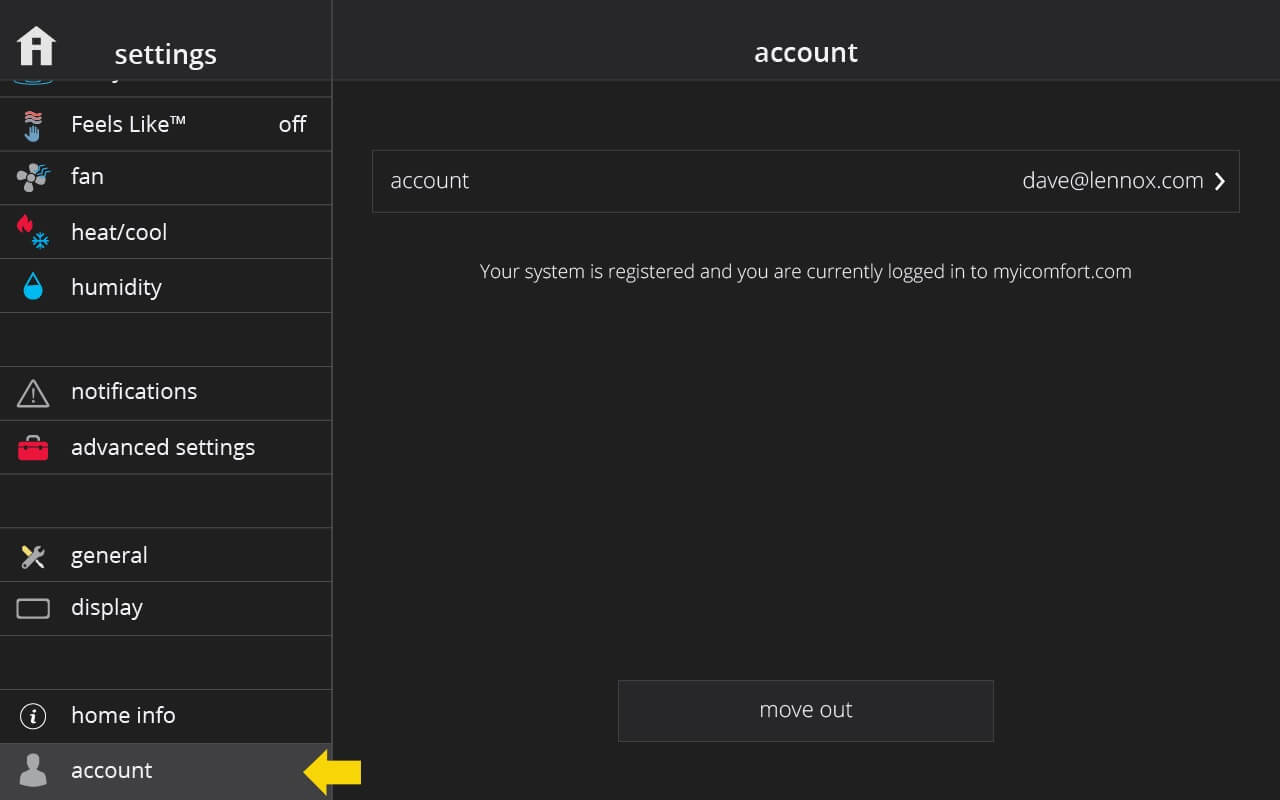
In the thermostat, under menu > settings > account, you can reset your iComfort® S30 password.
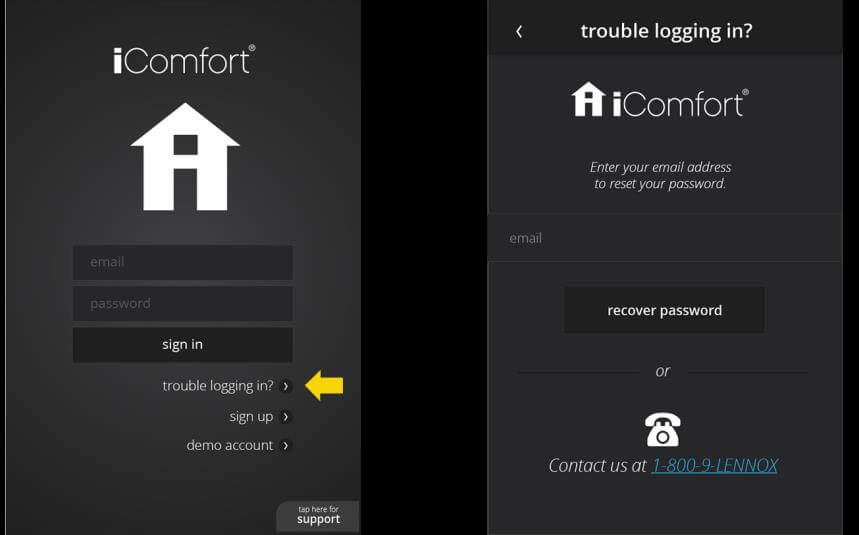
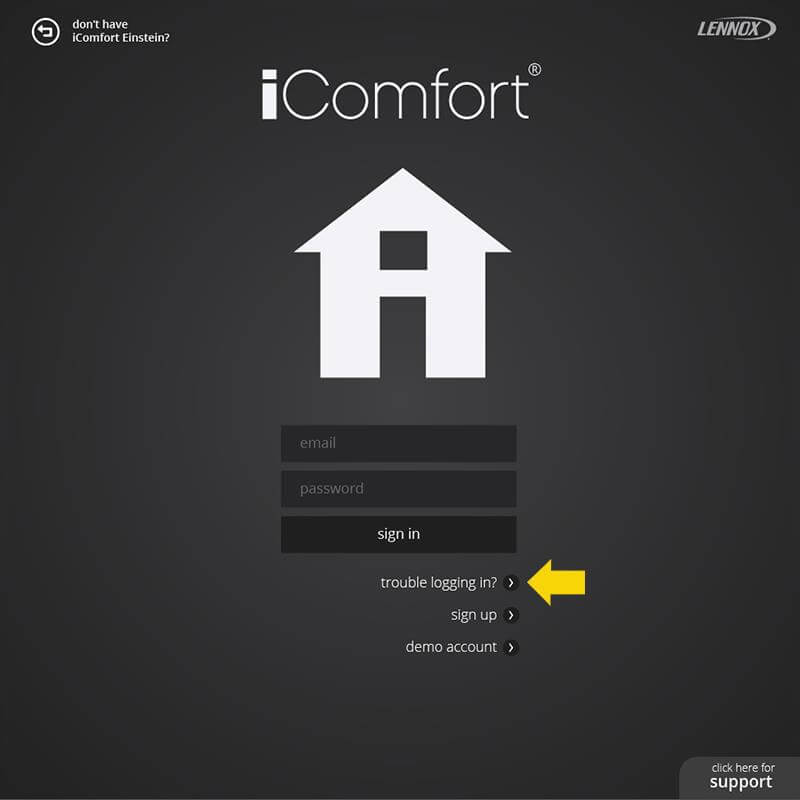
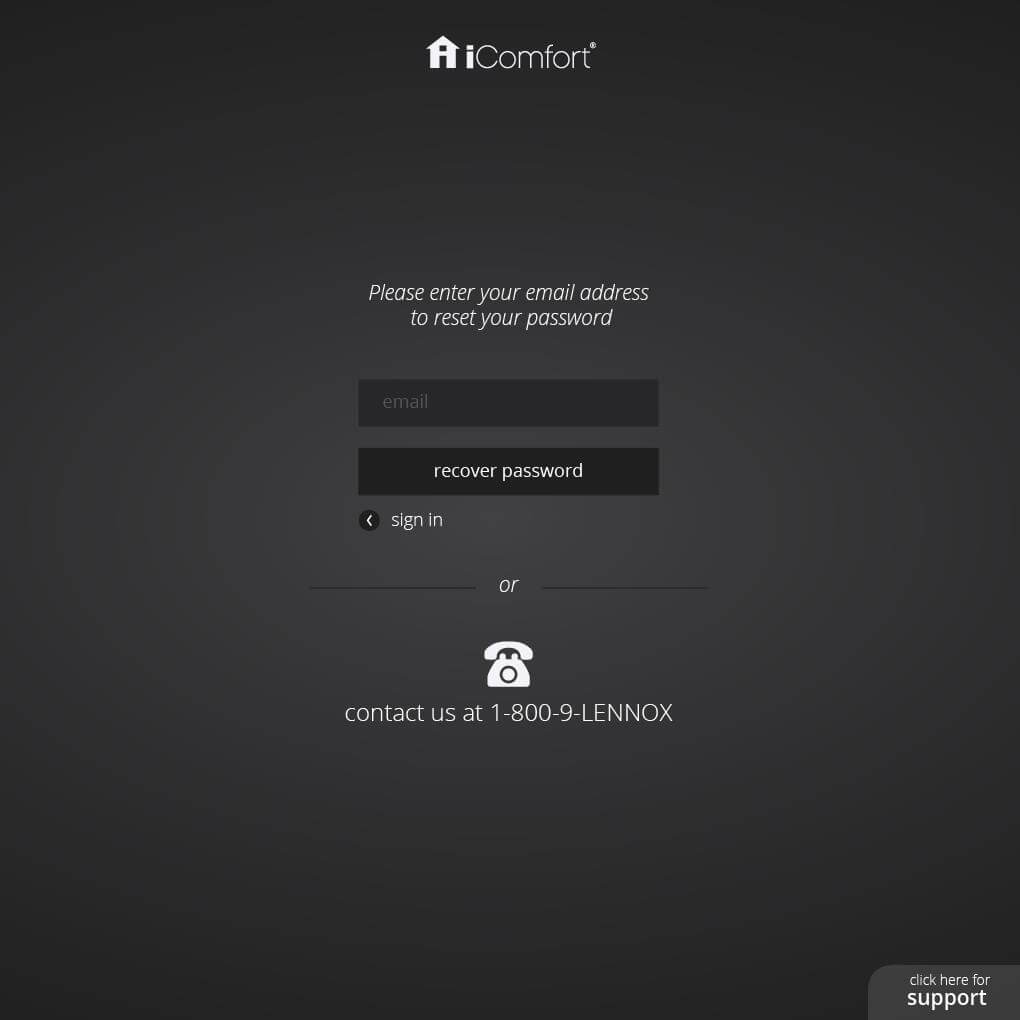
In the Lennox Home App or web portal, if you are signed out, then tap/click on the “Trouble Logging In?” button.
iComfort® S30
Phone
Website
-
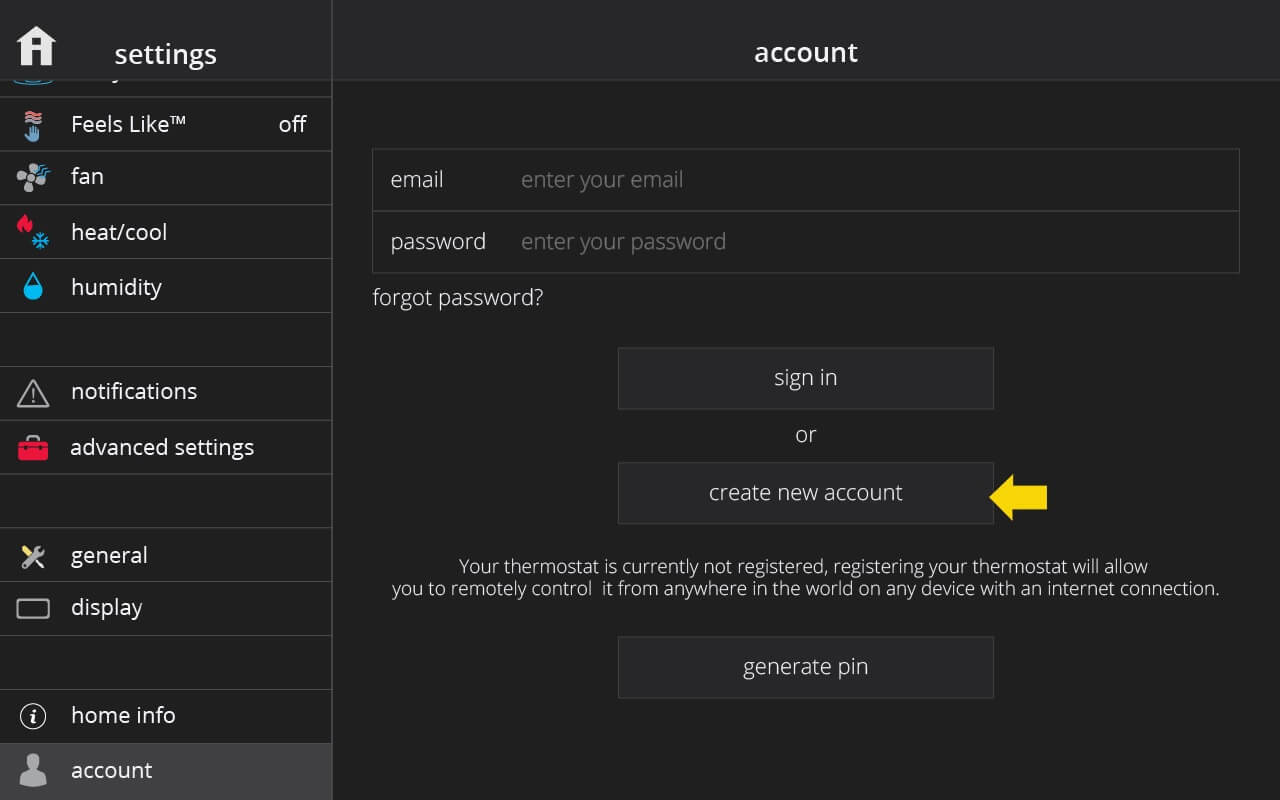
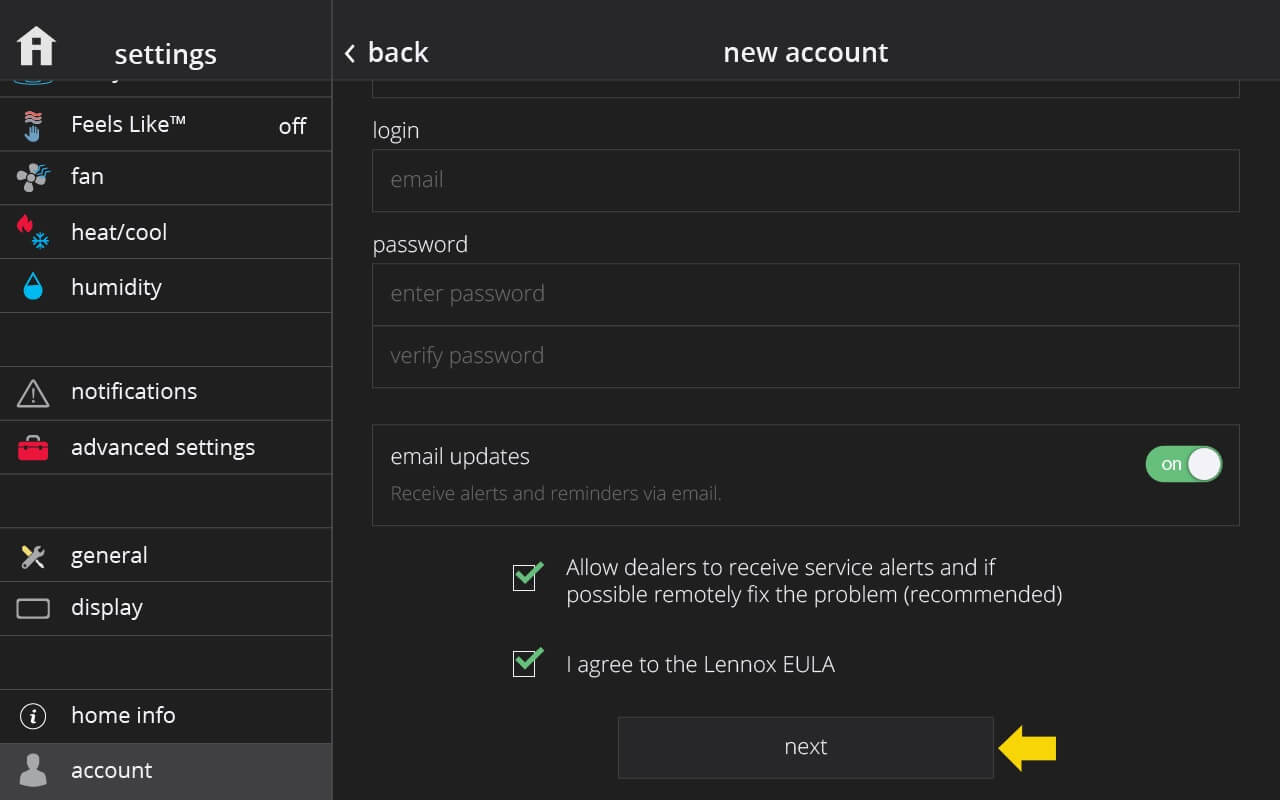
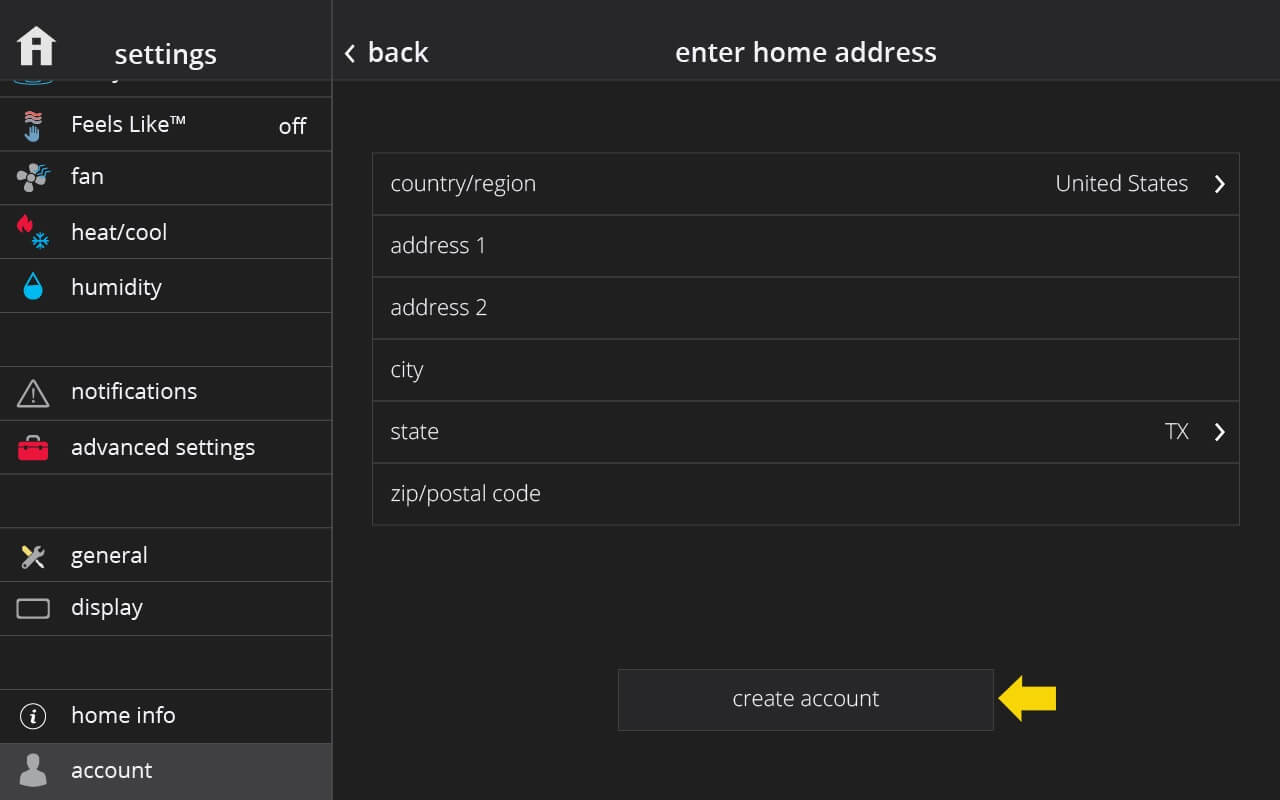
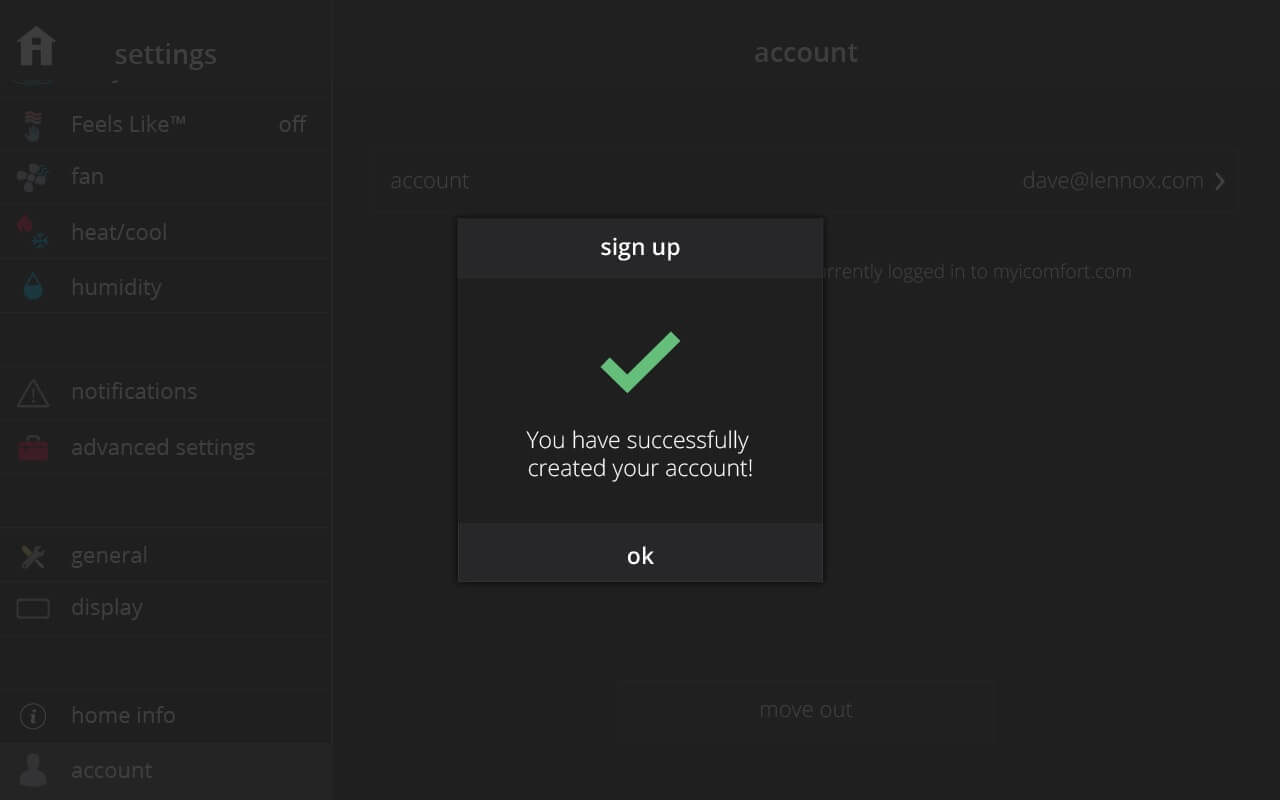
Under menu > settings > account, you can create a new iComfort® S30 account by following the instructions on the screen.
-
Once you have created an iComfort® S30 account and your are signed-in on the thermostat, you’ll be able to use the Lennox Home App and web portal to control your thermostat remotely from anywhere. To sign in on the thermostat, go to menu > settings > account.
-
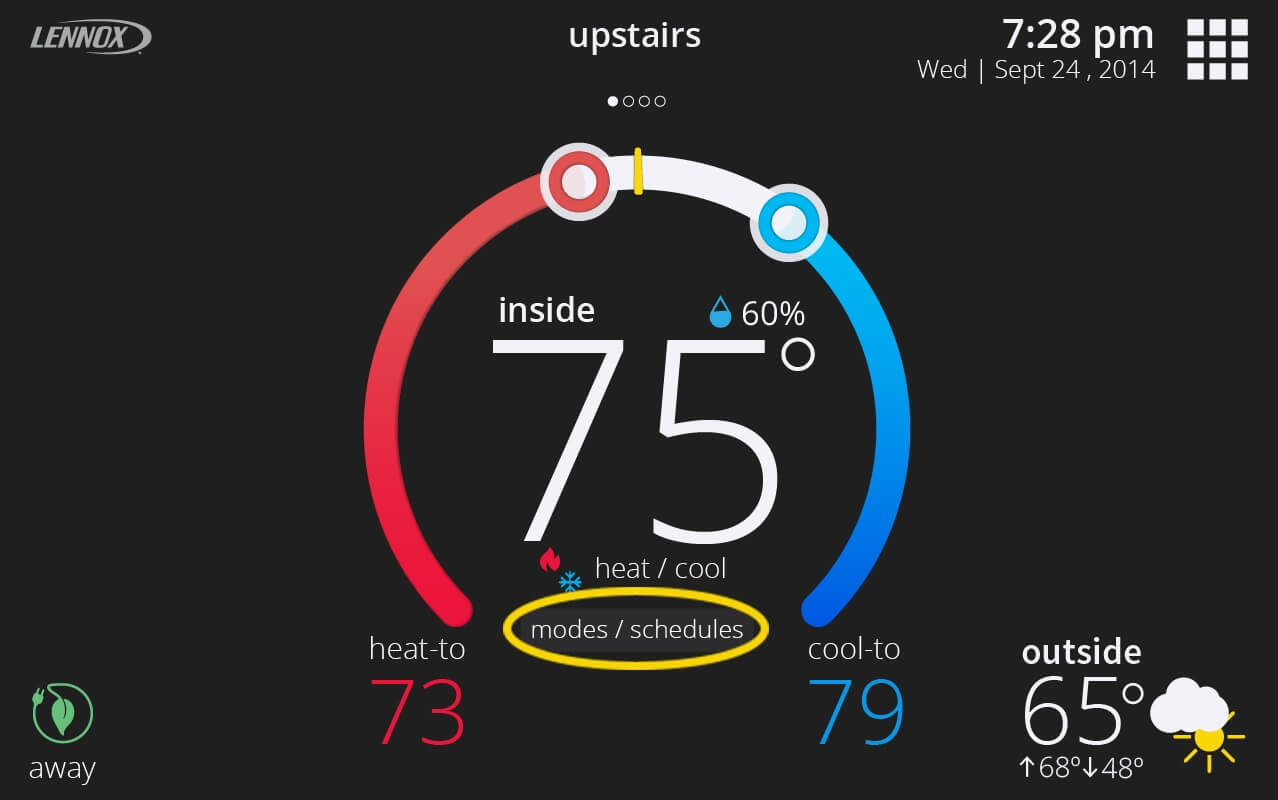
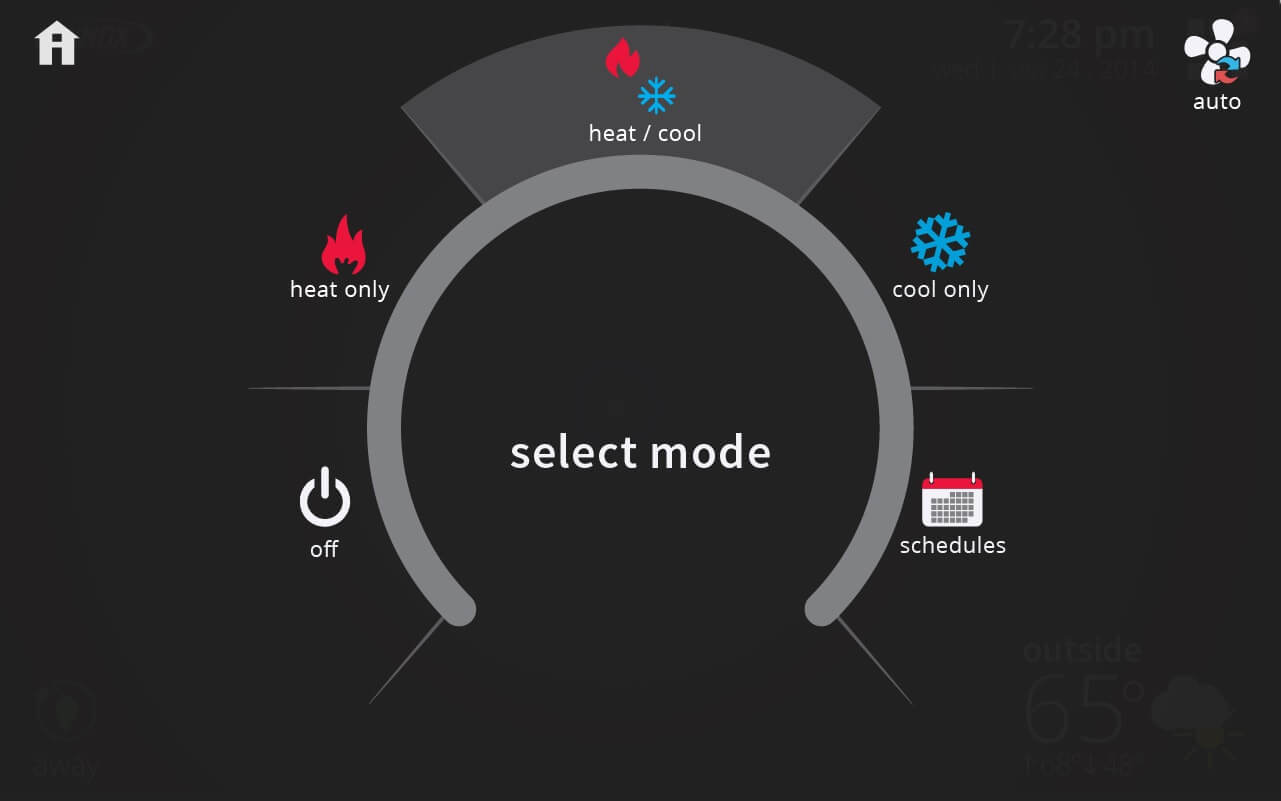
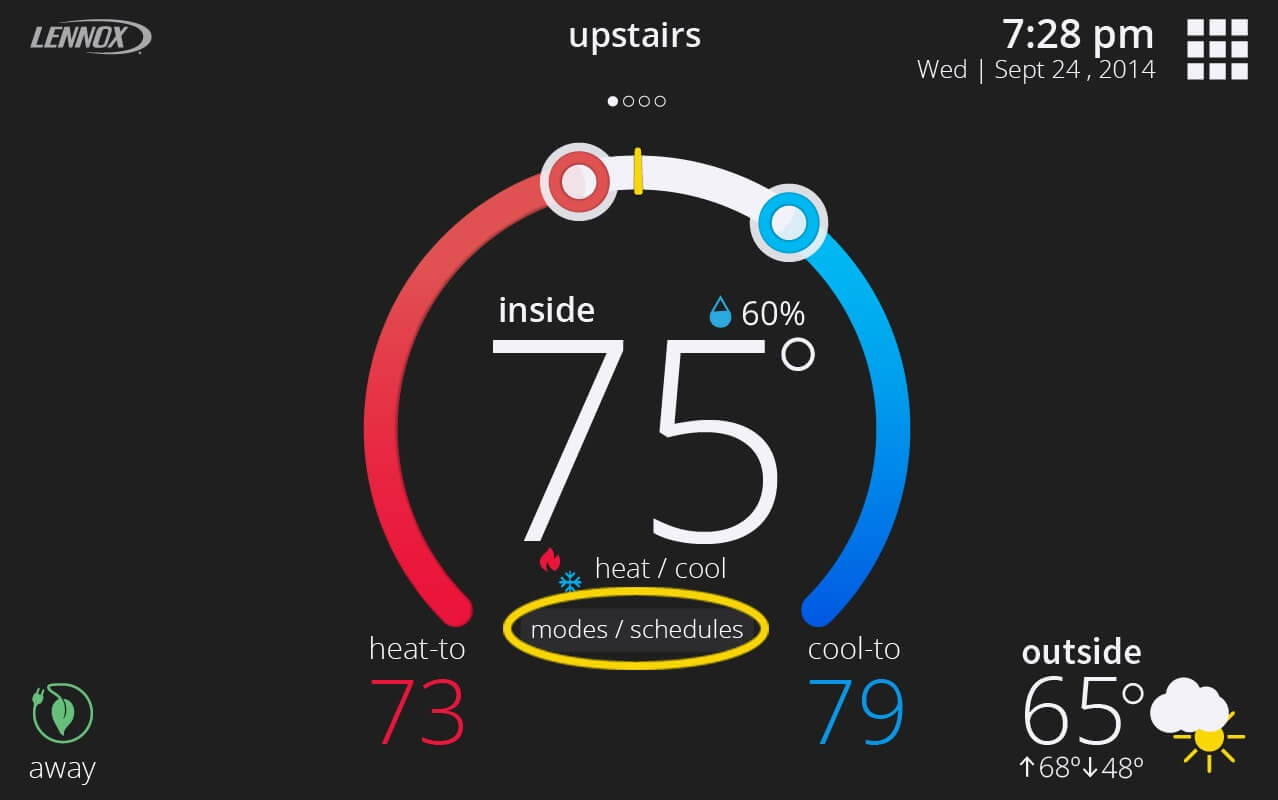
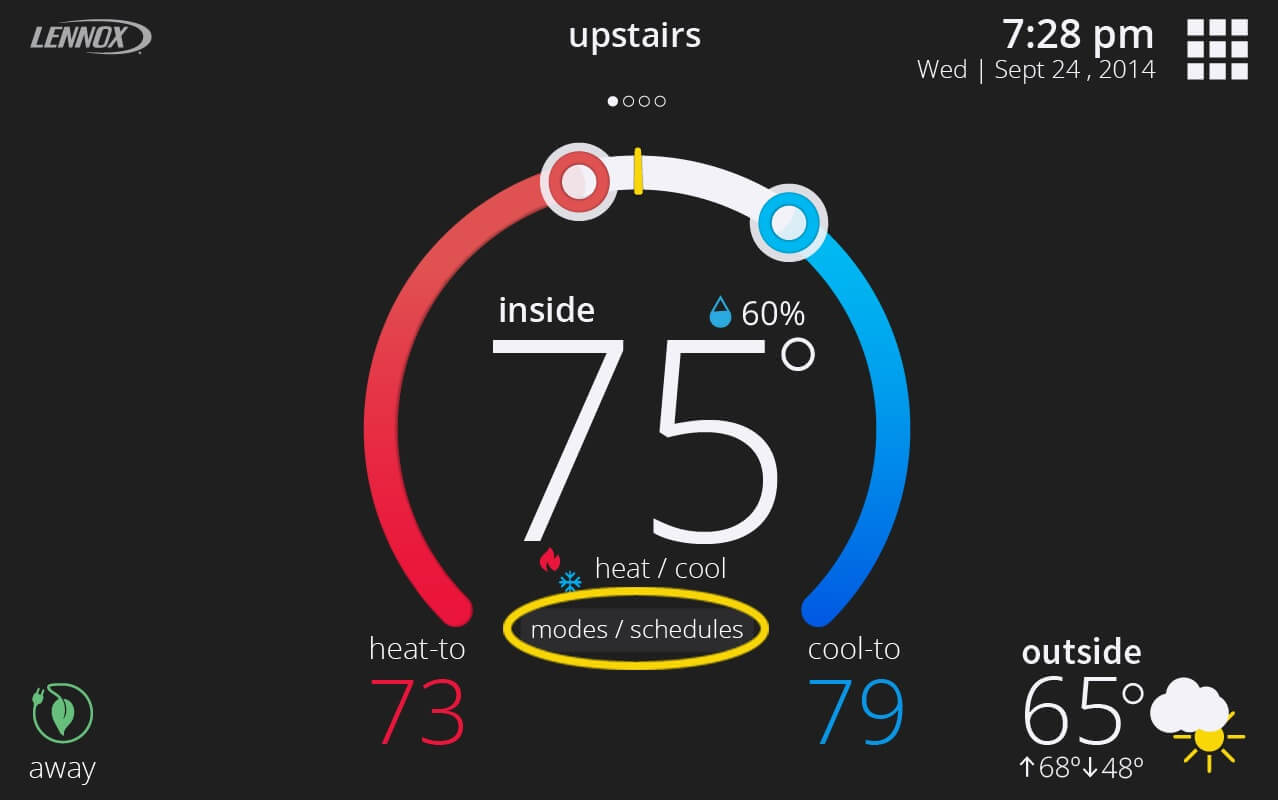
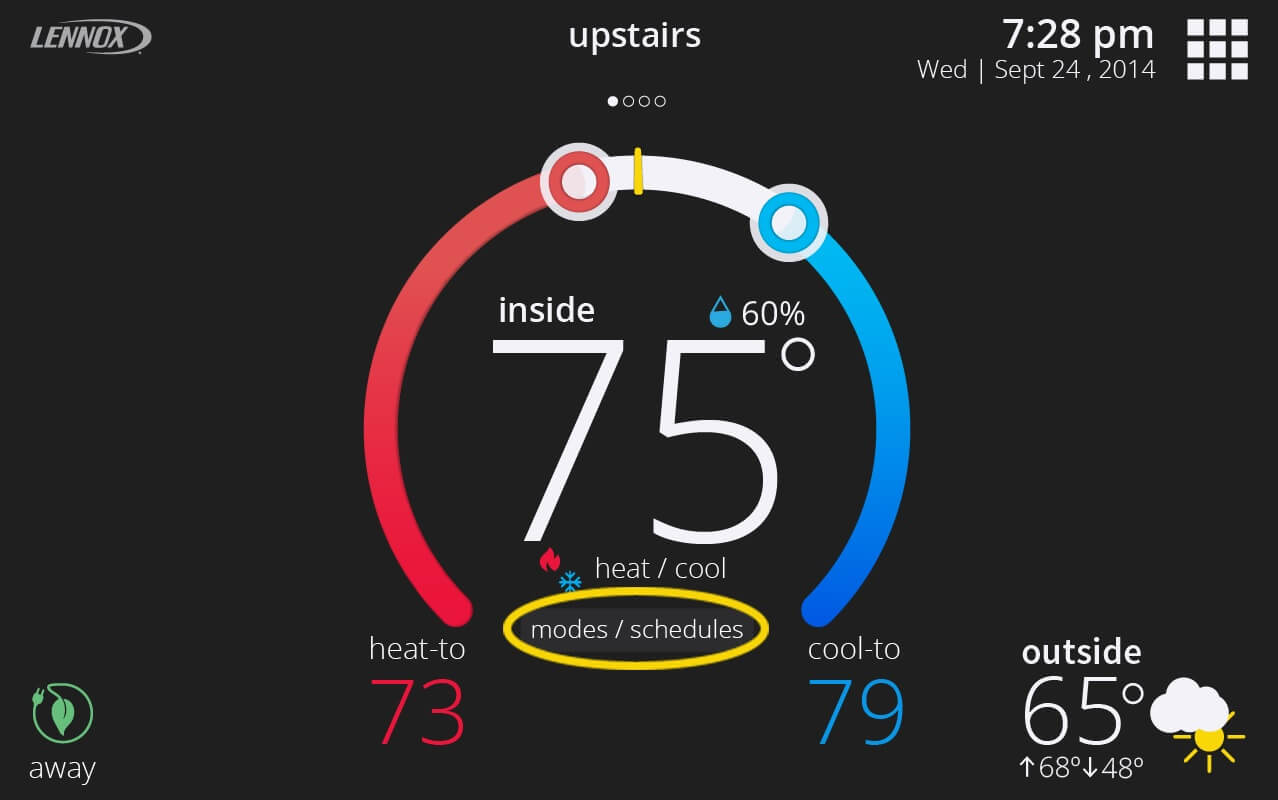
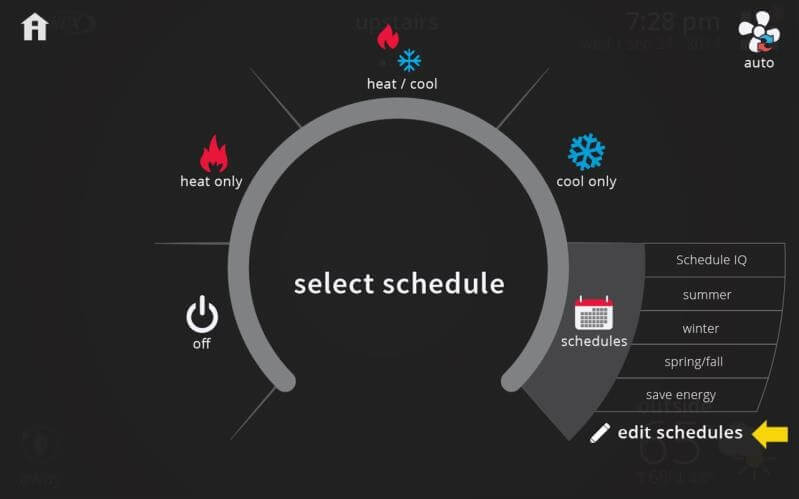
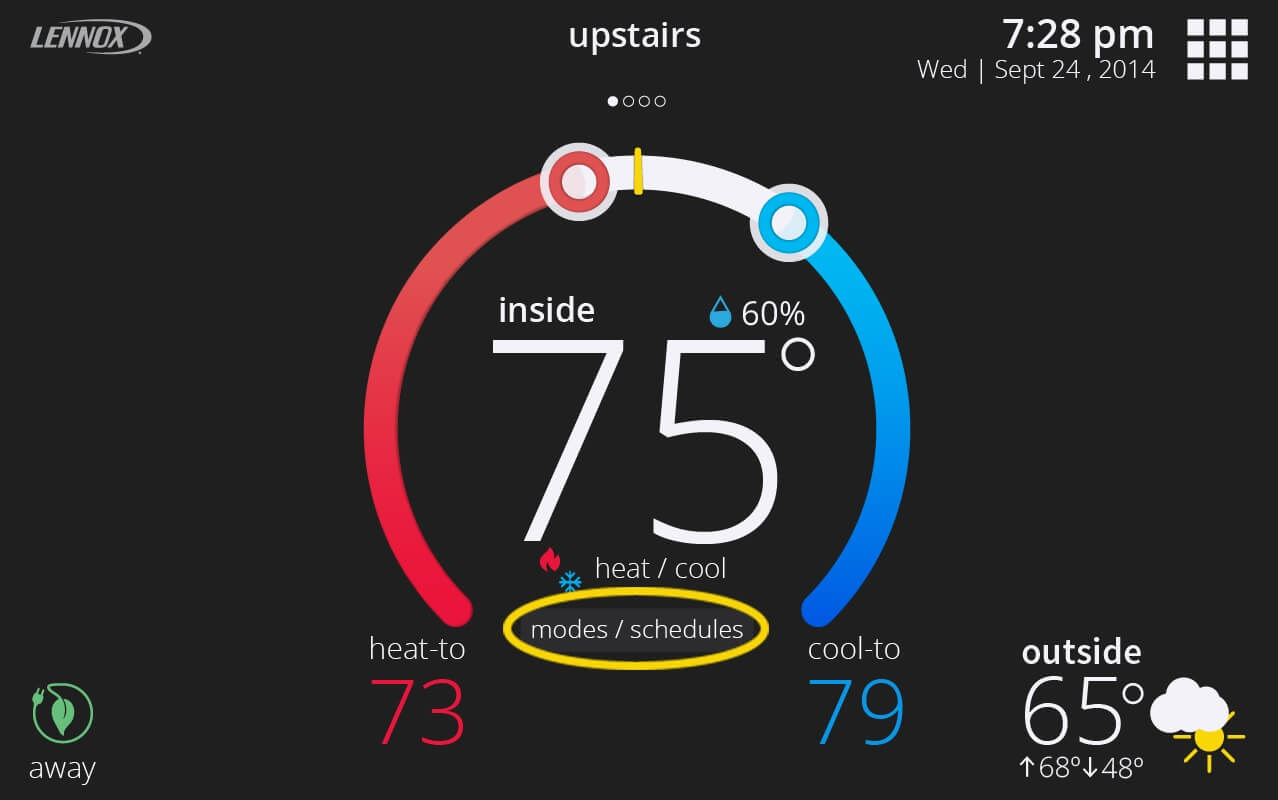
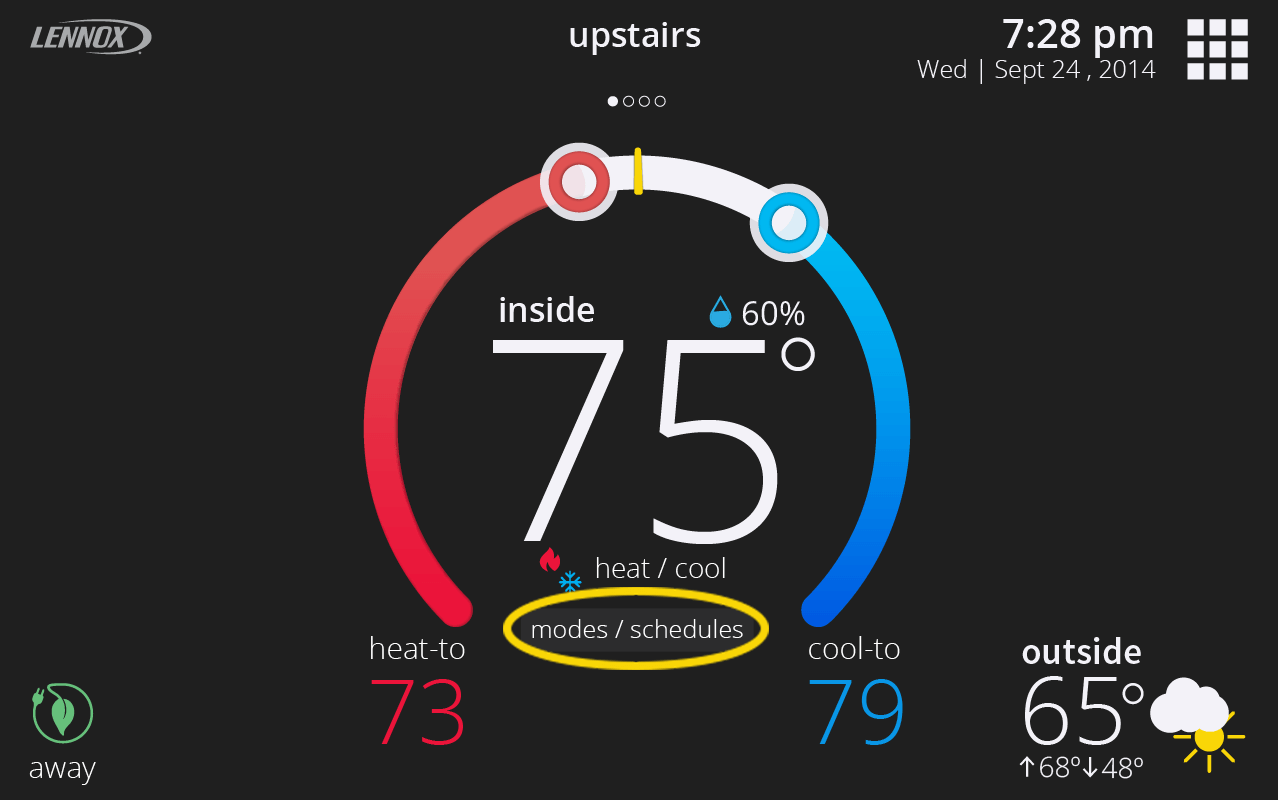
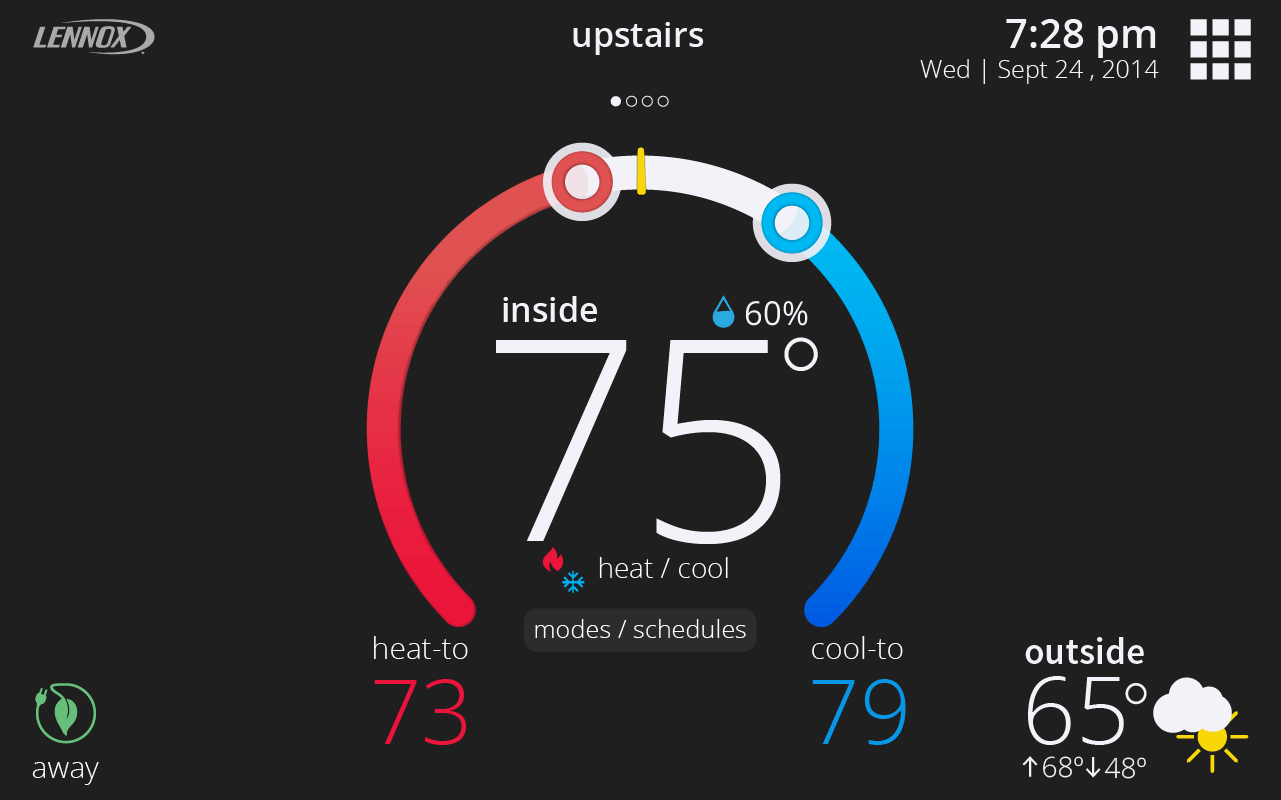
In the thermostat home screen, tap the modes/schedules button. A screen will display with the available system modes for your equipment (such as cool only, heat only, heat/cool, etc.).
-
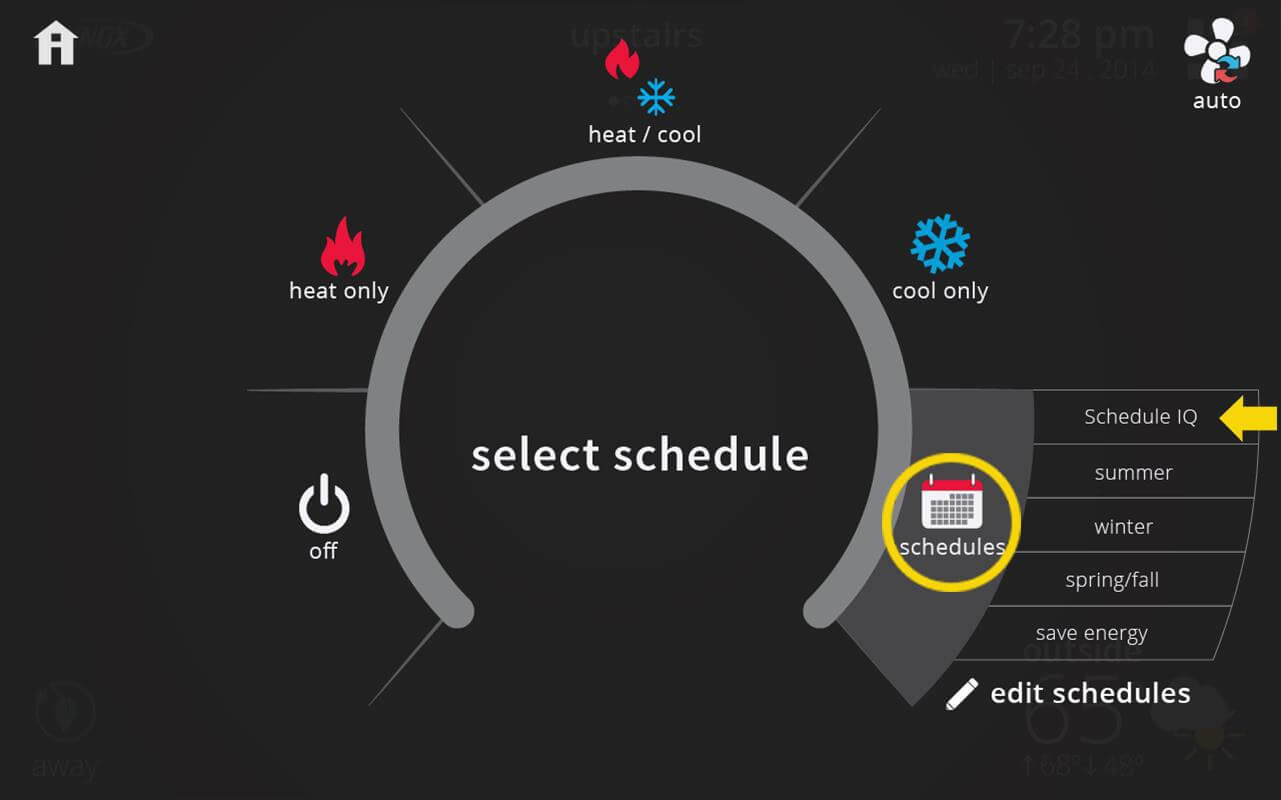
Schedule IQ is a smart schedule that works with Smart Away and combines the power of a traditional schedule. With Smart Away, you’ll never have to put your home in Away Mode when you leave or remember to adjust your thermostat temperature when returning home. With Schedule IQ, you also can set “At Home Day” and “At Home Night” set-points and times. To turn on Schedule IQ, in your thermostat’s home screen, go to modes/schedules > schedules and select Schedule IQ.
-
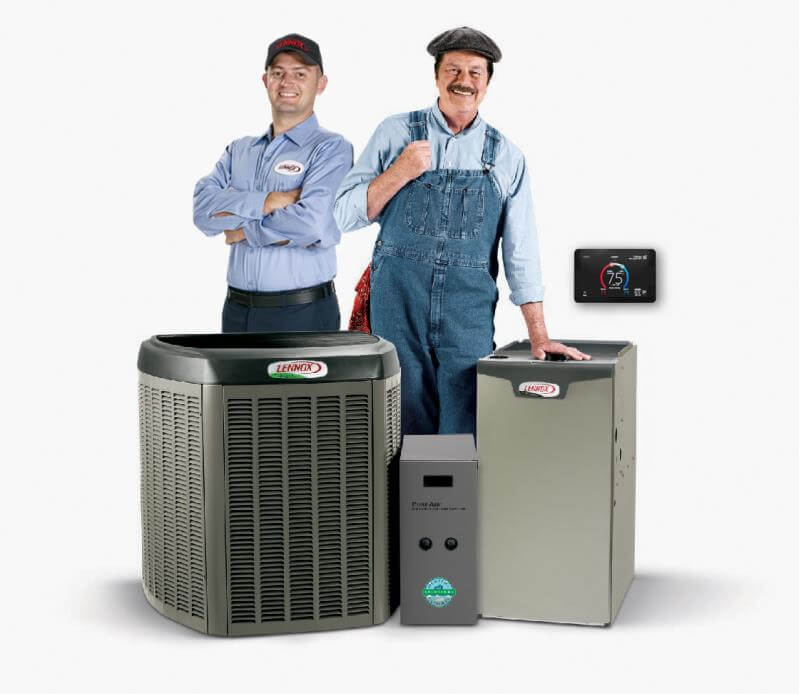
We recommend you do not install the iComfort® S30 yourself. We recommend you hire a certified dealer to do the installation for you. You can find a dealer near you here: http://www.lennox.com/locate/.
-
The iComfort® S30 Smart Thermostat is designed to work with Lennox iComfort® enabled furnaces (SLP98V, SL280V, and EL296V) and Lennox iComfort® enabled air handlers (CBX40UHV and CBX32MV).
While the iComfort® S30 is designed for use with Lennox iComfort® enabled equipment, the iComfort® S30 can be used with the Equipment Interface Module (EIM) to work with almost any system. The EIM allows the iComfort® S30 to work with Lennox-brand noncommunicating equipment and most other brands of heating and cooling equipment.
-
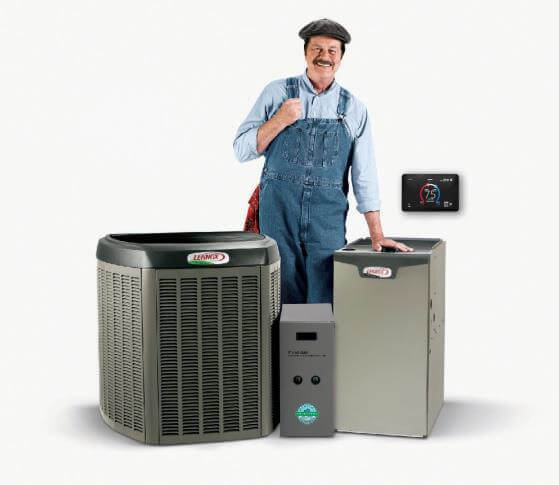
You can purchase iComfort® S30 from an authorized Lennox dealer. To find a dealer near you, click here:http://www.lennox.com/locate/.
-
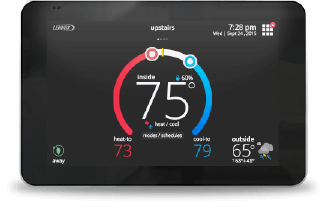
The iComfort® S30 Ultra Smart Thermostat is the ultimate controller for precise comfort.
Please click here to explore features of the product. -
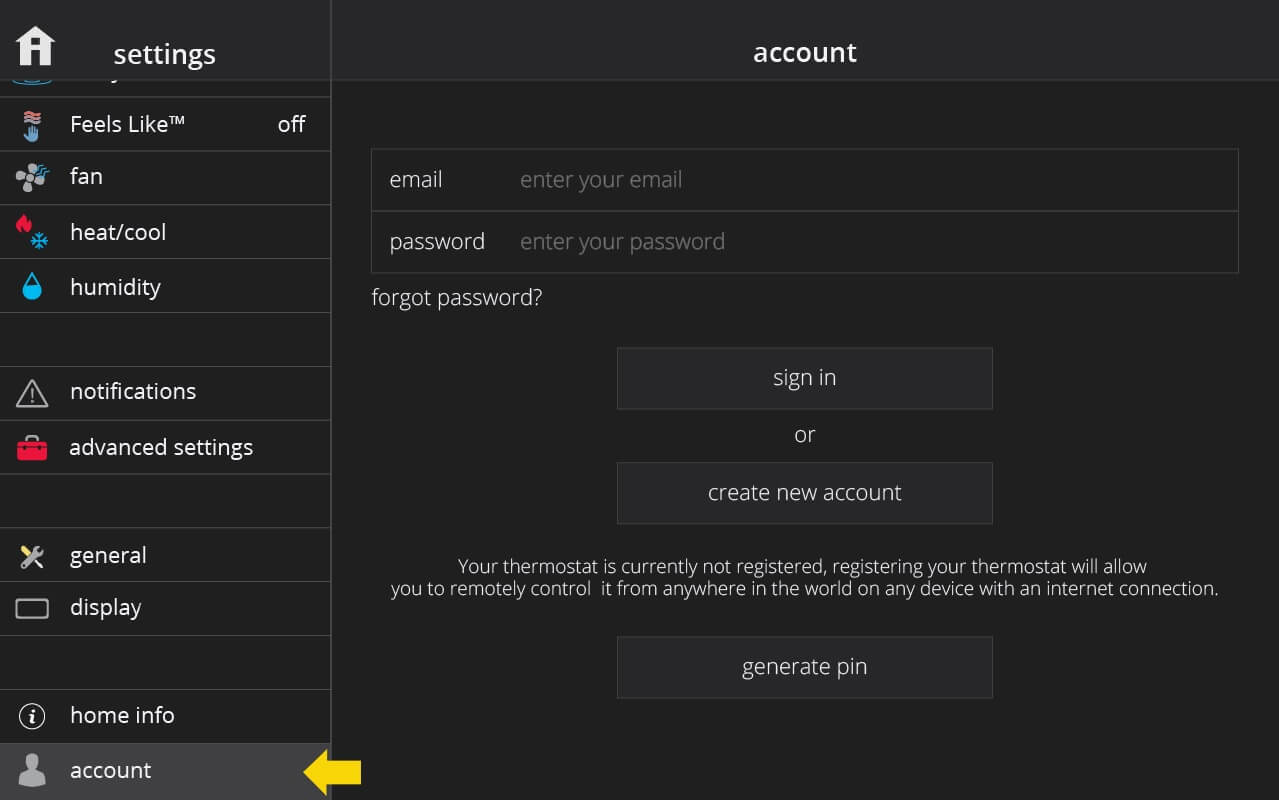
Tap on menu > settings > account to login using your existing iComfort® S30 credentials or to create new account. Having an iComfort® S30 account allows you to control your thermostat remotely from the web portal and Lennox Home App and it also allows you to utilize other advanced features of your iComfort® S30 thermostat such as Smart Away and Schedule IQ..
-
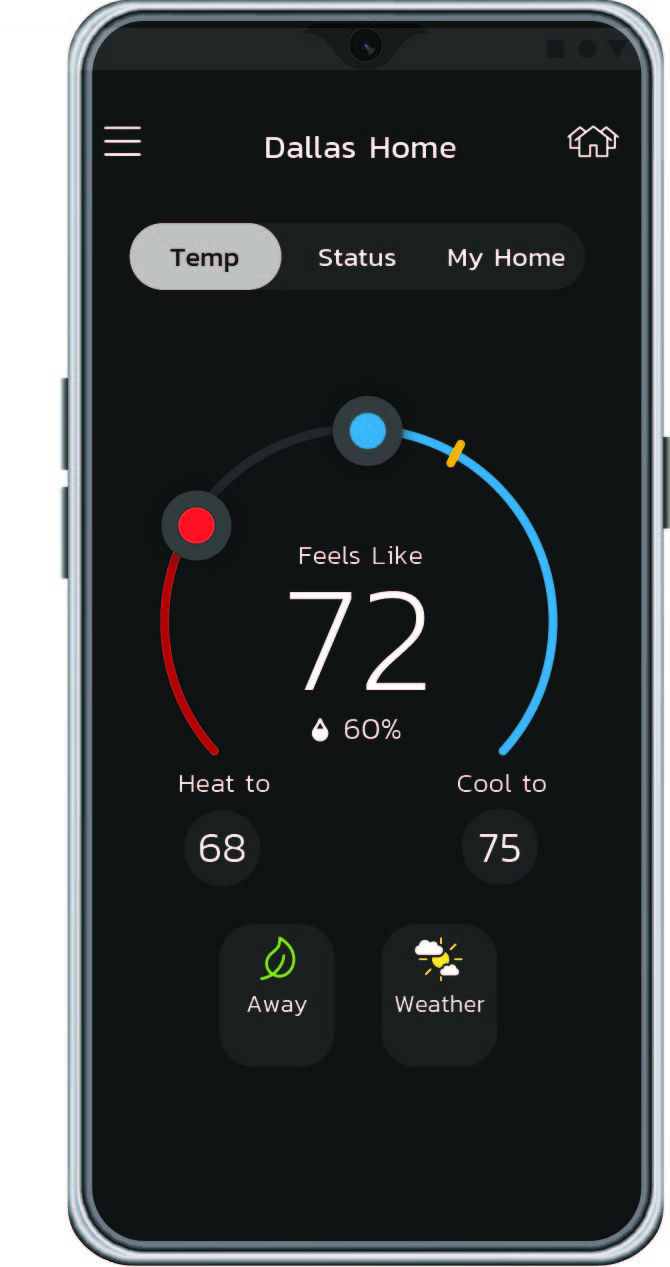
The Lennox Home App is available in the iTunes App Store and Google Play.


-
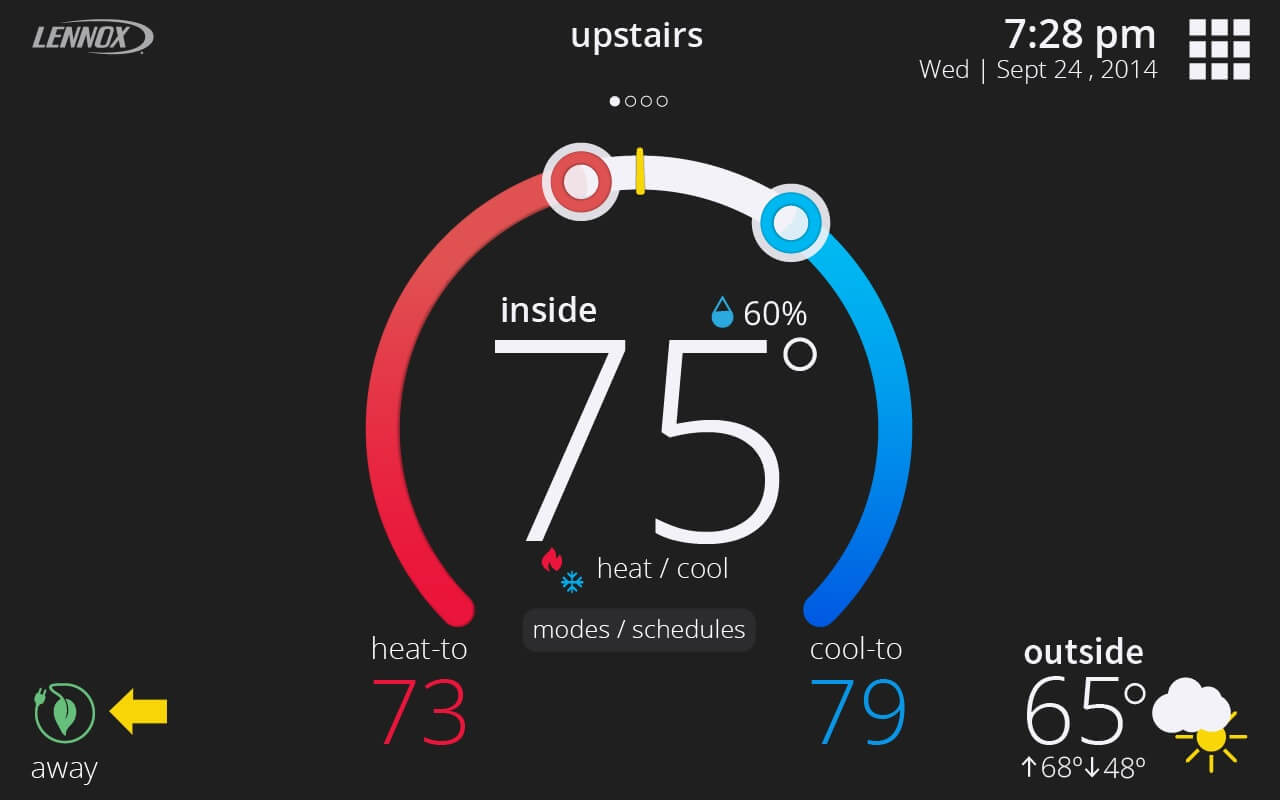
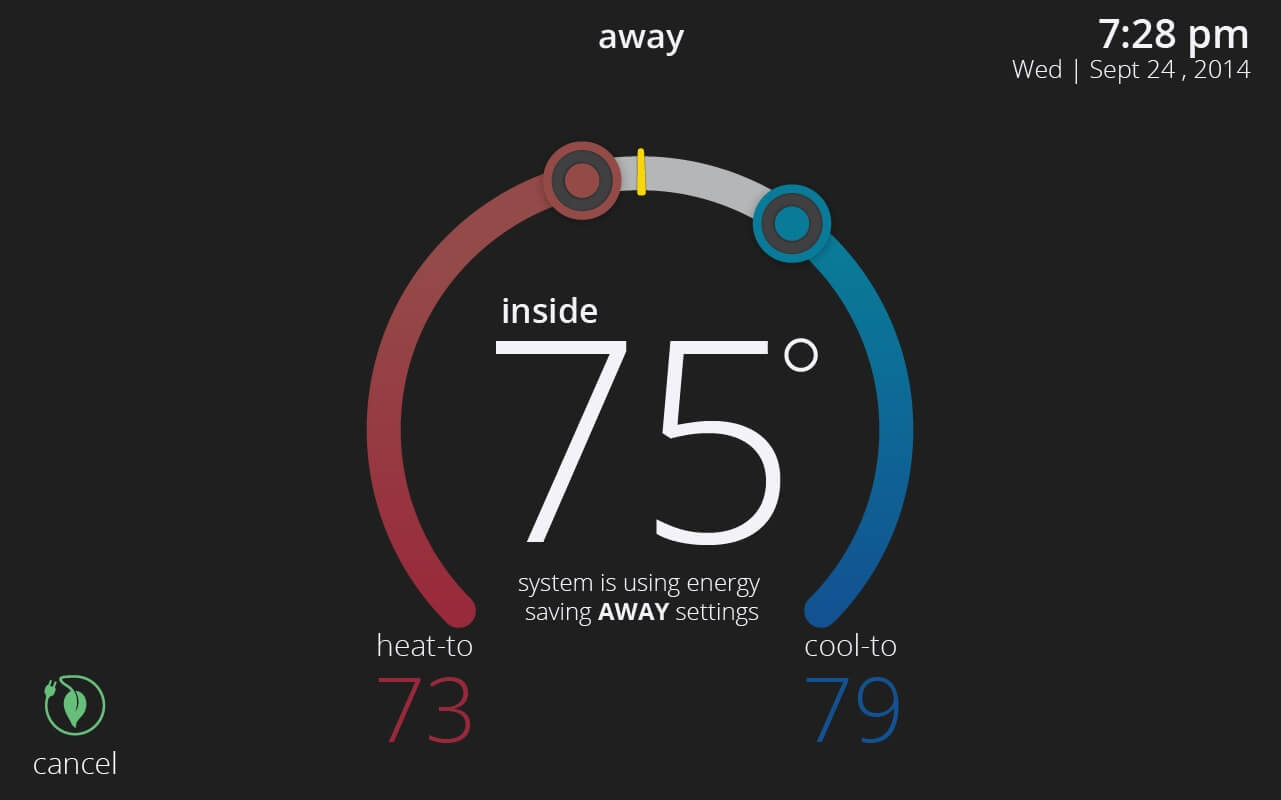
In the home screen, tap the Away button on the bottom left corner. Your system will automatically go into Away Mode. And you’ll now save money and energy when you’re not home.
-
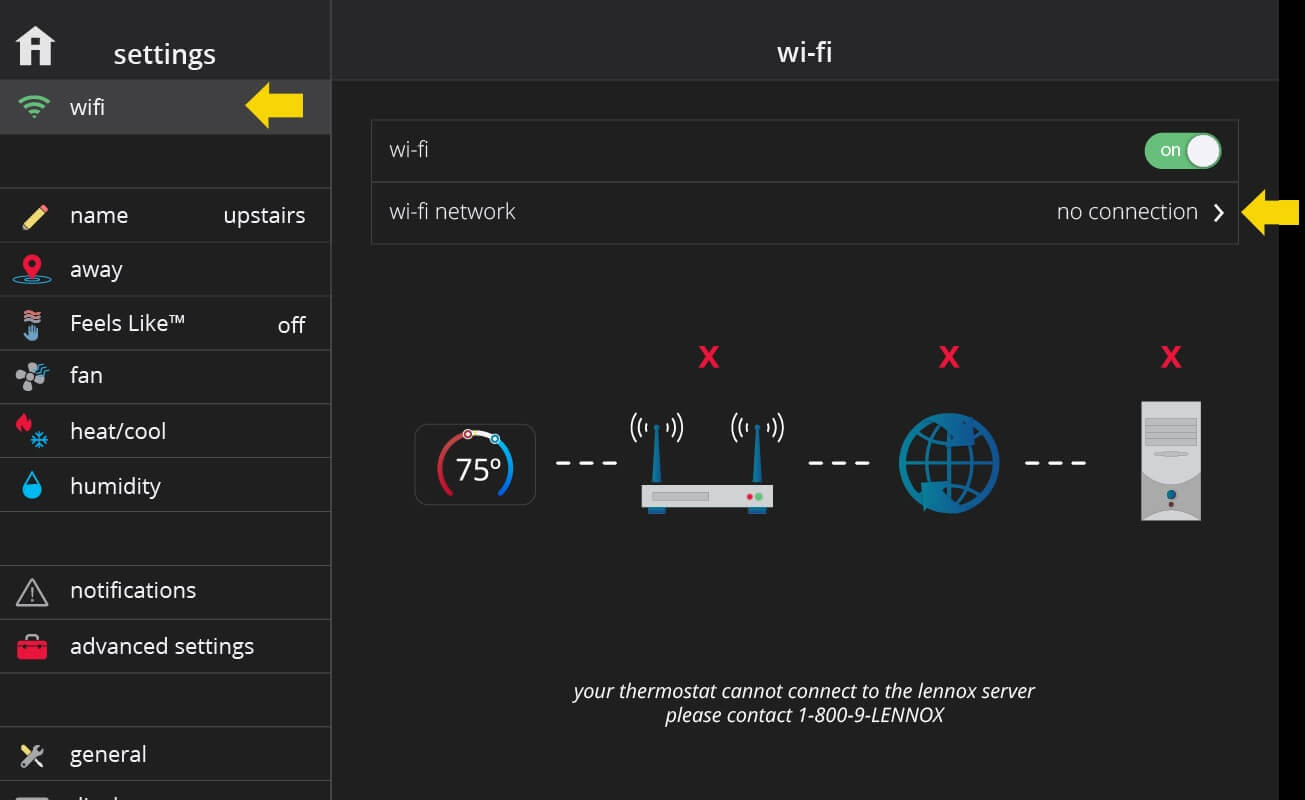
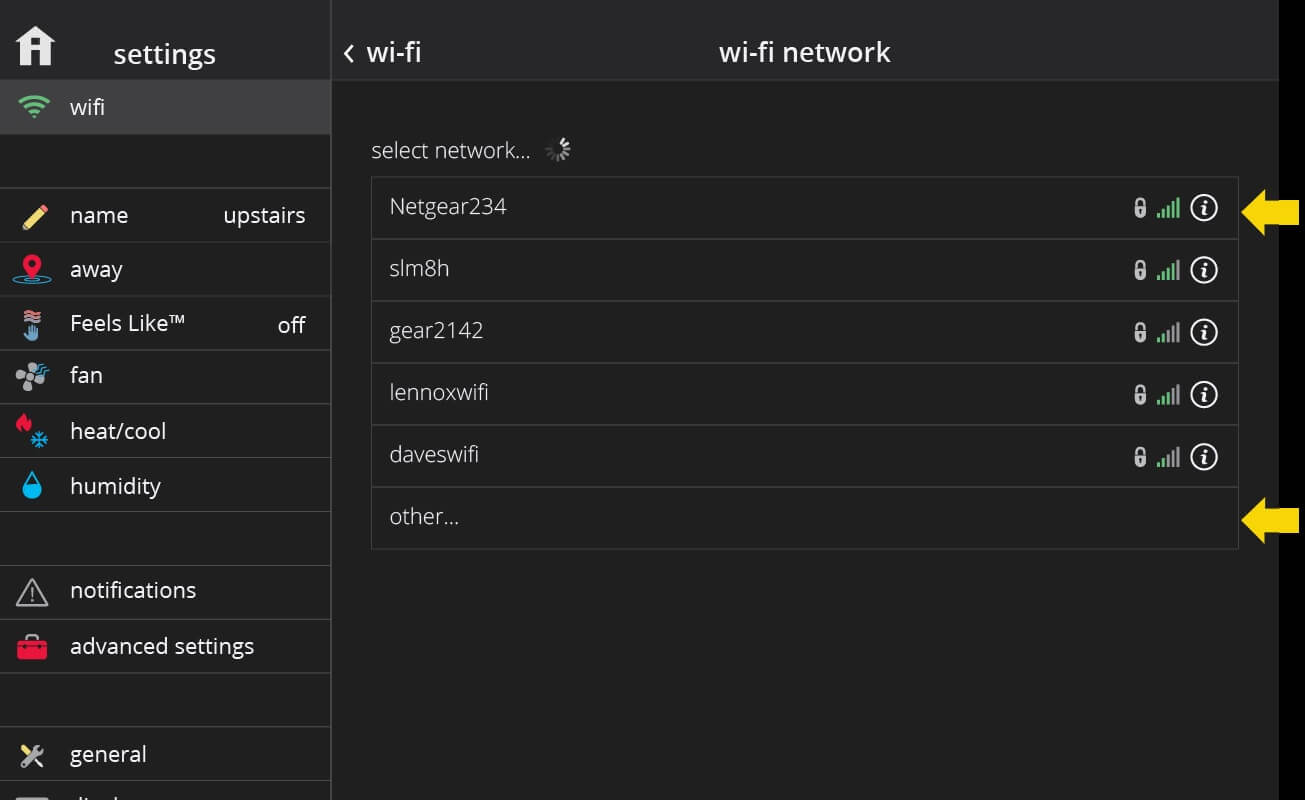
In order to set up Wi-Fi in your thermostat, go to menu > settings > Wi-Fi > Wi-Fi network. The thermostat will automatically search for Wi-Fi networks in your home. Simply select the desired Wi-Fi network and enter the password (if necessary). You can also manually add a Wi-Fi network by pressing the "Other" button.
-
In the home screen, tap the Away button on the bottom left corner. Your system will automatically go into Away Mode. And you’ll now save money and energy when you’re not home.
And it is located here on the Lennox Home App:
-
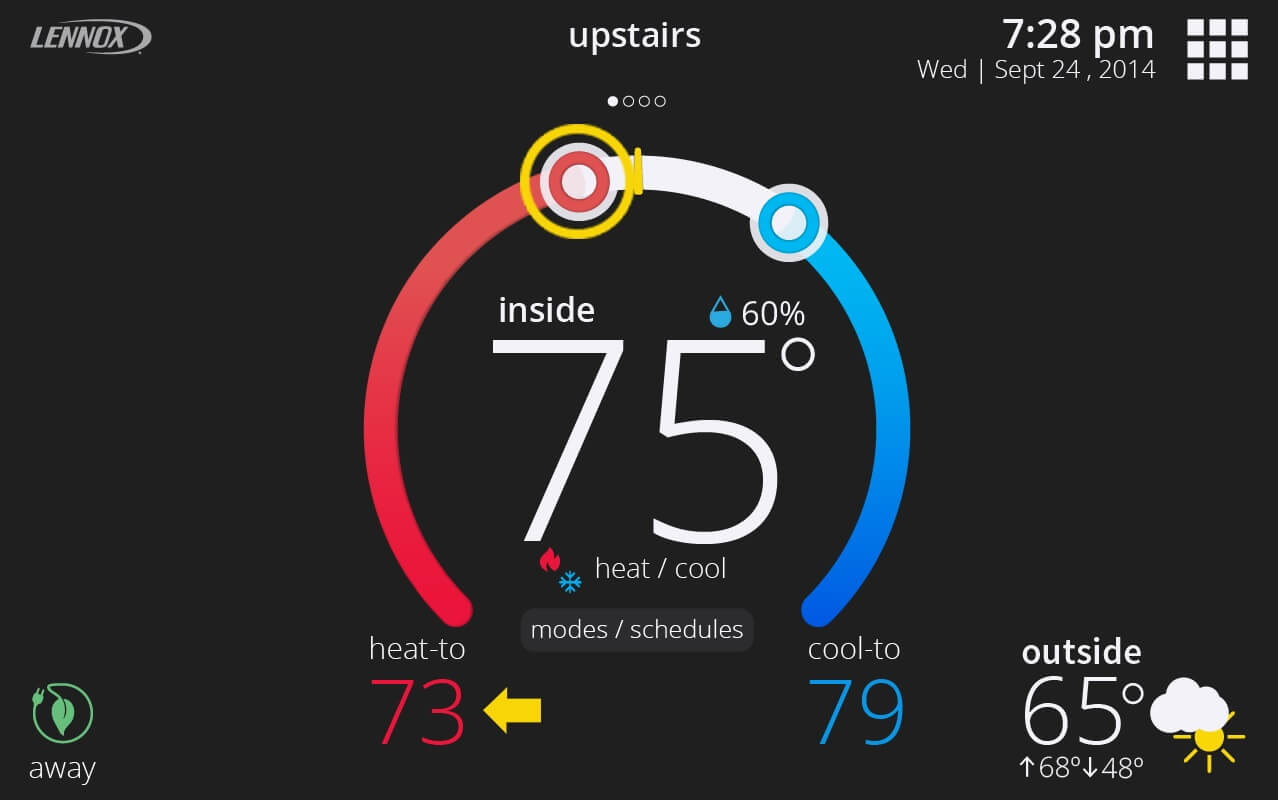
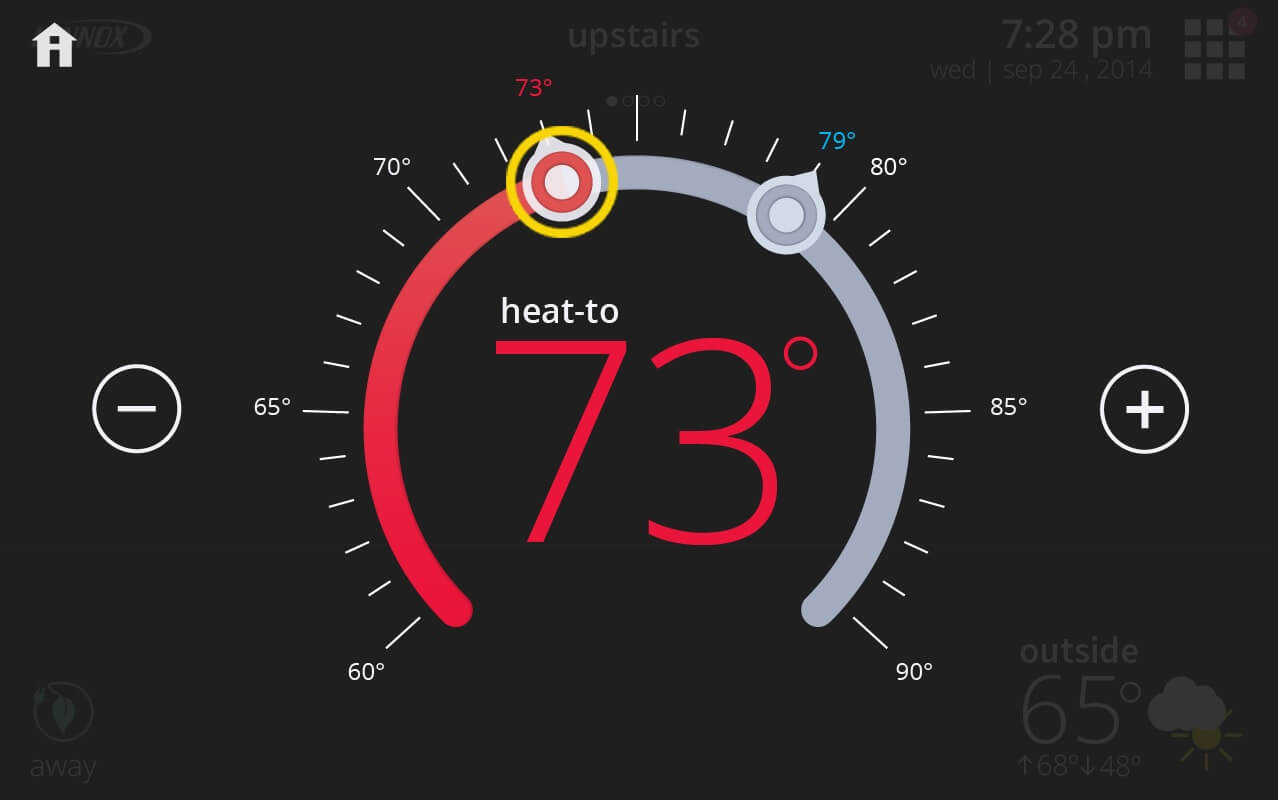
On your thermostat home screen, you’ll see a “horseshoe” shaped control. This is the temperature set-point control. Try dragging a knob up or down along the horseshoe or using the “+” and “-” buttons that appear when you start dragging the knob to adjust your set-point. If your system is in heat/cool mode, then you’ll see a red knob for controlling the heating setpoint and a blue knob for controlling the cooling set-point. If you have Perfect Temp. enabled, then you’ll see only one knob to control the single set-point for the desired temperature in your home.
-
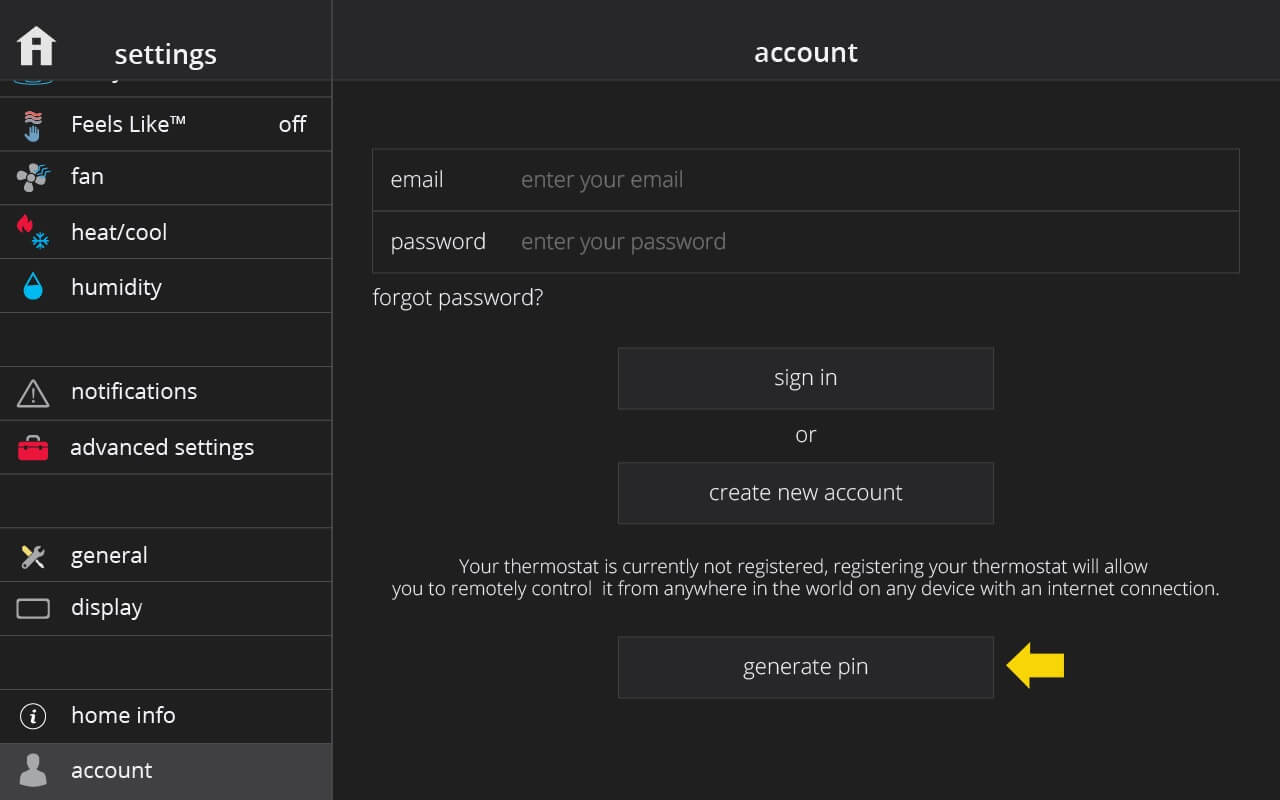
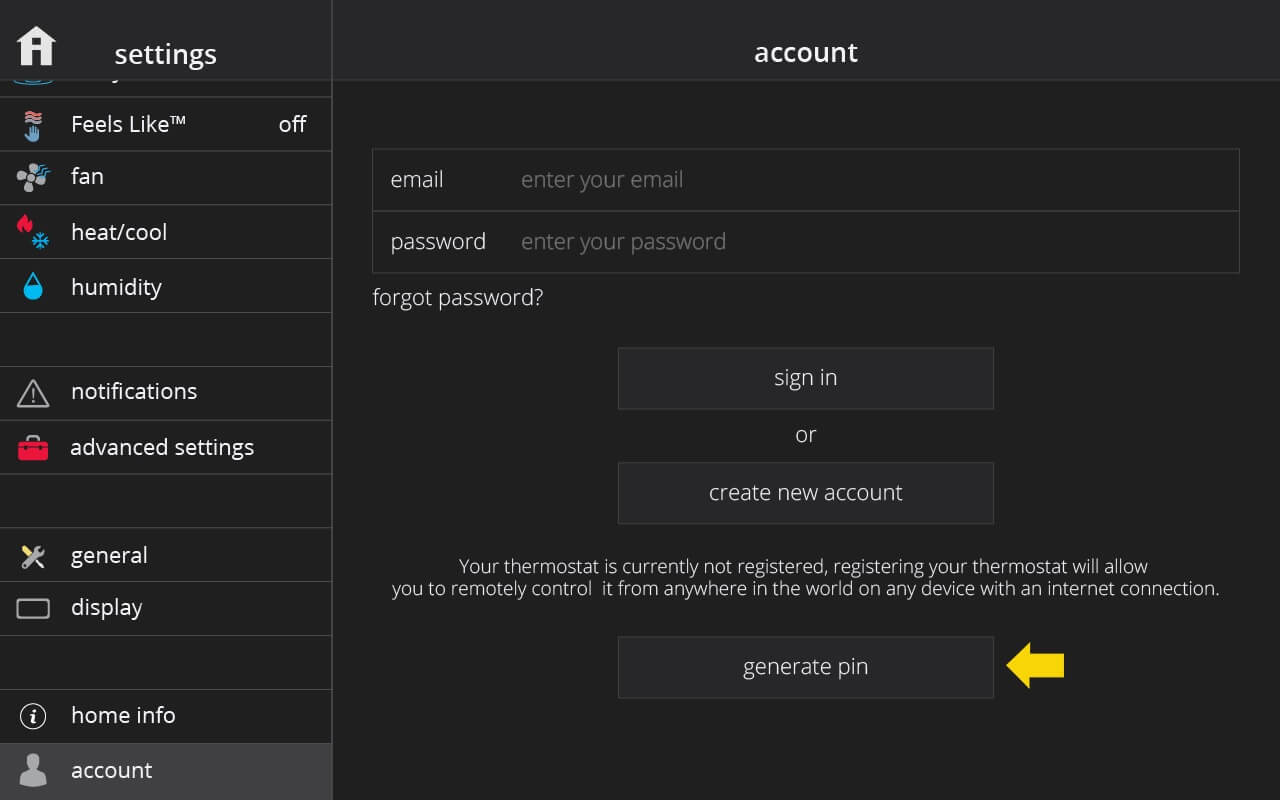
If you add an iComfort® using the Lennox Home App or via the web portal, you’ll need to generate a pin on your thermostat under menu > settings > account.
-
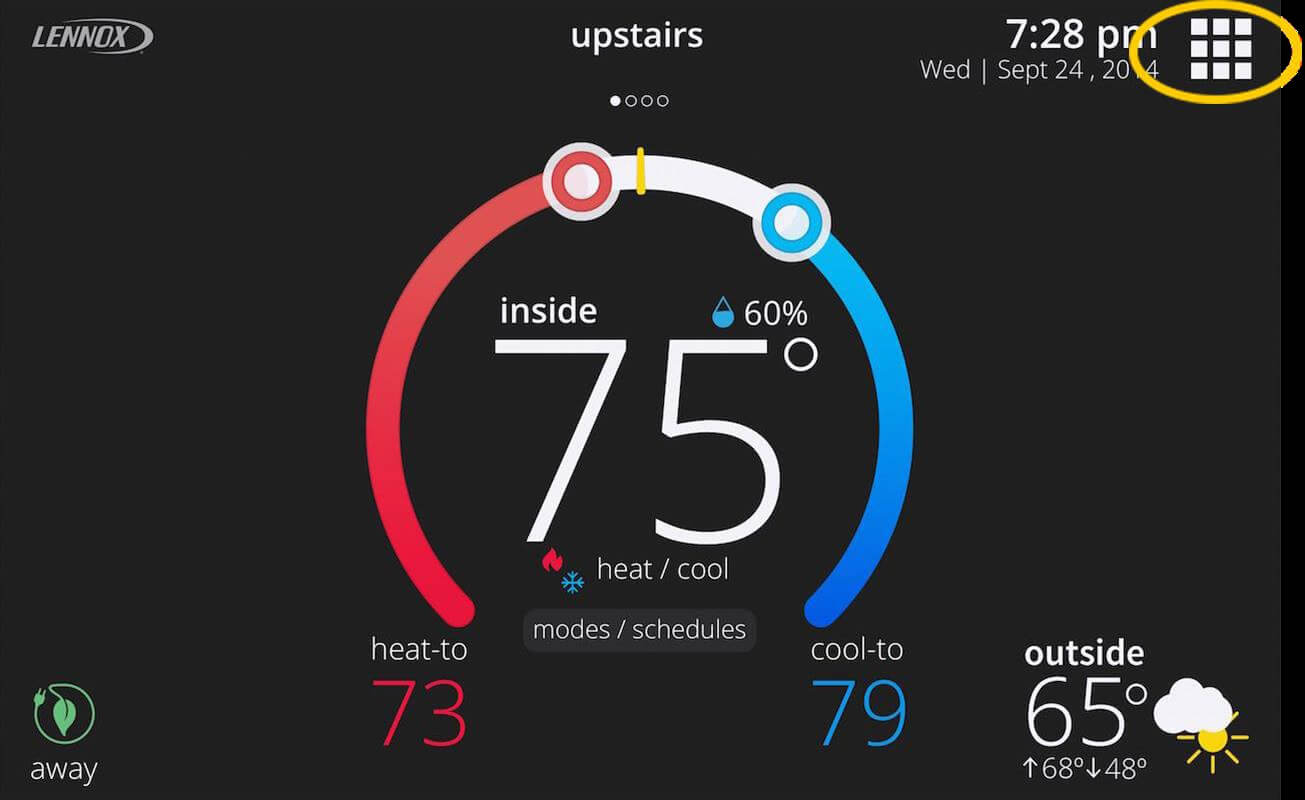
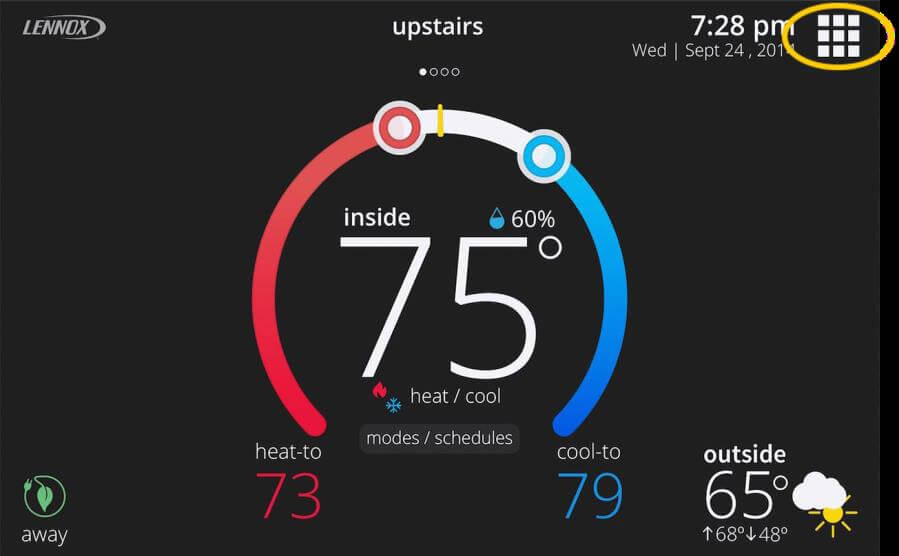
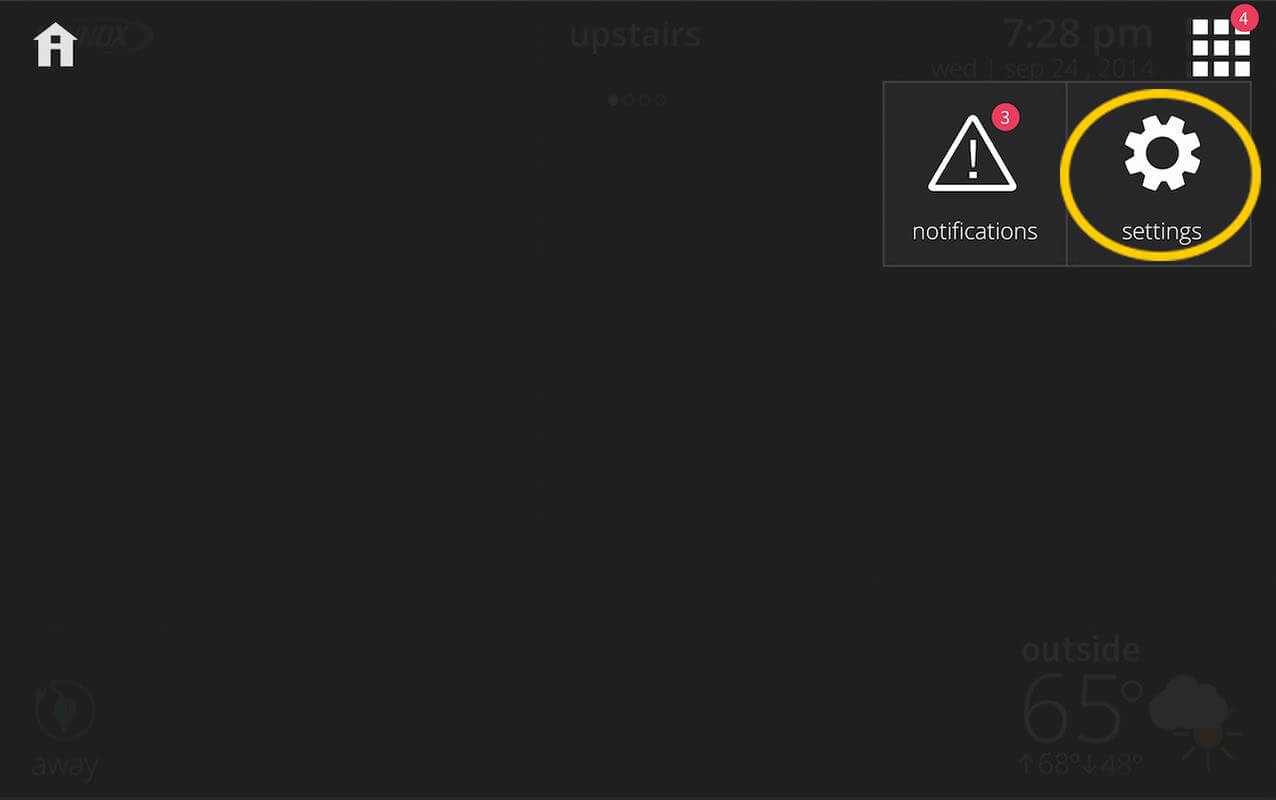
You can access the thermostat settings by tapping the menu > settings button on the home screen.
1: Tap is the menu button on the thermostat:
2: Then tap settings button on the pop-up (these are your system settings).
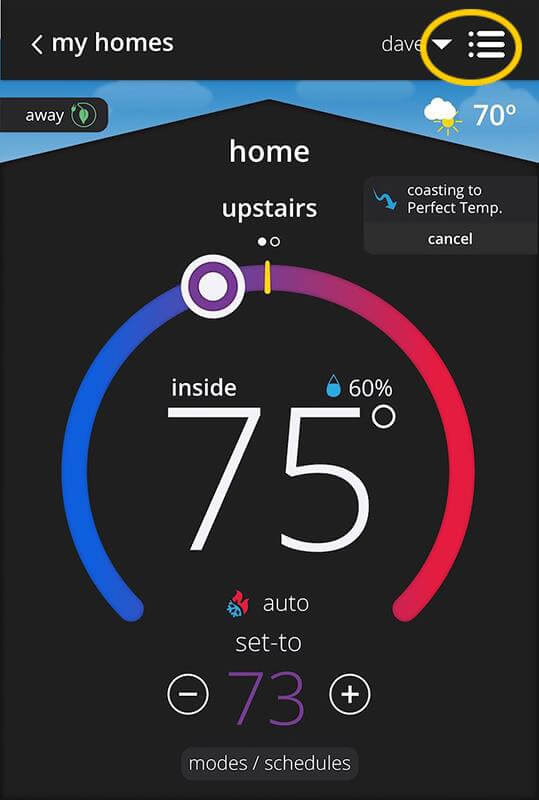
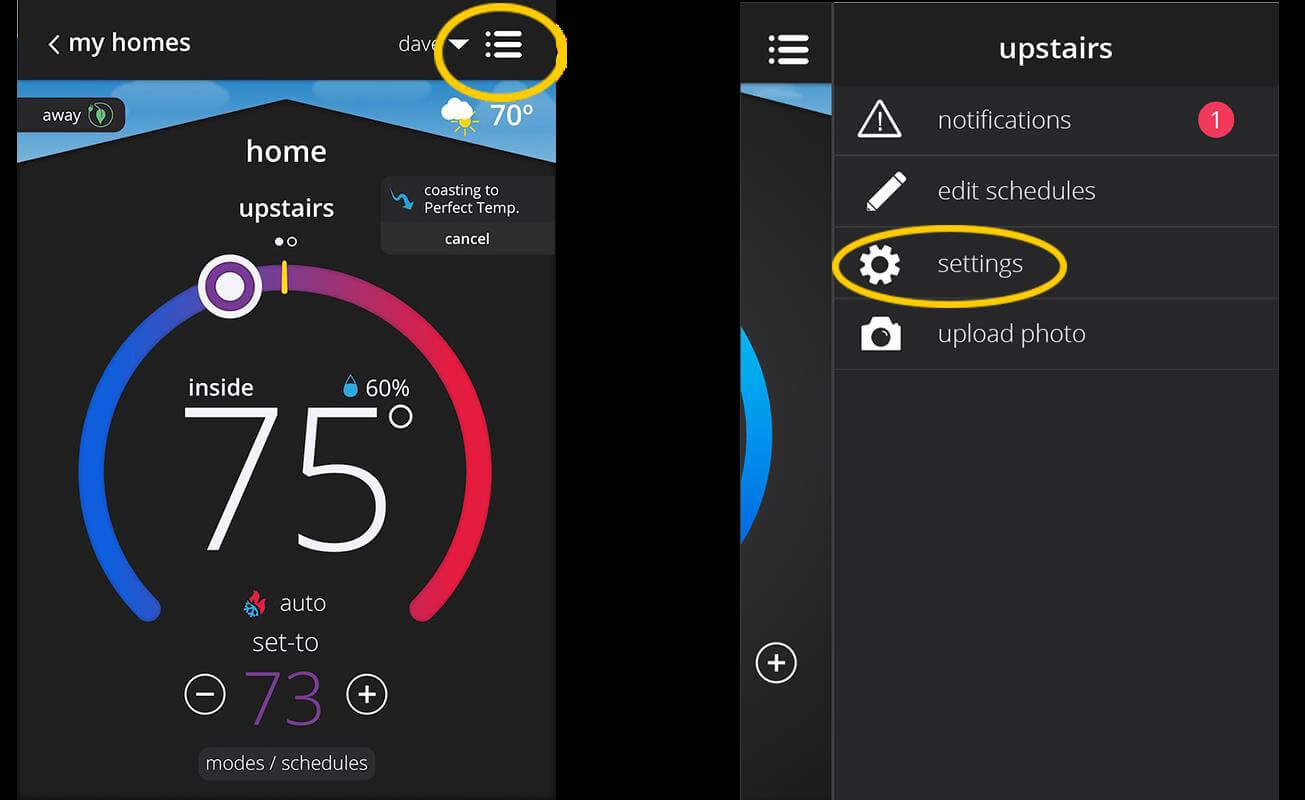
Alternatively, here is the menu button and settings option on the Lennox Home App:
-
Yes, as long as your thermostat is connected to Wi-Fi, you can manage and control your thermostat remotely via the iComfort® S30 web portal at https://www.lennoxicomfort.com/.
-
The Wi-Fi routers we recommend for use with iComfort® S30 are the following:
Linksys
Netgear
Xfinity
Apple
D-Link
2Wire
Actiontec
Cisco
Arris
Motorola
ASUS
AT&T
Belkin
Verizon -
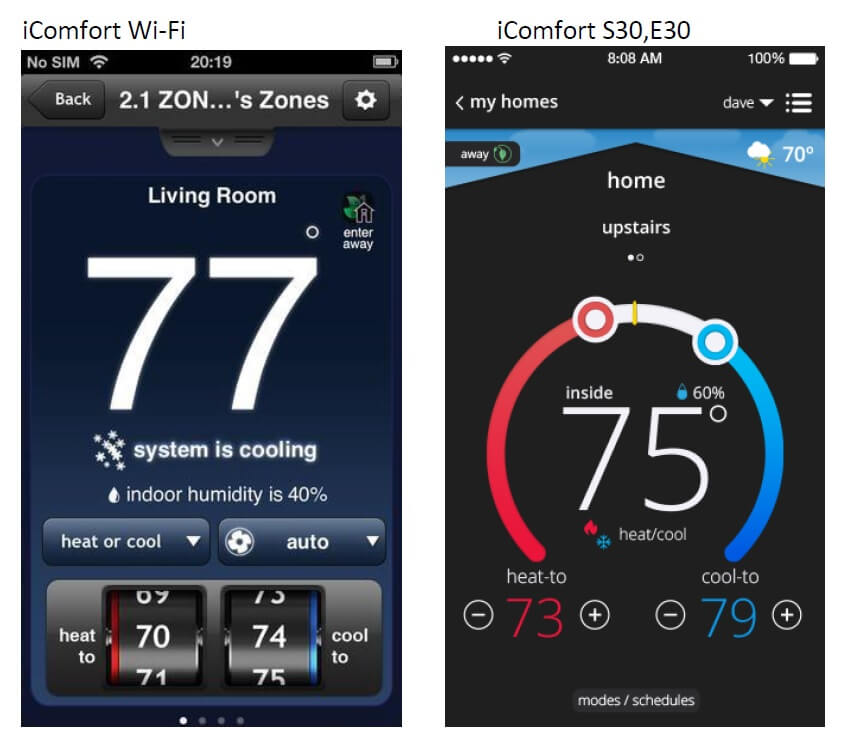
No, you cannot. The iComfort® Wi-Fi and iComfort® S30 have different mobile Apps and consumer web portals. Please go to https://www.myicomfort.com/ for iComfort® Wi-Fi, or go to www.s30.myicomfort.com for iComfort® S30.
-
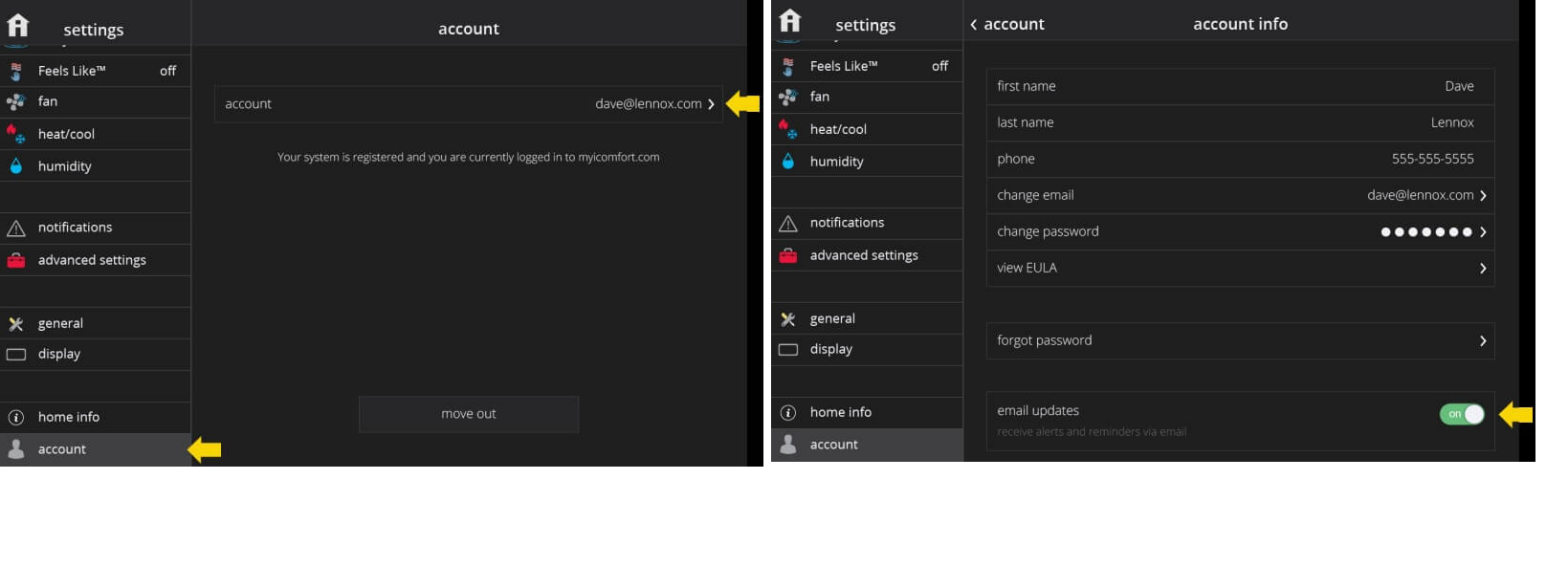
To stop receiving emails for your iComfort® S30 system, you can follow these steps:
On Thermostat
1. Go to menu > settings > account
2. Scroll down the account info and see the option “Email Updates”
3. Click to Turn off
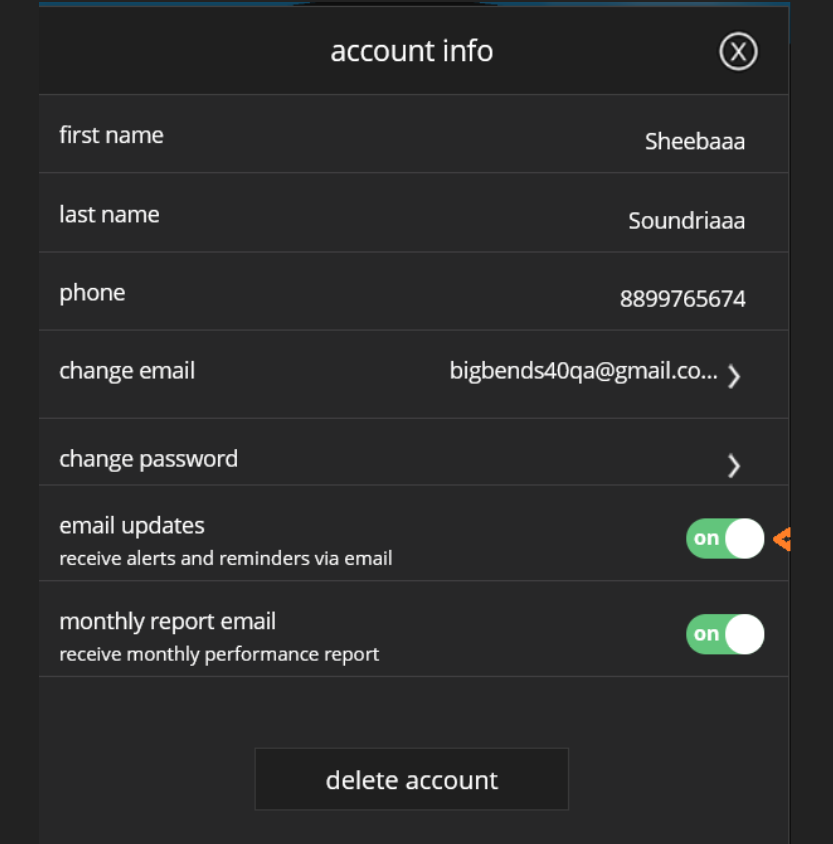
On the web portal:
1. Log in to the iComfort® S30 web portal.
2. Click on your account / email address at the top.
3. In the "account info" dialog, turn off "email updates".
-
-
-
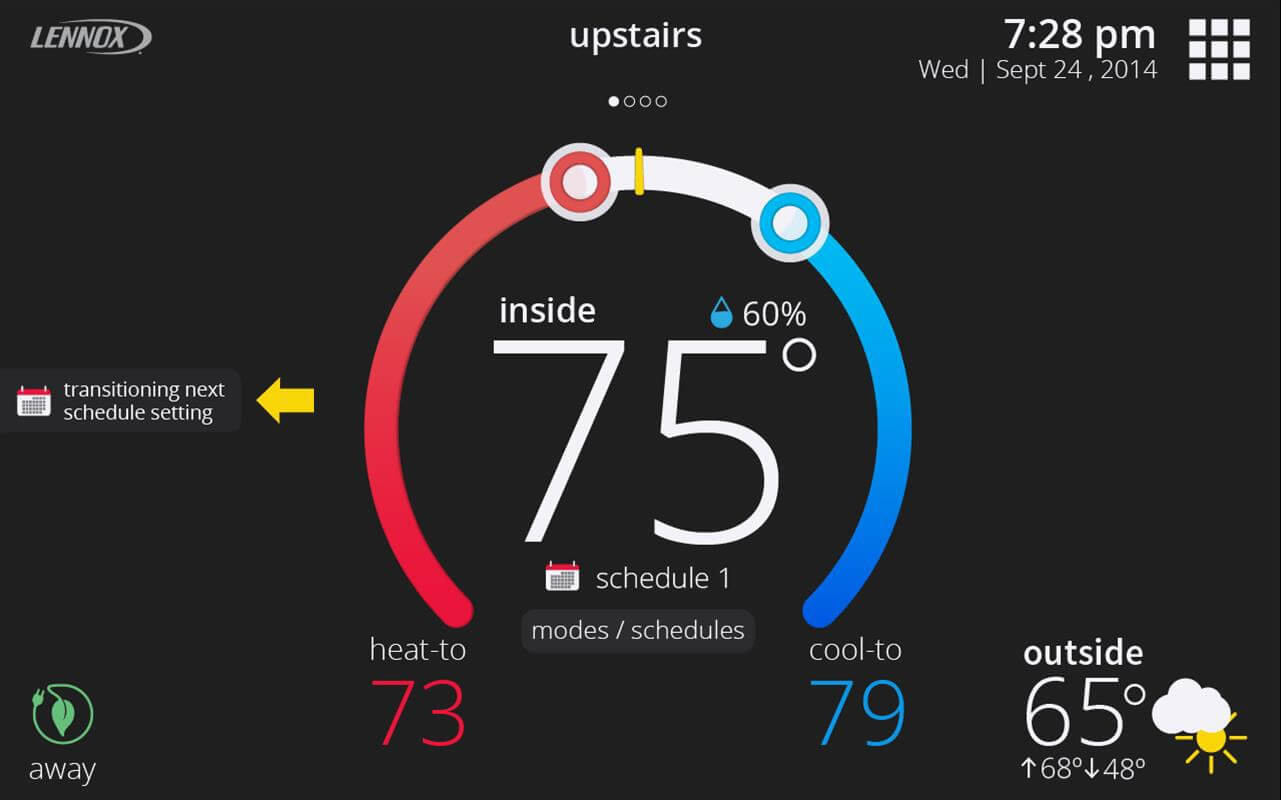
If your system is currently running a schedule, iComfort® could start working earlier than expected to achieve the desired temperature at the specified time in the schedule that is currently running. When this occurs, the "Transitioning To Next Schedule" status message appears in the left side of the home screen.
-
With Smart Away you’ll never have to remember to put your home in Away Mode when you leave your house or remember to adjust your thermostat temperature when you return home. This means you’ll always be comfortable and saving energy when you’re away.
The Smart Away feature relies on the Lennox Home App running on your mobile device (smart phone or tablet).
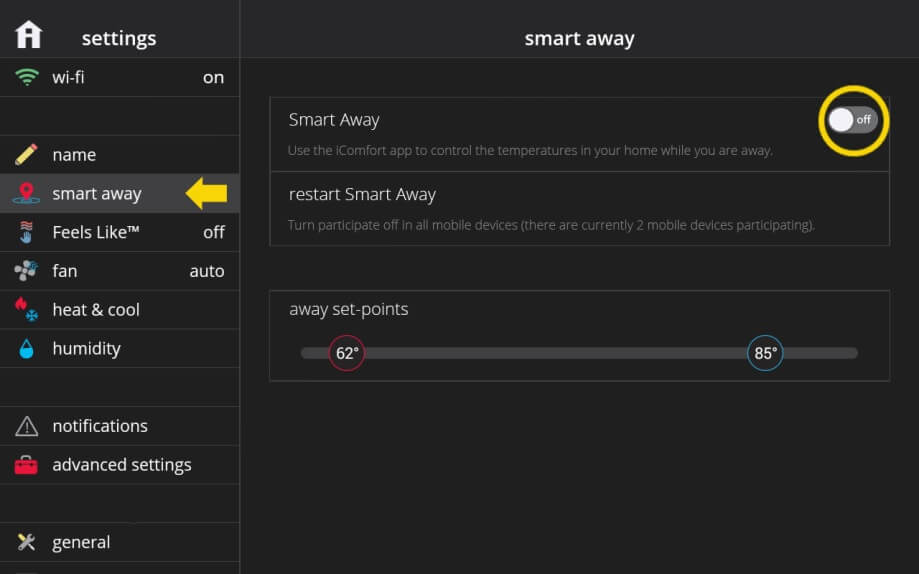
Smart Away works for any user in the home that has a mobile phone/tablet with Global Positioning System (GPS) and a data plan by setting geofences around the home. You can specify your Smart Away settings such as away fence and away set-points in the Lennox Home App under menu > settings > away.
Smart Away can only be enabled if you have an iComfort® S30 account and you’re signed-in on your thermostat. -
Smart Away works with multiple users in the same household, as long as they have a smart phone/tablet and participate is turned on.
-
A geofence is a geographical boundary around the home.
Does it work with multiple people in the house?
Yes, it can support multiple smart phone users living in the same house. The thermostat will listen to geofence changes from all the smart phones and determine the set-points for the home based on each user's approximate location (or geofence) and Smart Away settings.

-
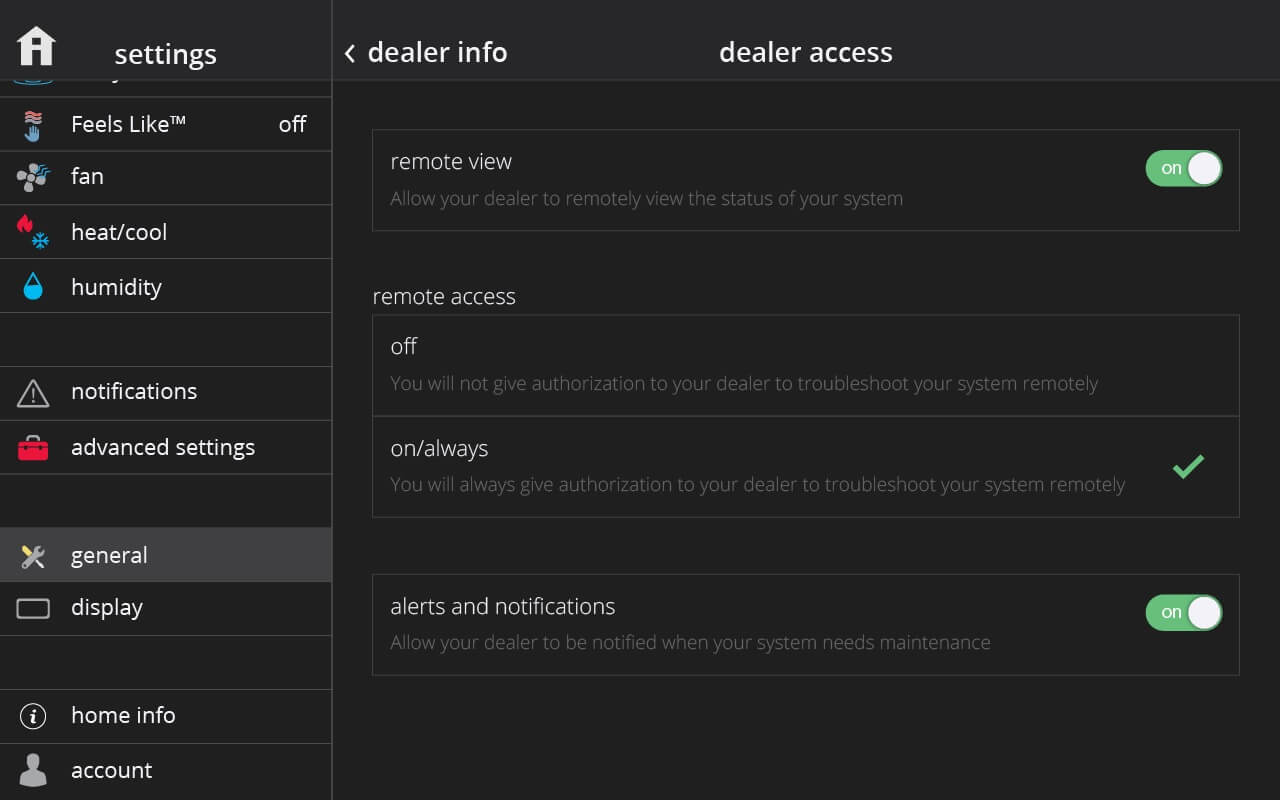
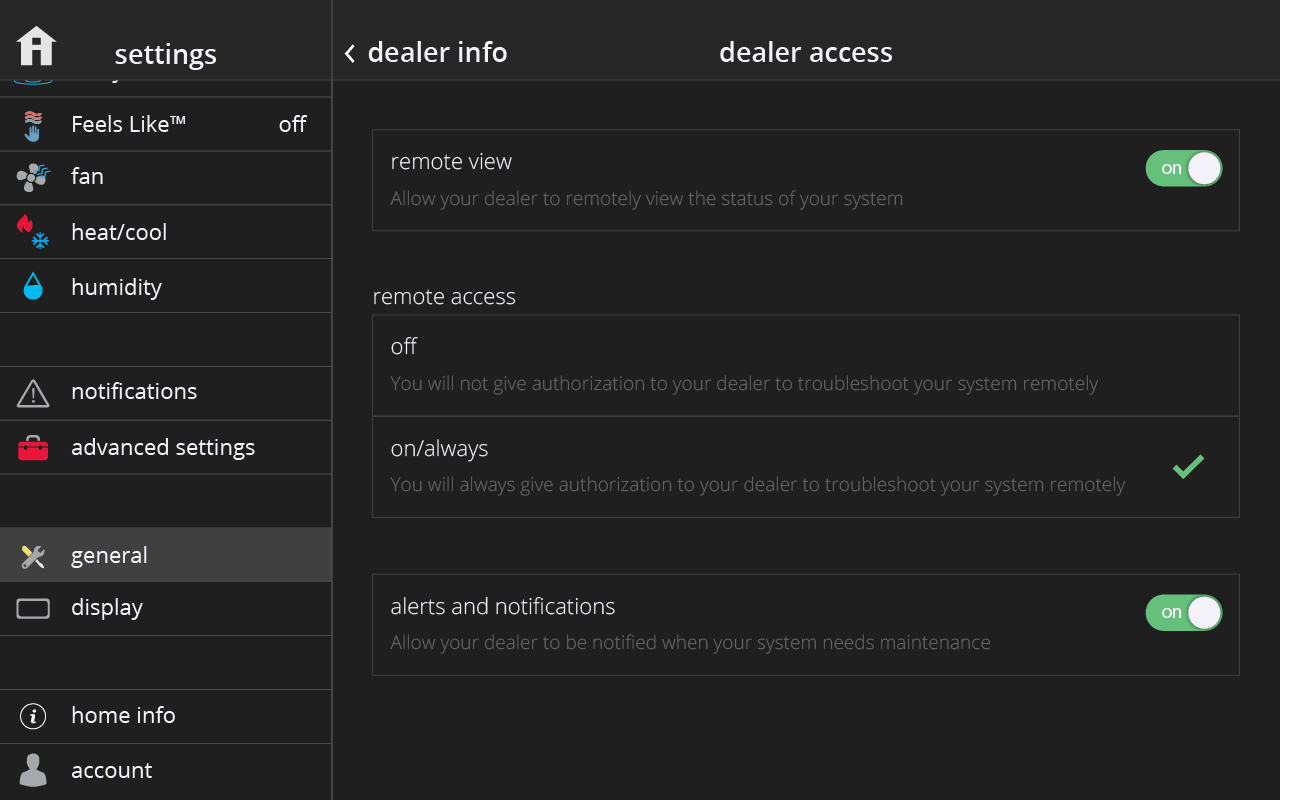
We recommend that you allow your dealer to have remote access to your system, this way your dealer is able to quickly troubleshoot any issues, alerts, or warnings that may occur remotely. However, you do have the ability to limit the level of access from full control to view-only privileges.
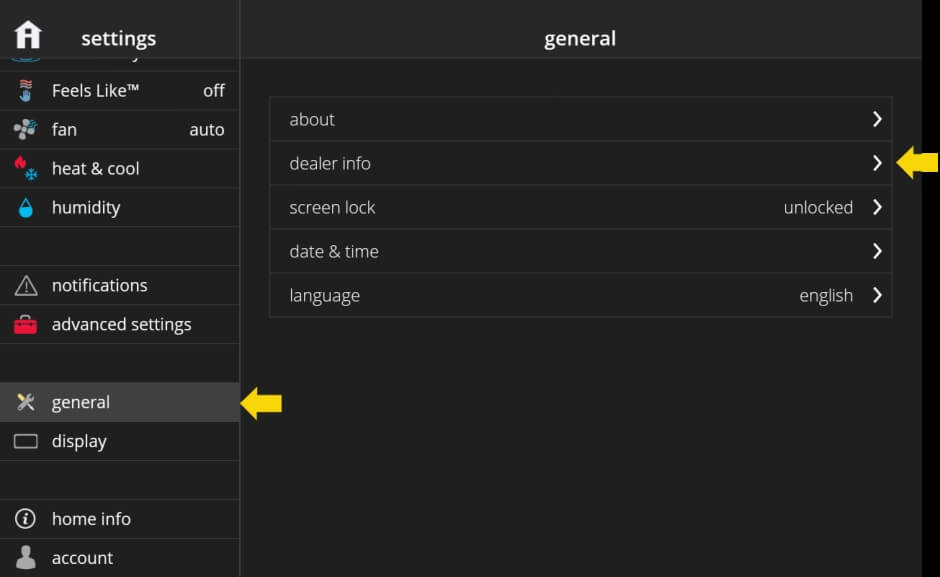
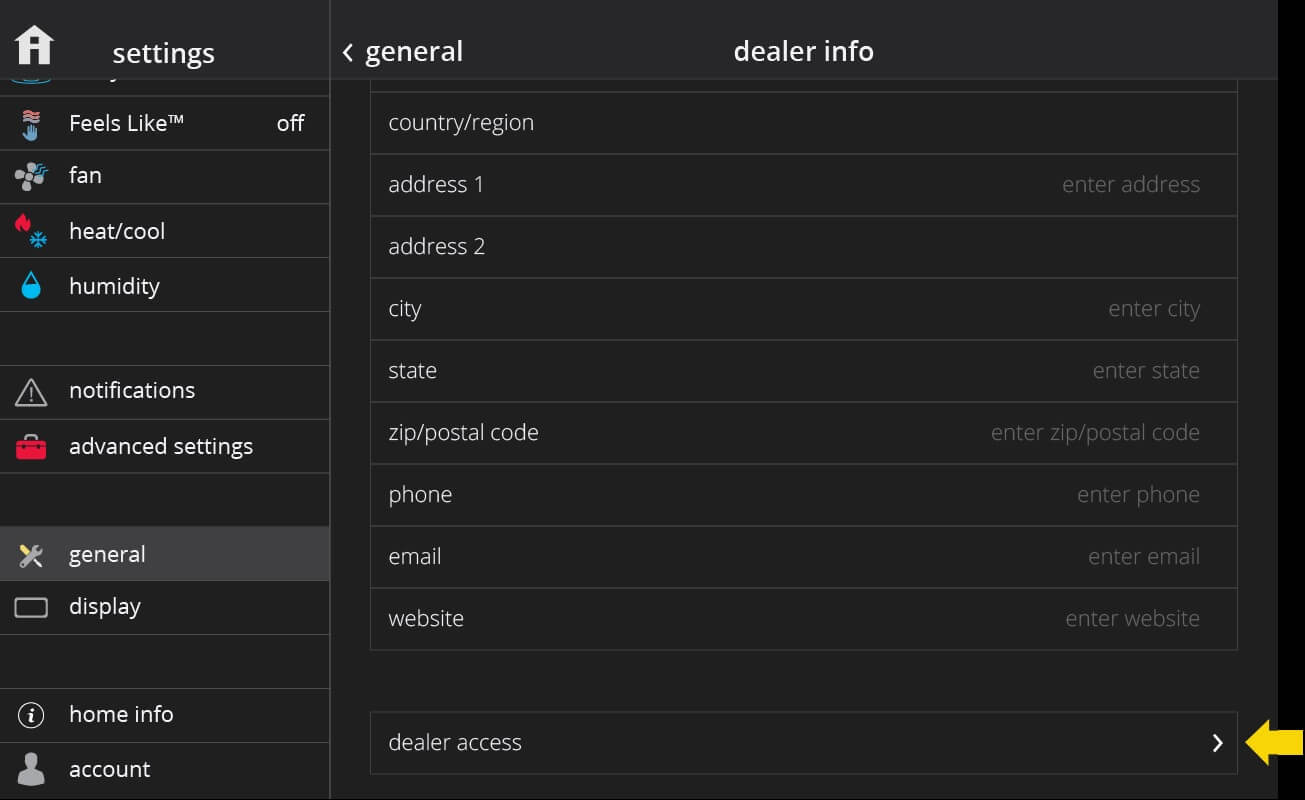
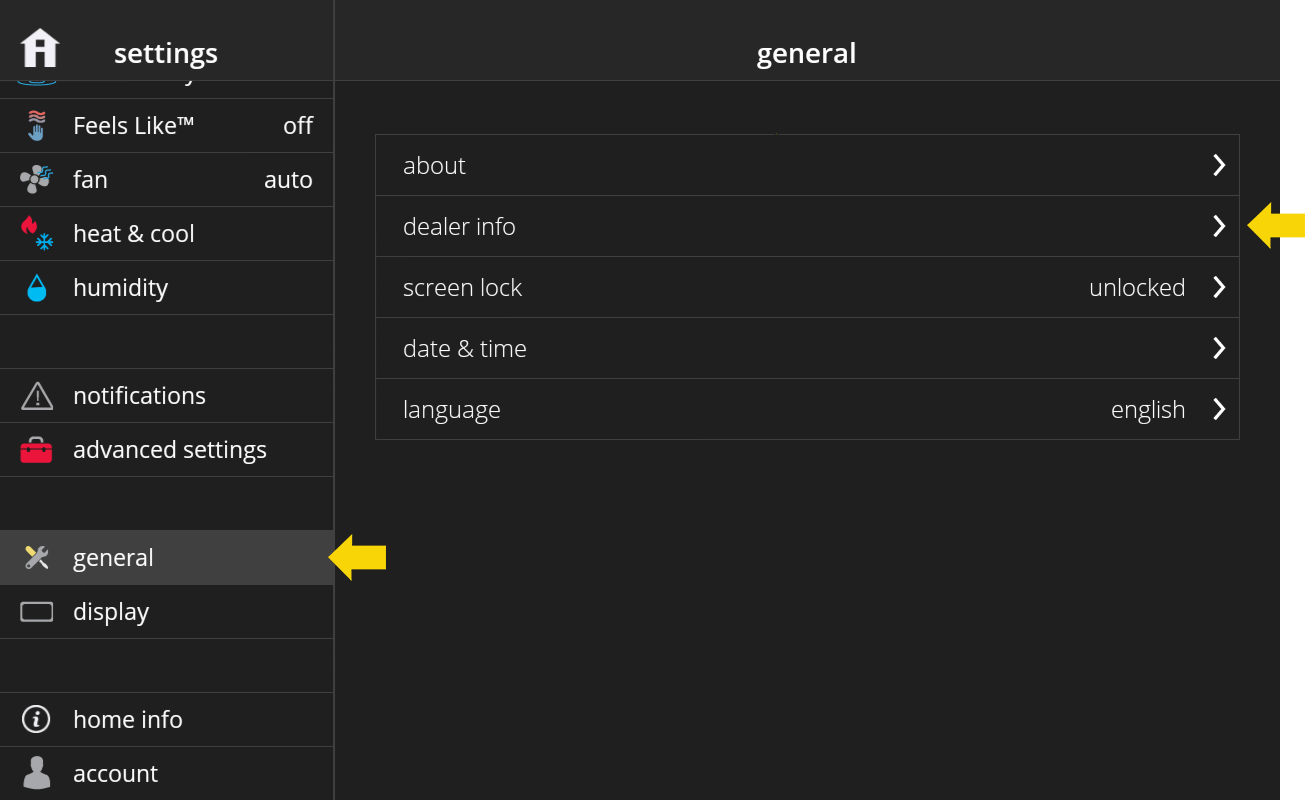
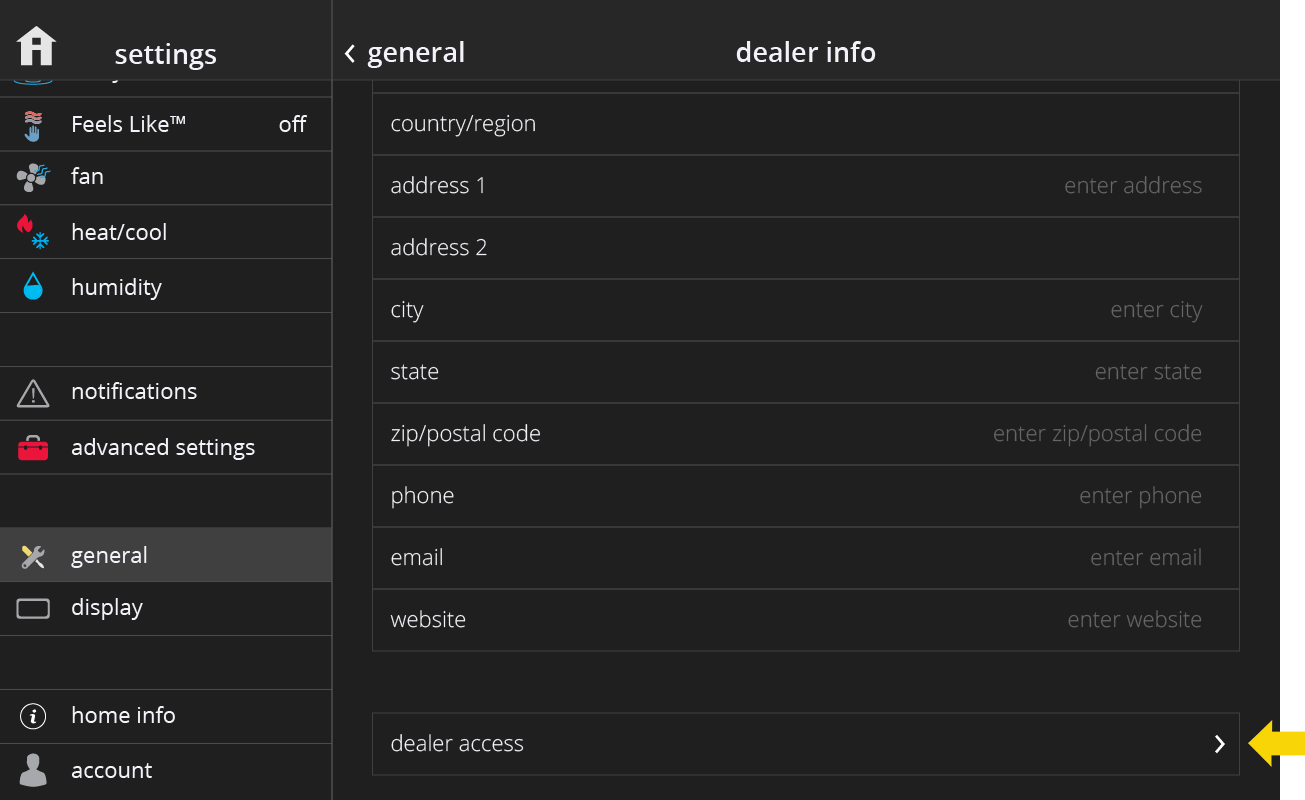
To edit your dealer access go to menu > settings > general > dealer info > dealer access.
What is the difference between Remote View, Remote Access and Alerts and Notifications?
1) Remote View: Allows your dealer to remotely view the status of your system.
2)Remote Access: When off is selected, your dealer will not have authorization to troubleshoot your system remotely. If you have "On/Always" selected, you’re giving authorization to your dealer to troubleshoot your system remotely at any time (On/Always is selected by default).
3) Alerts and Notifications: Allows your dealer to be notified when your system needs maintenance and when critical alerts and warnings occur (your dealer does not get reminders, for example for replacing the filter, or other informational messages you may receive).
-
1) From the home screen, tap the “Modes/Schedules” button.
-
1) From the home screen, tap the “Modes/Schedules” button.
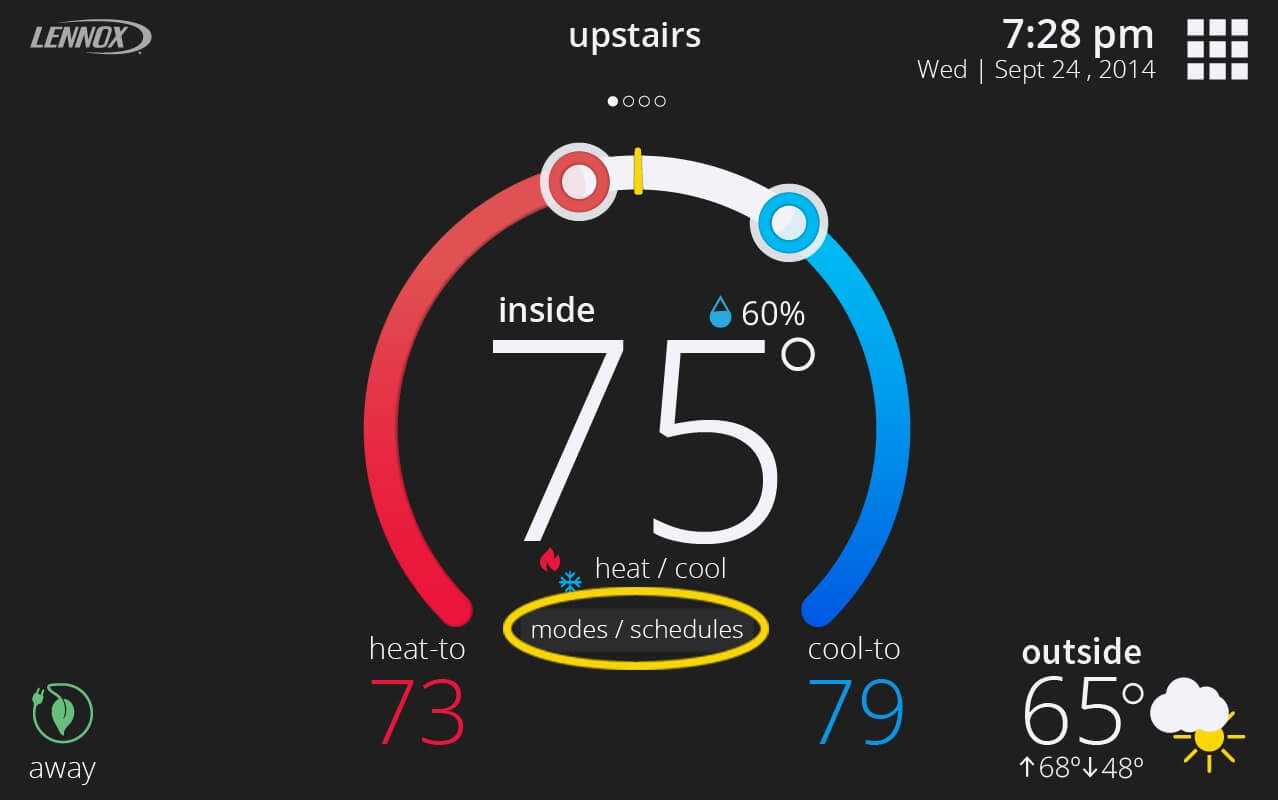
2) In the select modes screen, tap “Schedules” and then tap the "Edit Schedules" button.
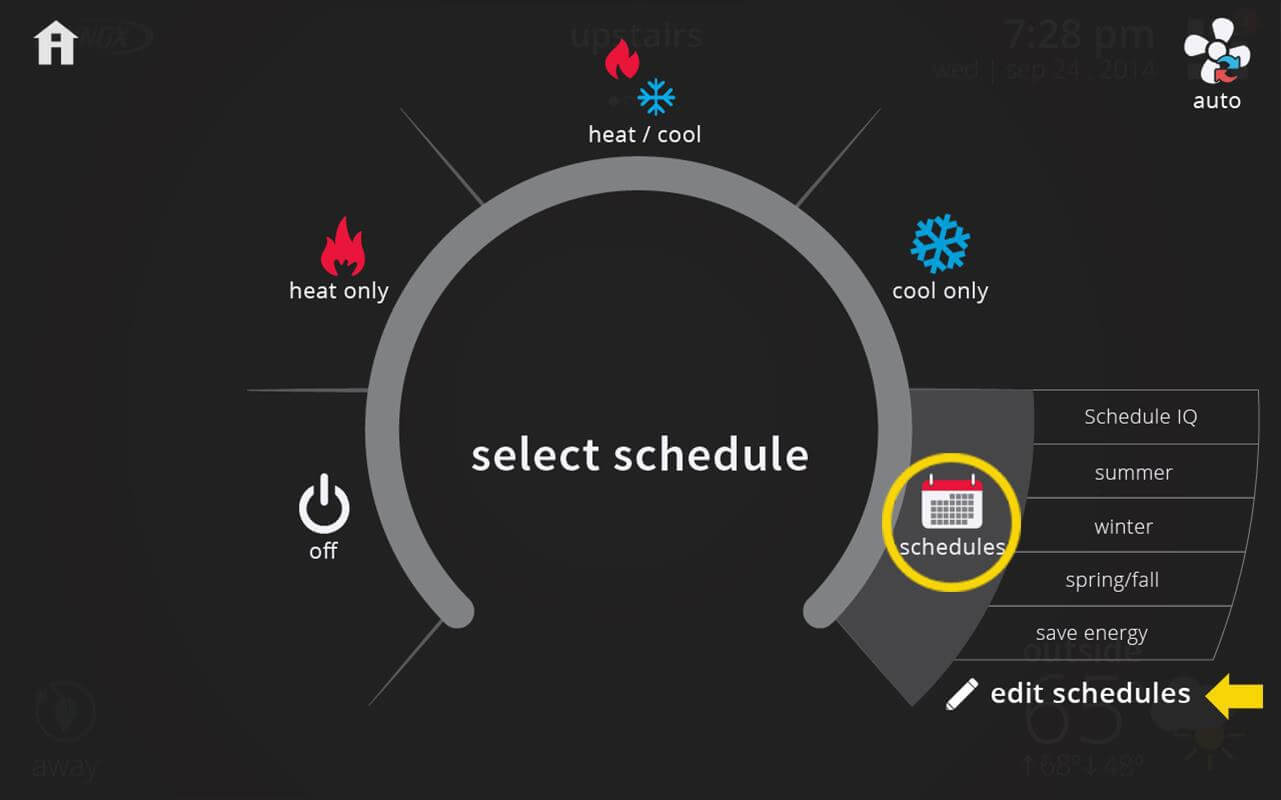
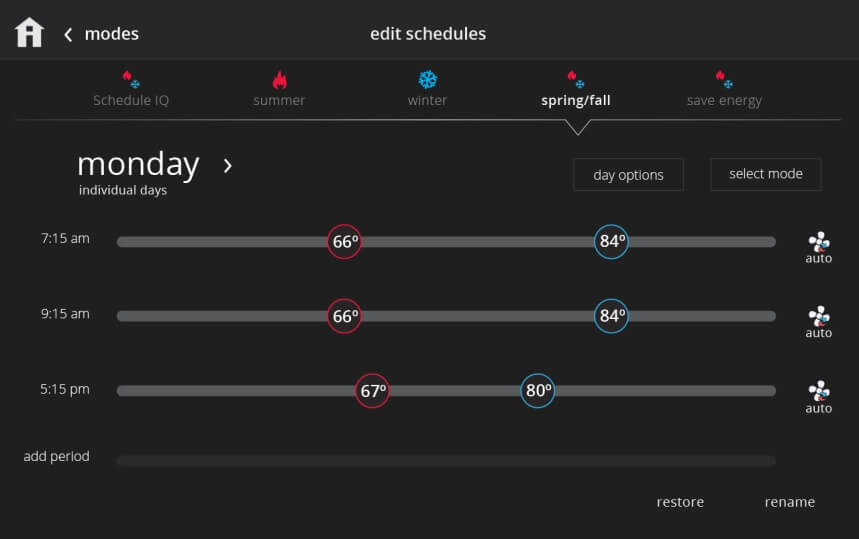
3) In the edit schedules screen, you can select which schedule you would like to edit. You can customize heat and cool set points, period times, system mode, and fan mode in traditional schedules (not Schedule IQ).
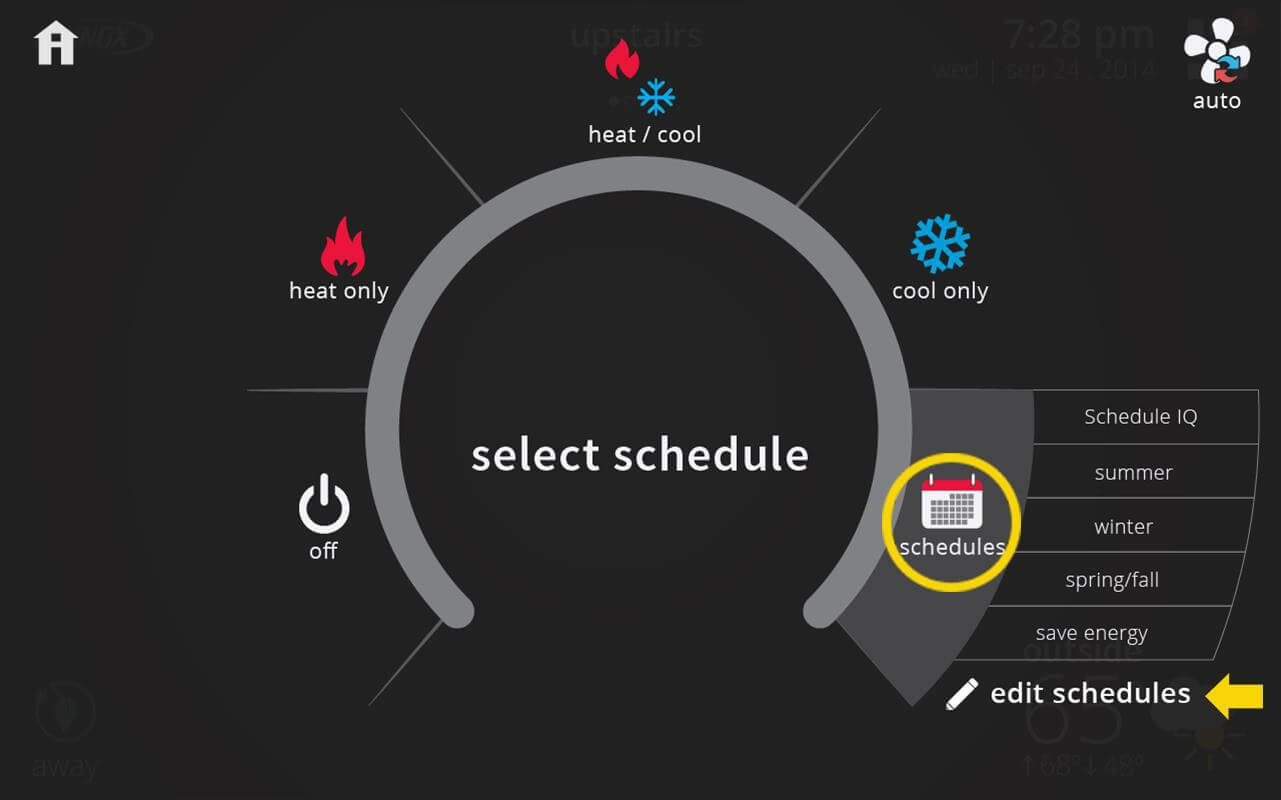
Why and how is Schedule IQ different than winter, summer, spring/fall, and save energy schedules?
Schedule IQ is a smart schedule that uses Smart Away along with traditional scheduling for when you’re at home during the day and night. The other schedules (winter, summer, etc.) are traditional schedules in which you can set up to four periods and their corresponding set-points. They come pre-loaded with recommended settings for the season (winter, summer, spring/fall) or for saving energy (save energy schedule).
Are schedule changes applied to other systems?
No, for example, you may have two systems in your home, one for upstairs and one for downstairs. If so, then each system has its own settings and its own schedules. For example, if you edit "Winter" schedule in system "Upstairs", and you would like to apply the same change for system “Downstairs”, you would need to edit “Winter” schedule for system “Downstairs” too (via modes/schedules > schedules > edit schedules). You would also need to make sure to select “Winter” schedule under modes/schedules > schedules for each of the systems. However, if you have iHarmony zoning, a change in a schedule for a system does apply to all other zones in that same system. But you also need to make sure that each zone has the mode/schedule you desire selected. -
1) From the home screen, tap the “Modes/Schedules” button.
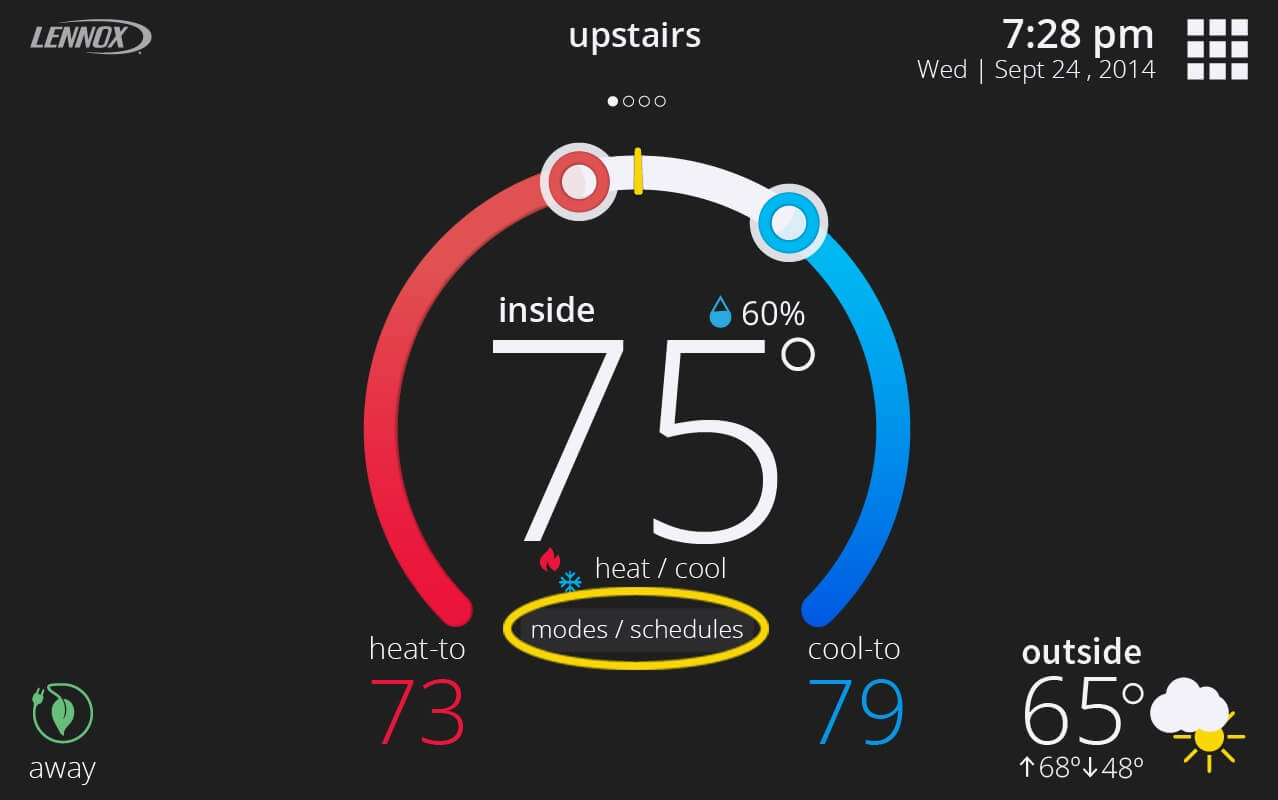
2) In the select modes screen, select “Schedules” and within the fly out popup press "Edit Schedules".
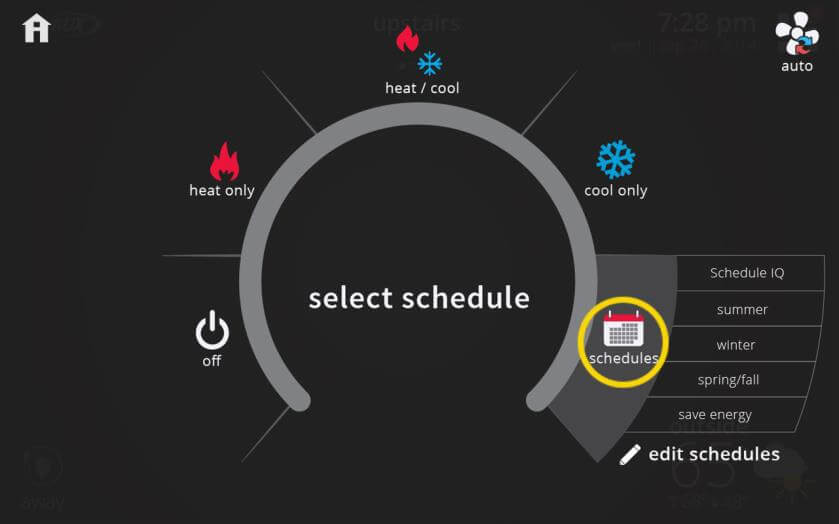
3) Once in the edit schedules screen, you’re able to select the schedule you would like to modify. For traditional schedules (summer, winter, spring/fall, and save energy), you can customize the days, time periods, set-points for each time period, and also select a system mode, and fan mode (optional). You’re allowed up to 4 periods in one day.
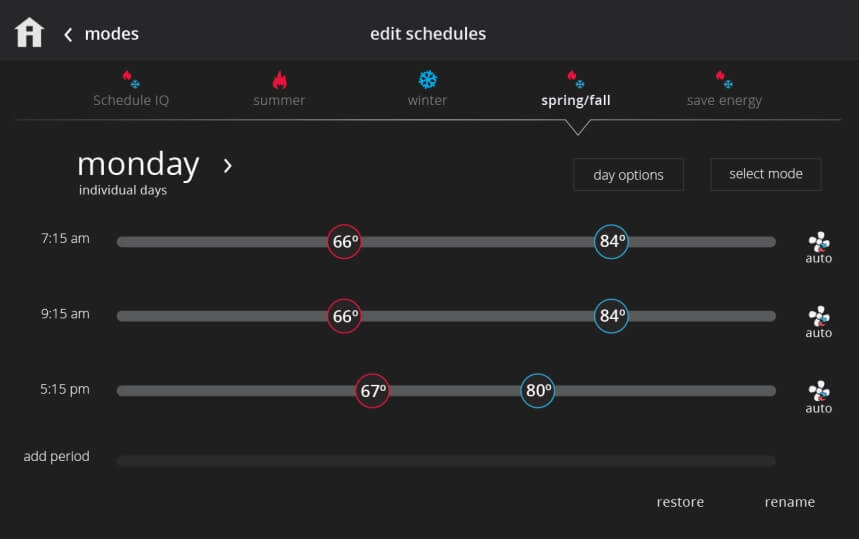
You can also rename traditional schedules and restore them to their factory default settings. For example, the save energy schedule comes preloaded with recommended set-points for saving energy, but because of differences in geographic regions, these settings may not be the most optimal for your area, and thus we allow you to modify them. If you would like to see what the default set-points were at the time of purchase, then you can tap "Restore". -
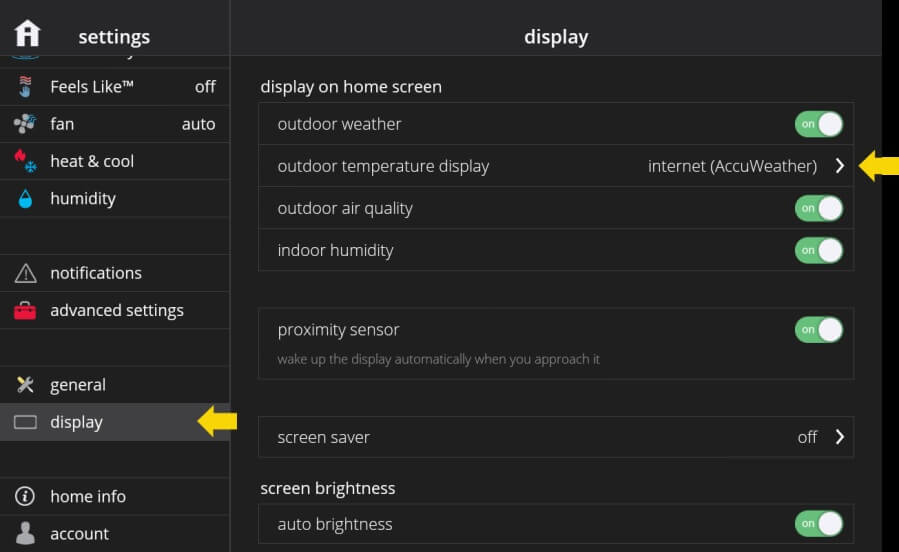
The outdoor temperature displayed in your thermostat's home screen can come either from the sensor in your outdoor unit or from https://www.accuweather.com/. You can choose between these two sources under menu > settings > display > outdoor temperature source.
When the AccuWeather option is selected, your iComfort® S30 must be connected to Wi-Fi.
-
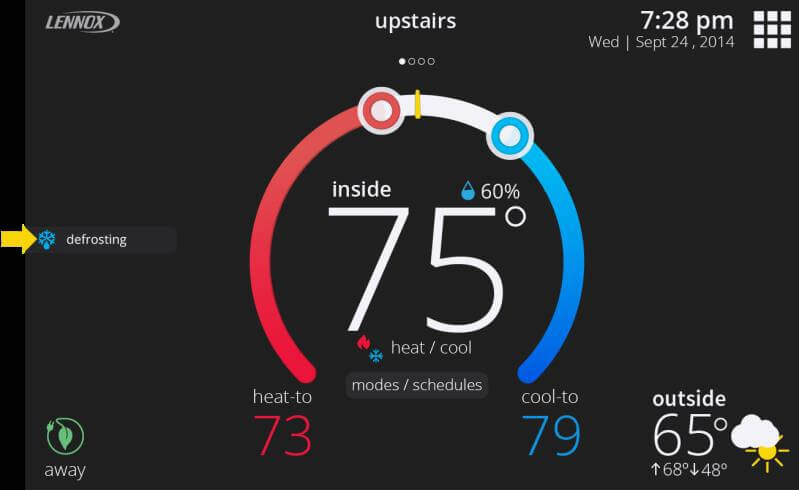
Defrosting happens when the temperature outside gets too cold, or if there is ice and the system cannot use the heat pump (if your system has a heat pump). To get rid of frost, the system will run a mode similar to AC to take the heat from inside the house across the indoor coil and transfer it outside to warm the outdoor unit. The goal is to heat the outdoor unit to evaporate the water.
-
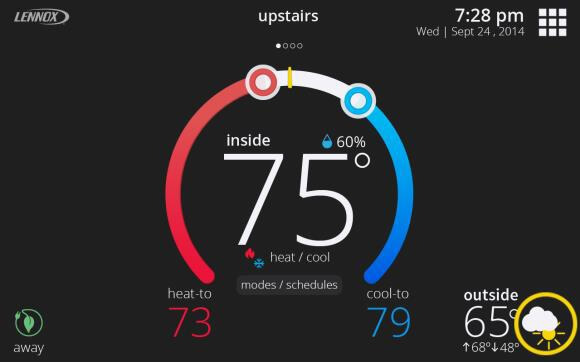
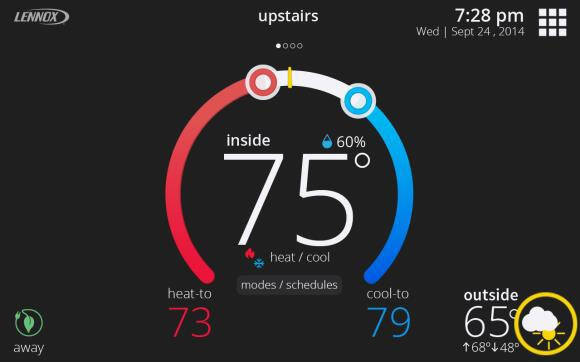
The weather forecast on the weather screen on your thermostat (and Lennox Home App and iComfort® S30 web portal) comes from https://www.accuweather.com/.
To view the weather forecast in your area and current outdoor air quality conditions, simply tap on the weather icon in the home screen.
-
Just like in a weather report, the Feels Like temperature is the temperature you feel right now, which may actually be different than the current temperature. The Feels Like feature is a combination of outdoor and indoor temperatures and indoor humidity to determine what it actually feels like in the home. When Feels Like is turned on, your iComfort® S30 will display this temperature.
Also, when Feels Like is turned on and you change the temperature set-point, you’re specifying what temperature you would like your house to feel at.

Feels Like comes enabled by default. To turn it off, go to menu > settings > Feels Like.

-
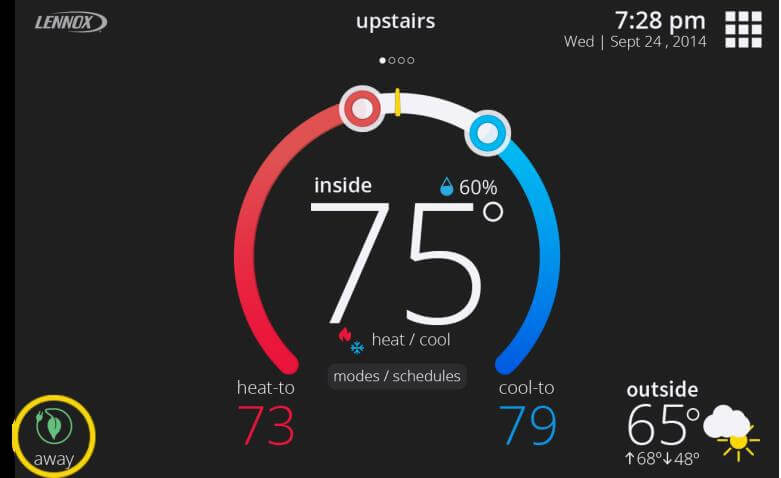
Away Mode is a special mode for when you’re away or nobody is home. When Away is active, the home screen brightness dims and it allows you to specify a heat set-point and a cool set-point that will be used when you’re not at home. You can also change the Away set-points at any time under menu > settings > away.
To use Away Mode, you manually put your system in Away Mode when you leave your house by tapping the Away button on the home screen on your thermostat (bottom left). The Away button is also available in the Lennox Home App and web portal in the “my homes” screen. When you return home, you’ll need to cancel Away Mode.
(home in away)
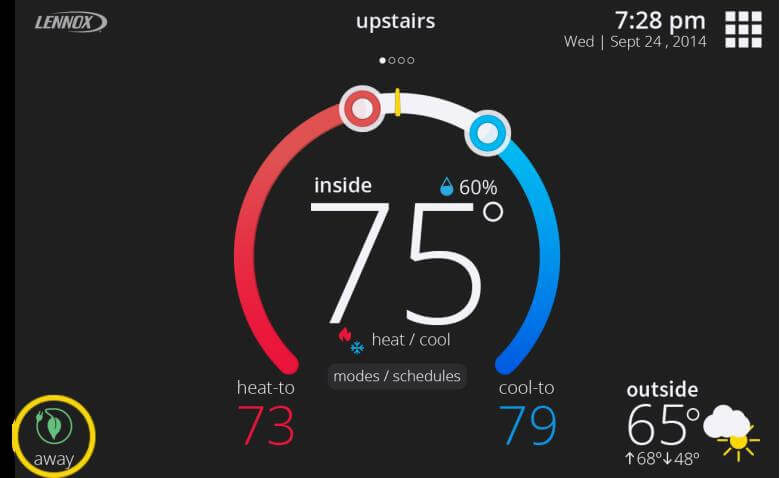
Alternatively, if you have a smart phone, you can enable Smart Away so you’ll never have to manually put your home in Away Mode when you leave your house and remember to adjust your thermostat temperature when you return home. This means you’ll always be comfortable and saving energy when you’re away. -
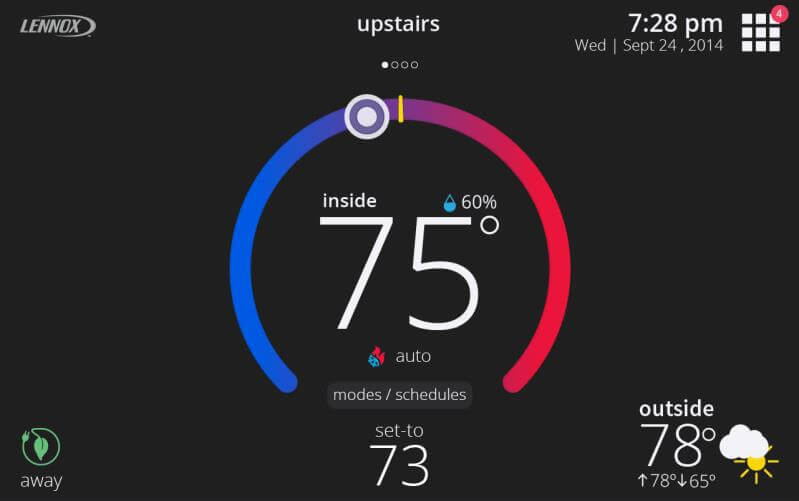
Do you like your home to always be at the same temperature no matter what? Then Perfect Temp. is for you. Perfect Temp. is a feature that uses auto mode (a special heat/cool mode) with advanced algorithms to control the humidity and fan so your home is always at the same temperature.
Also, when it is spring or fall and you don’t know whether your system should be cooling or heating, Perfect Temp. allows you to set only one set-point instead of two (for heating and cooling).
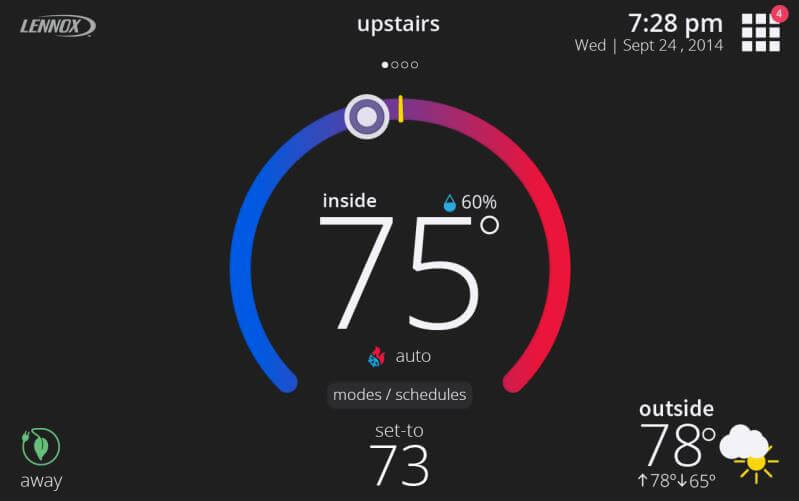
Perfect Temp. comes disabled by default. To turn it on, go to menu > settings > heat & cool. We recommend you try it!
What are the advantages of Perfect Temp.?
Perfect Temp. lets you set your home at your ideal temperature, and your system automatically adjusts heating and cooling to maintain that setting.
Perfect Temp. also works with Schedule IQ, so your home can be set at your ideal away temperature set-point when you’re away.
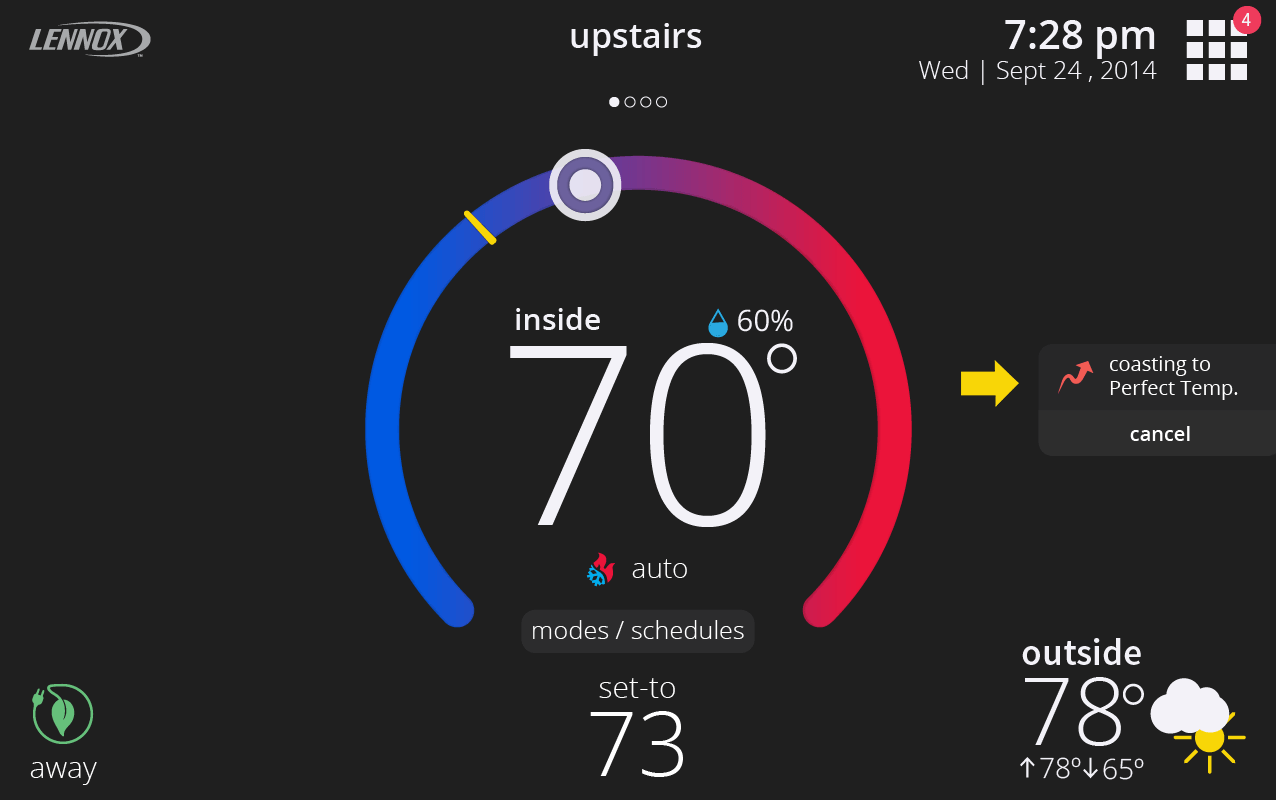
Perfect Temp. will save your home energy usage, with a feature called “coasting”, which allows the current temperature to reach the desired single set-point without the system doing any work based on monitoring current outdoor weather conditions. -
Schedule IQ is a smart schedule that works with Smart Away. With Smart Away, you’ll never have to put your home in Away Mode when you leave your house or remember to adjust your thermostat temperature when you come home. With Schedule IQ selected, it will automatically change set points according to your geofence and Away settings. Schedule IQ also allows you to combine Smart Away with the flexibility of traditional scheduling by setting “At Home Day” and “At Home Night” set-points and times.
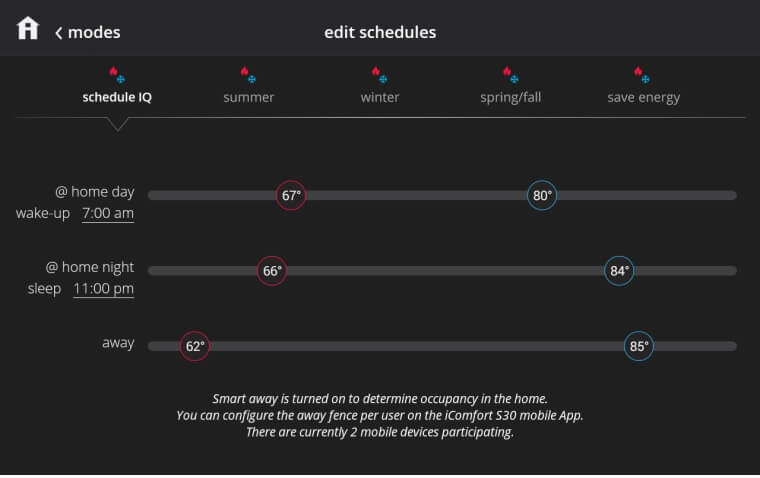
To access and edit Schedule IQ, go to modes/schedules > schedules > edit schedules > Schedule IQ.
-
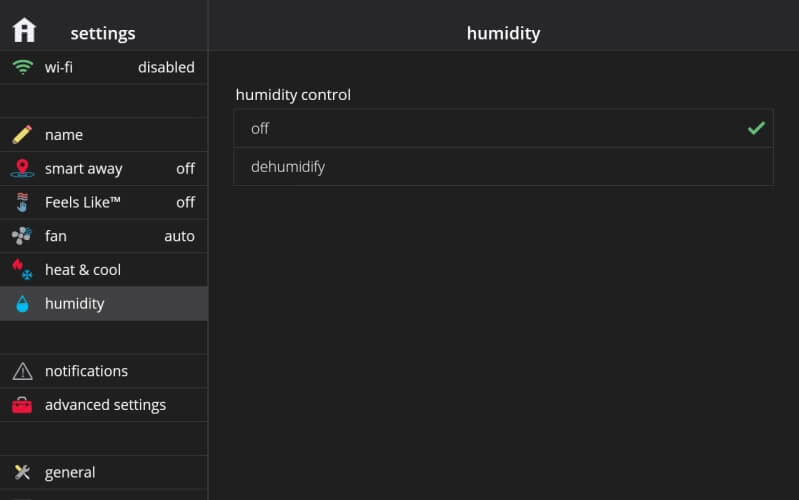
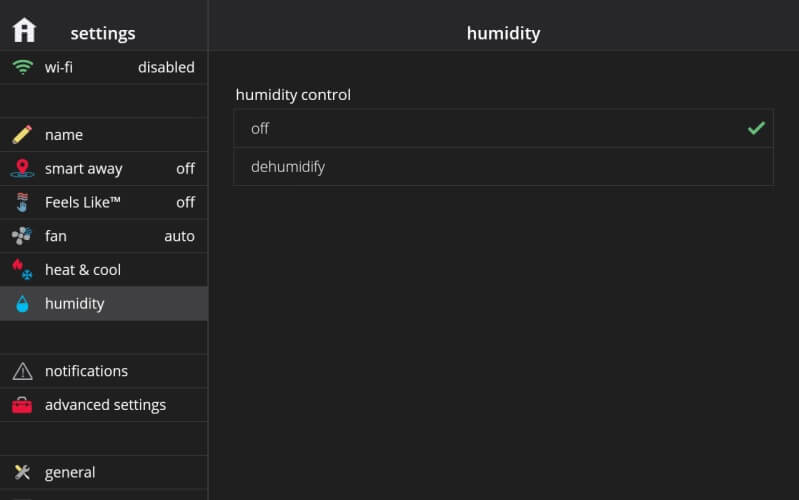
Yes, your iComfort® S30 will dehumidify, humidify or do both according to your humidity settings and equipment installed. Your iComfort® system humidity settings are located under menu > settings > humidity. Depending on your equipment, you may have different humidification and/or dehumidification options available.
-
Yes, you can control the range of temperatures you set your home to by going to menu > settings > heat & cool and turning on “wider set-point range”.
-
It depends on your equipment configuration, if you have iHarmony zoning, and how many zones/sensors you have purchased.You can learn more and purchase iHarmony zoning here: http://www.lennox.com/products/comfort-controls/iharmony/
-
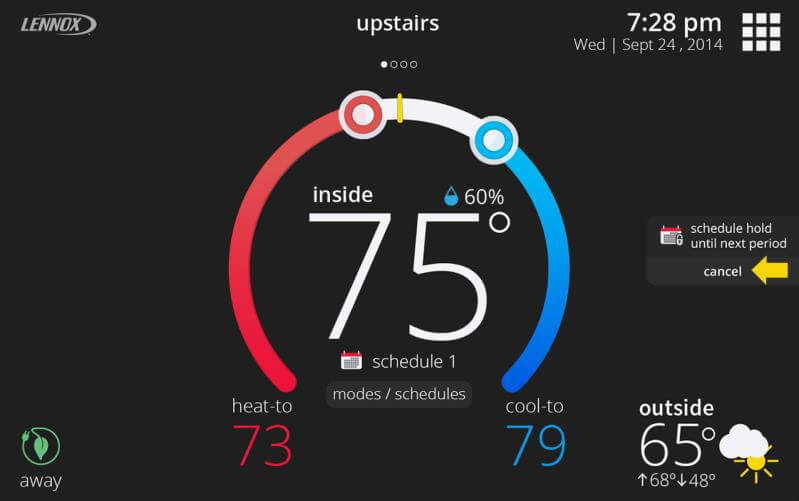
When you have a schedule selected, if you make manual changes to the temperature set-points, you’ll see a message about the schedule being in “Hold” since you have manually overwritten the schedule set-point(s). You can customize the duration of the “Hold”, but by default the schedule is on hold until the next period. After a “Hold” is set, you can choose to “Cancel” the schedule hold, which will resume the schedule to normal operation.
-
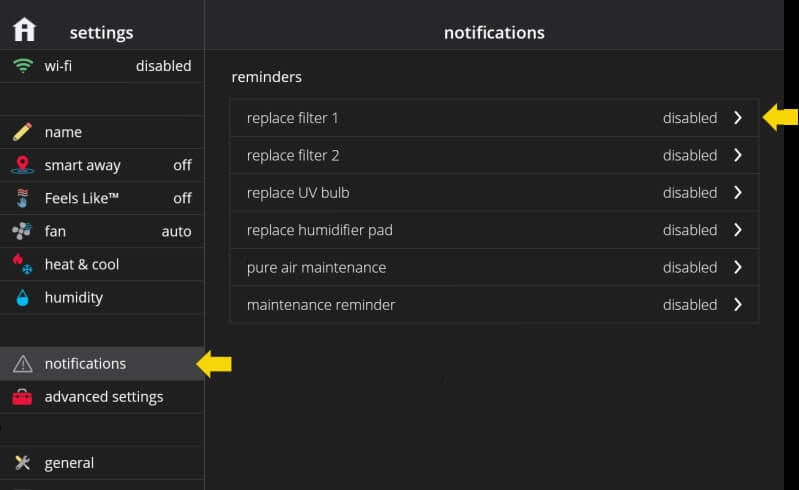
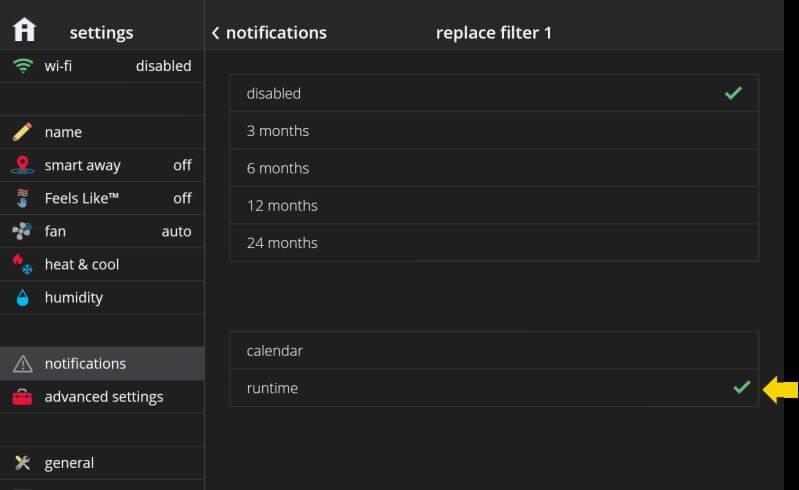
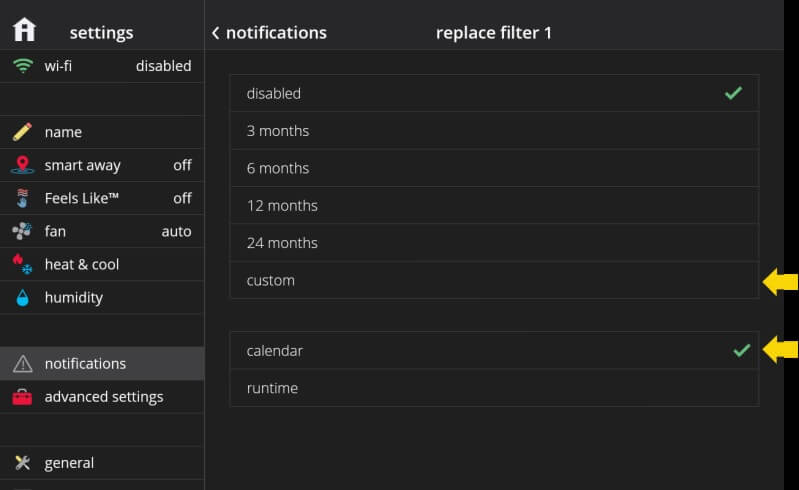
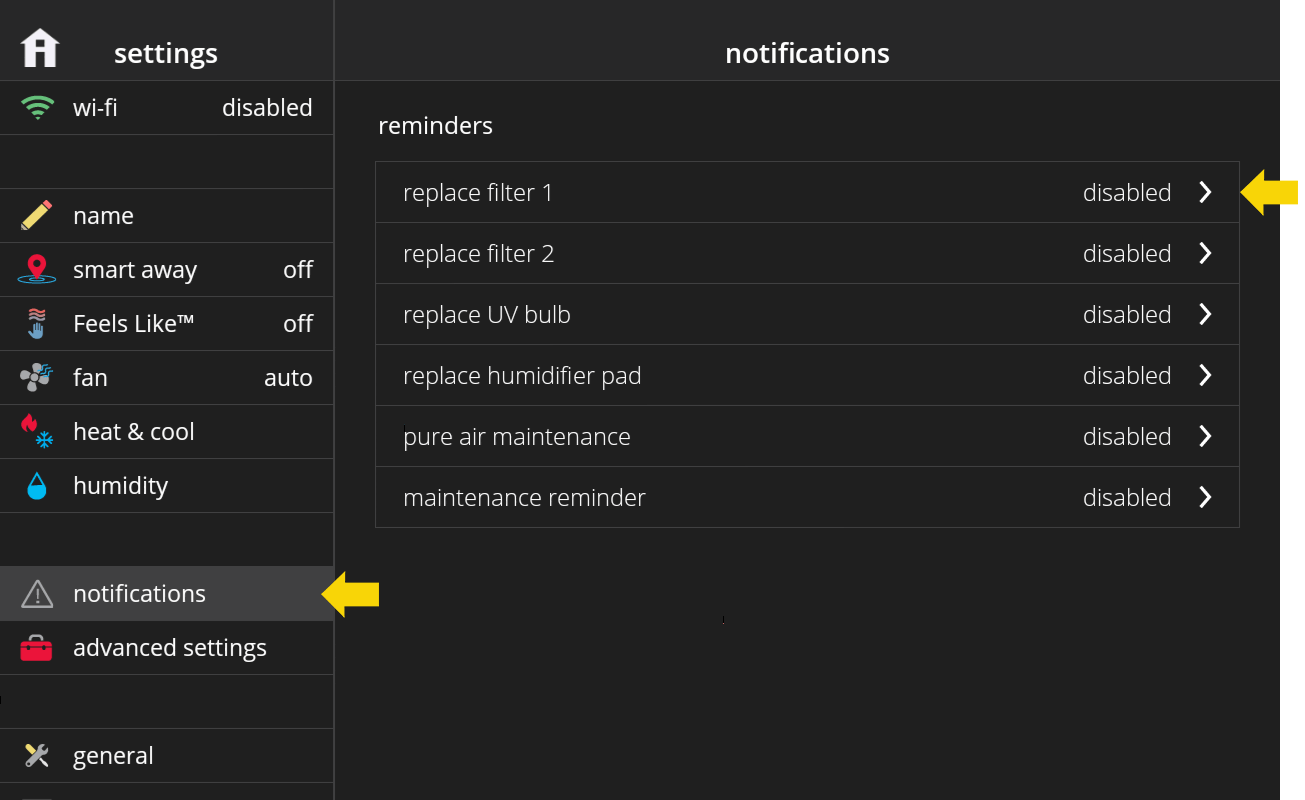
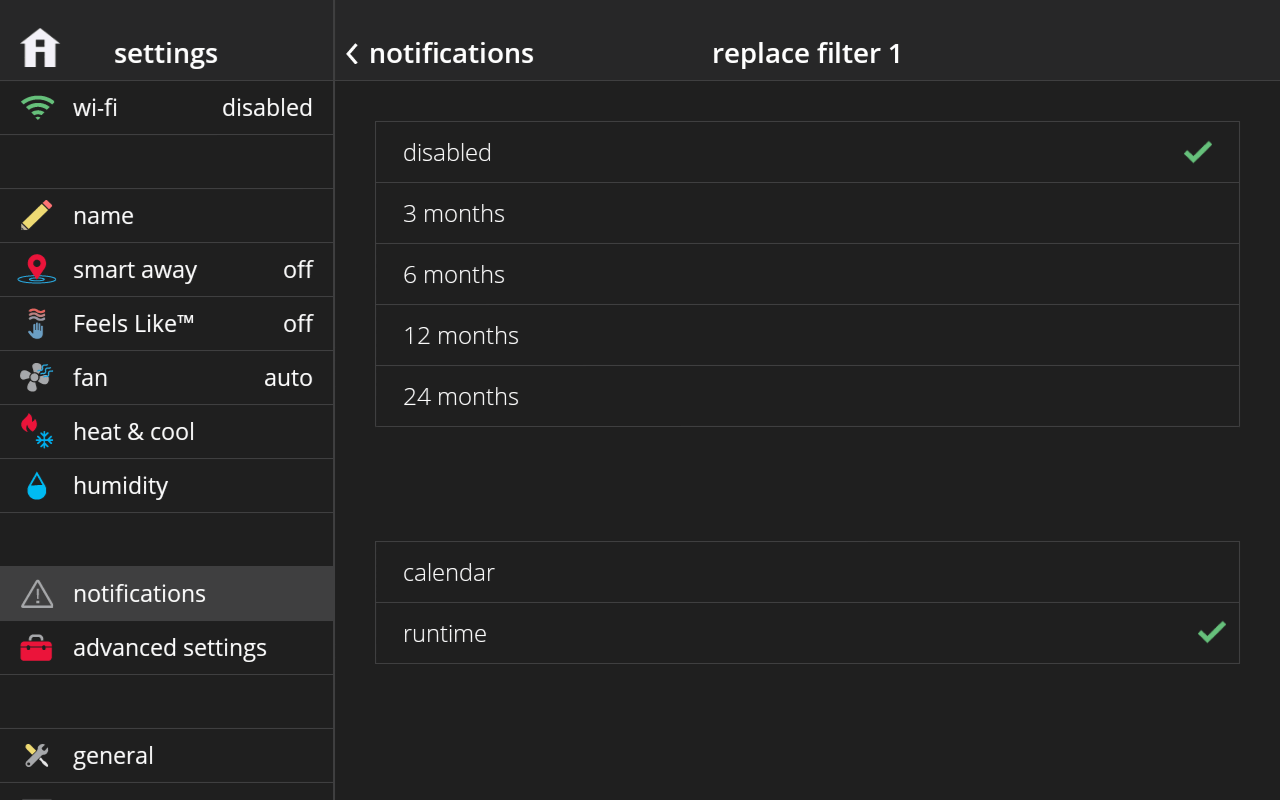
In menu > settings > notifications > reminders, you're given two options: "Calendar" and "Run-Time". Let’s say you have “Filter 1 Reminder” set to 3 months. With “Calendar Time”, it will take 3 months regardless whether the system is running or not for the reminder to show. With “Run-Time”, it will take 3 months of the system running (which may be longer than 3 calendar months) for the reminder to show.
-
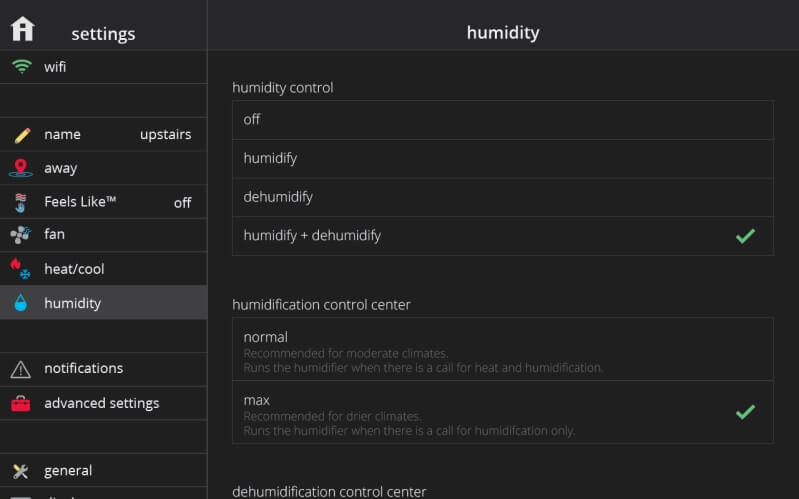
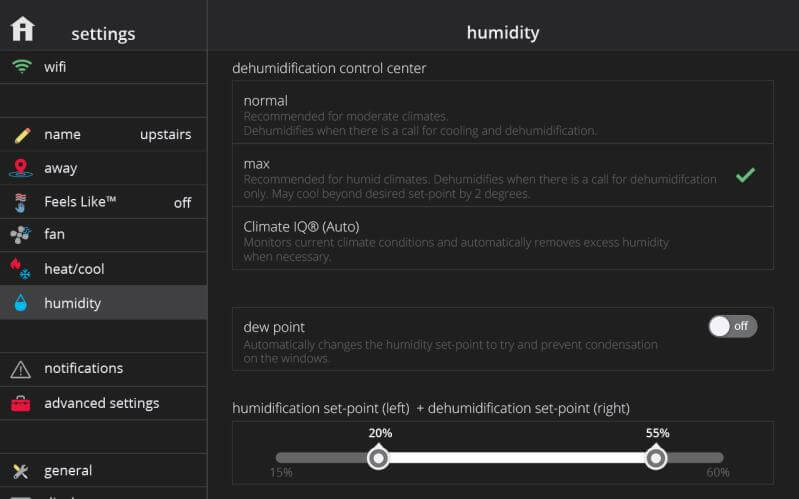
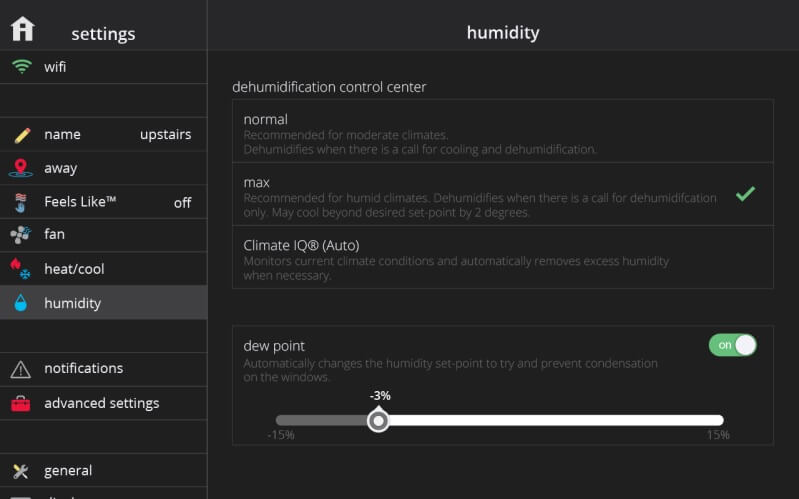
It depends on the equipment you have in your home. You may have purchased a humidifier or a dehumidifier or you may have both. The humidity options available to you are located under menu > settings > humidity. Below is a summary of the humidity options and what they do:
Humidification
Normal - Recommended for moderate climates. Runs the humidifier when there is a call for heat and humidification.
Max - Recommended for drier climates. Runs the humidifier when there is a call for humidification only.
Dew Point - Automatically changes the humidity set-point to try and prevent condensation on the windows.
Dehumidification
Normal - Recommended for moderate climates. Dehumidifies when there is a call for cooling and dehumidification.
Max - Recommended for humid climates. Dehumidifies when there is a call for dehumidification only. May cool beyond desired set-point by 2 degrees.
Climate IQ© - Monitors current climate conditions and automatically removes excess humidity when necessary.
-
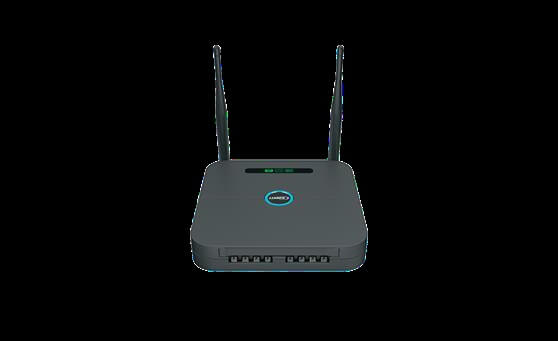
The Smart Hub is a system and network controller. It has the ability to connect to other iComfort® S30 devices running Lennox software to create a special Lennoxmanaged local network. A Lennox-managed local network is independent of the actual physical network it is running on, and it can operate over the home Wi-Fi network or over the Smart Hub Wi-Fi network.
It is typically located near the indoor unit. This could be in your attic, basement or garage. Below is an example image of what a Smart Hub looks like.
-
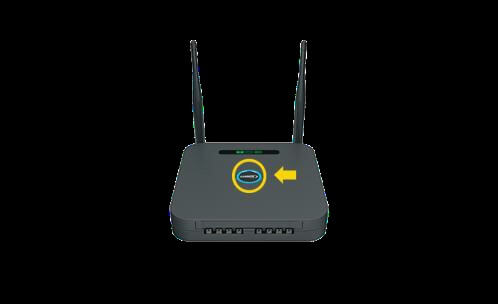
You can restart the Smart Hub by pressing and holding the center Lennox button for more than 5 seconds.
-
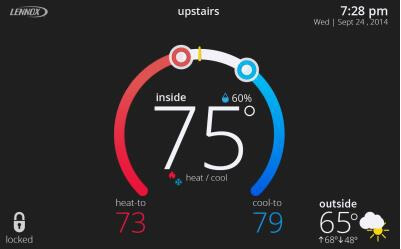
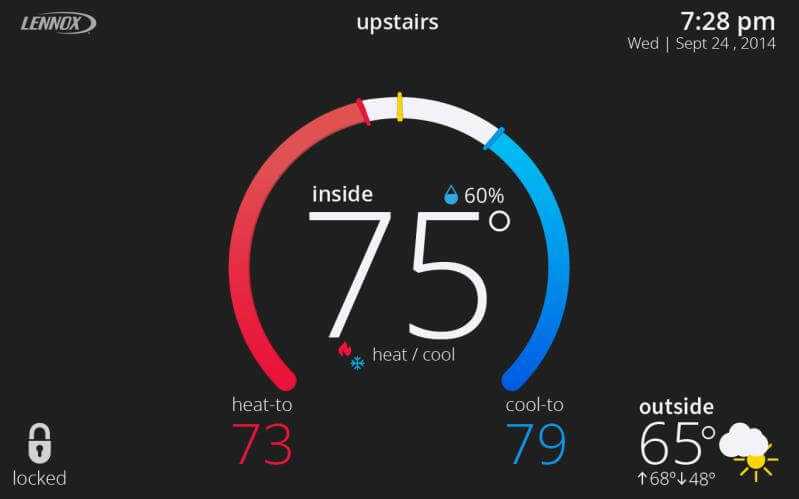
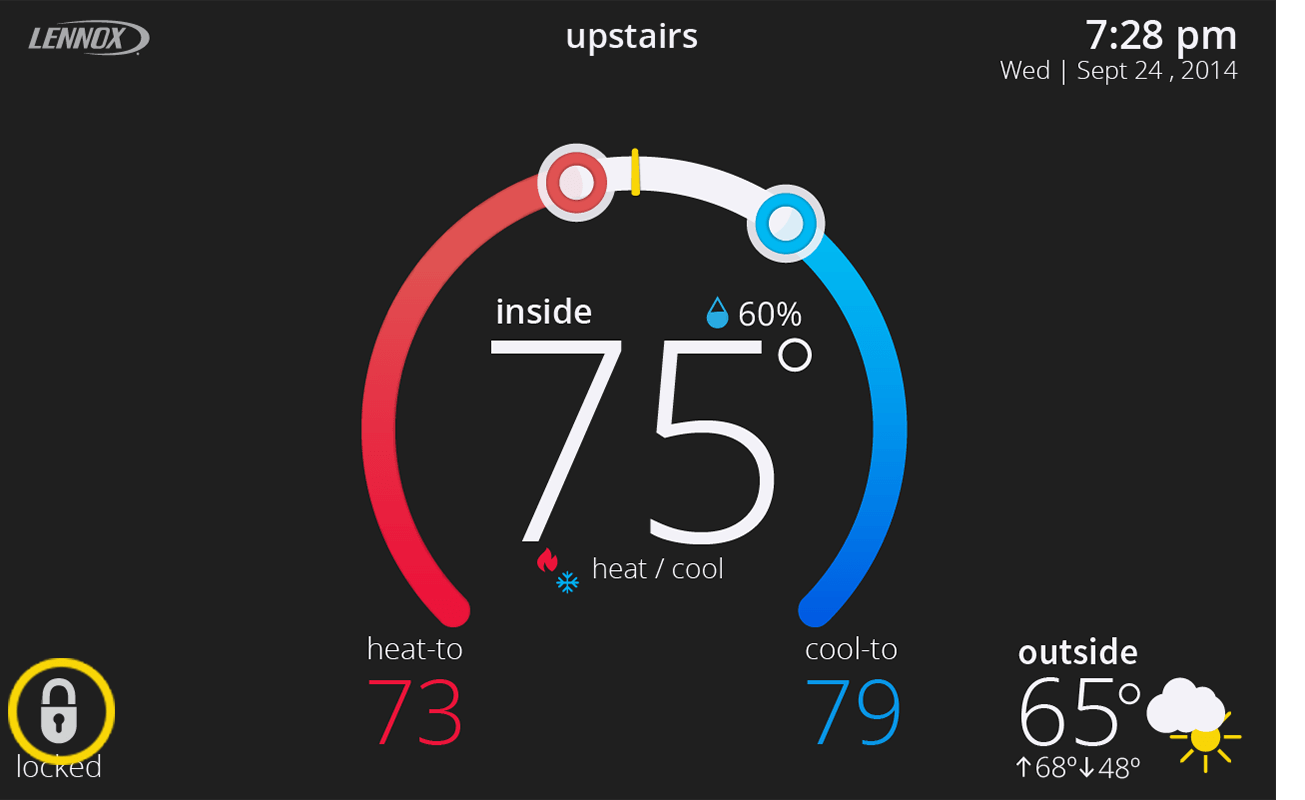
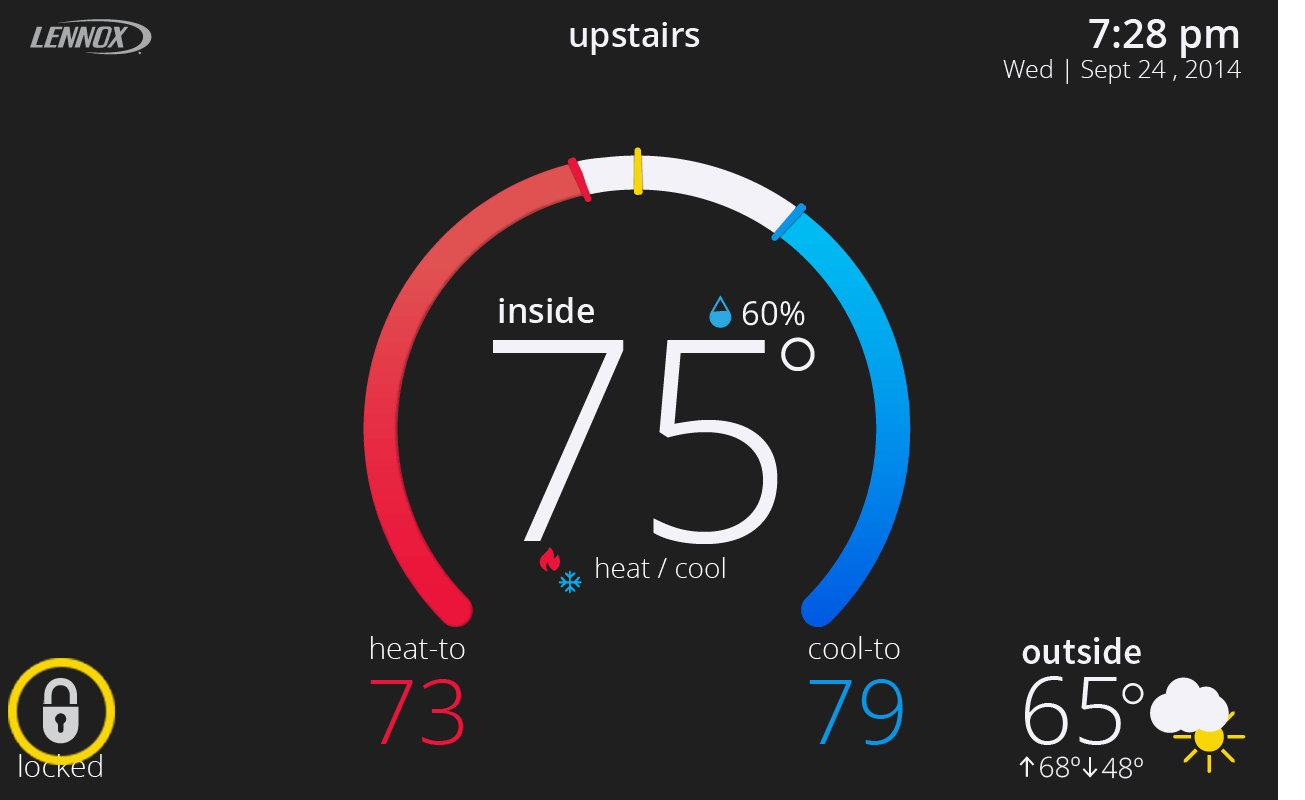
Having a lock icon on your thermostat means you’re restricted from certain features. There are two types of lock screens: "Partially" locked and fully "Locked".
Partially locked means you’re only able to edit and change set-points. You’re restricted from changing anything in settings and changing the system mode / schedule (screen 1).
Locked means you’re only able to view the set-point(s) and indoor temperature in every zone but not able to edit or change any settings (screen 2).
-
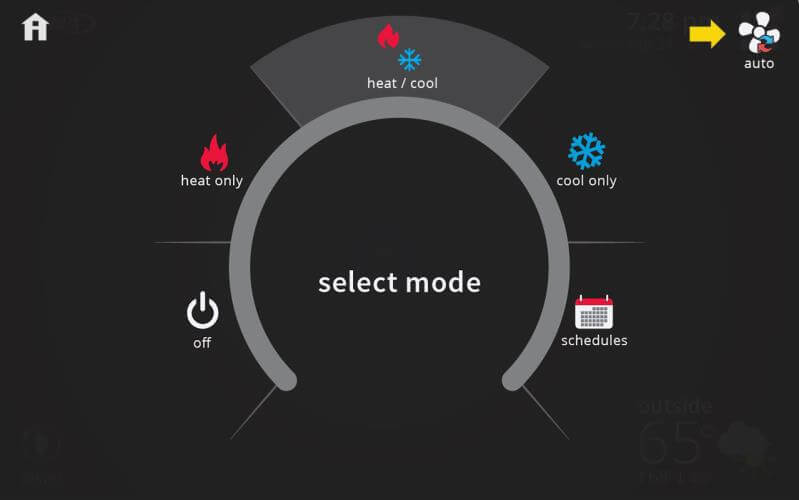
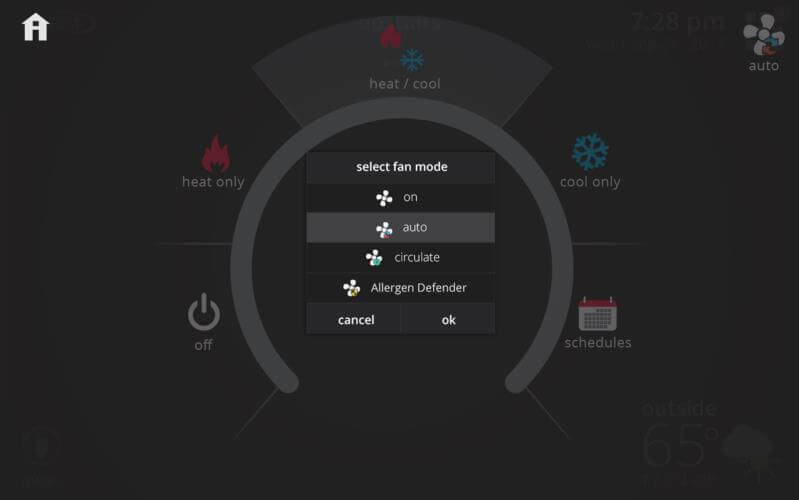
Your fan mode options are located in the modes/schedules screen on the top right. Pressing the fan icon will allow you to manually control the fan mode. The modes available are: On, Auto and Circulate. Your fan button may look disabled or grayed-out, if so, you can tap on it and a pop-up will display explaining why (it may be due to Allergen Defender or Perfect Temp. features being turned on).
-
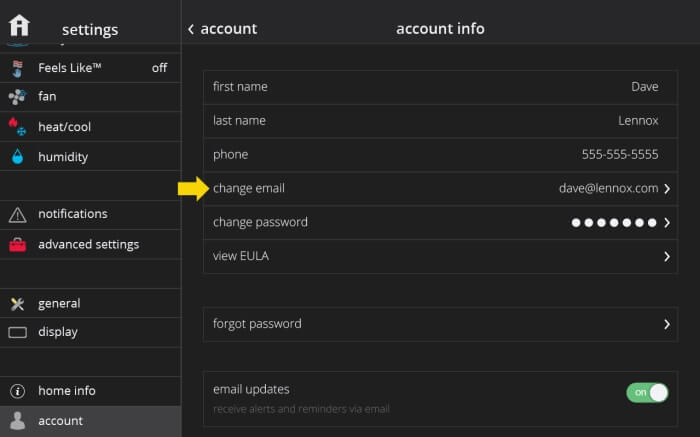
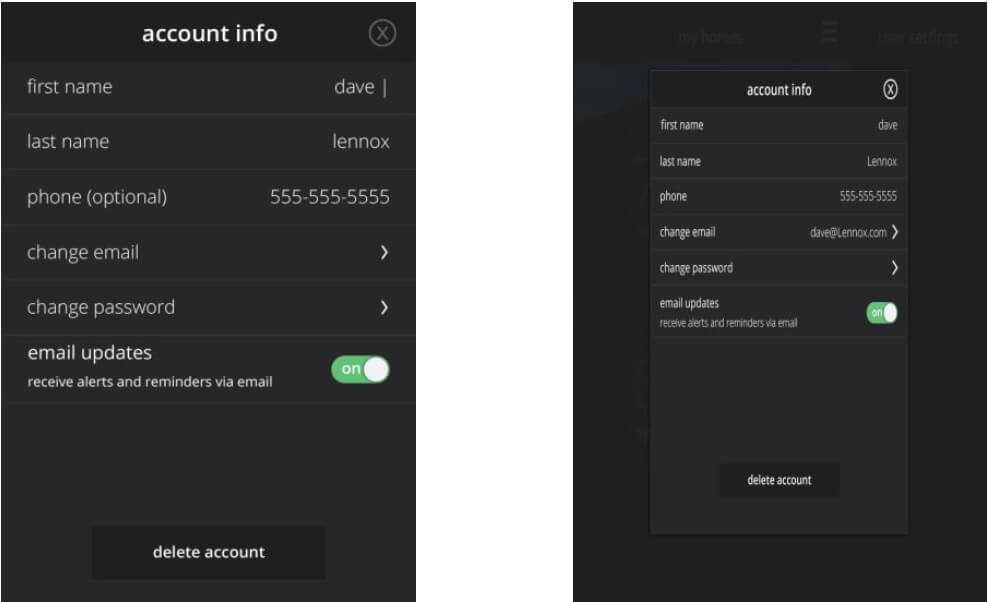
In your thermostat, go to menu > settings > account to change your account information such as name, billing address, email address, password and other settings. In your Lennox Home App or web portal, you can tap/click on your email address on the top right and then “View Account”.
iComfort® S30
-
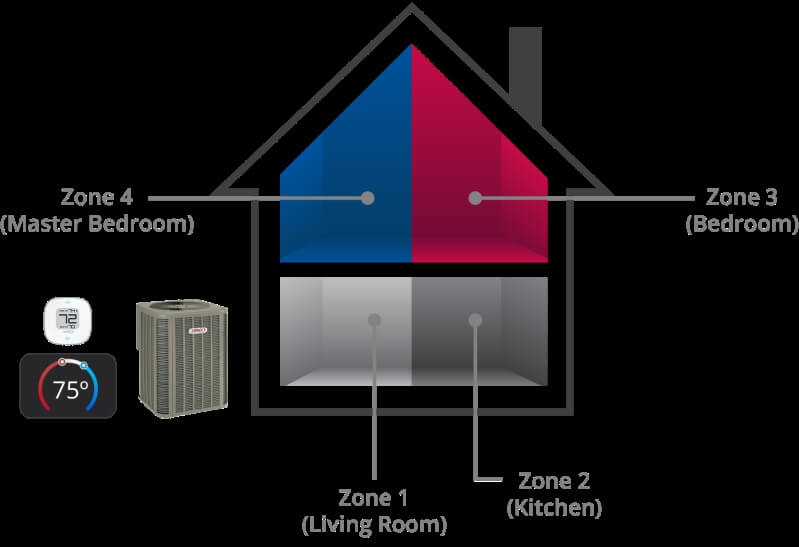
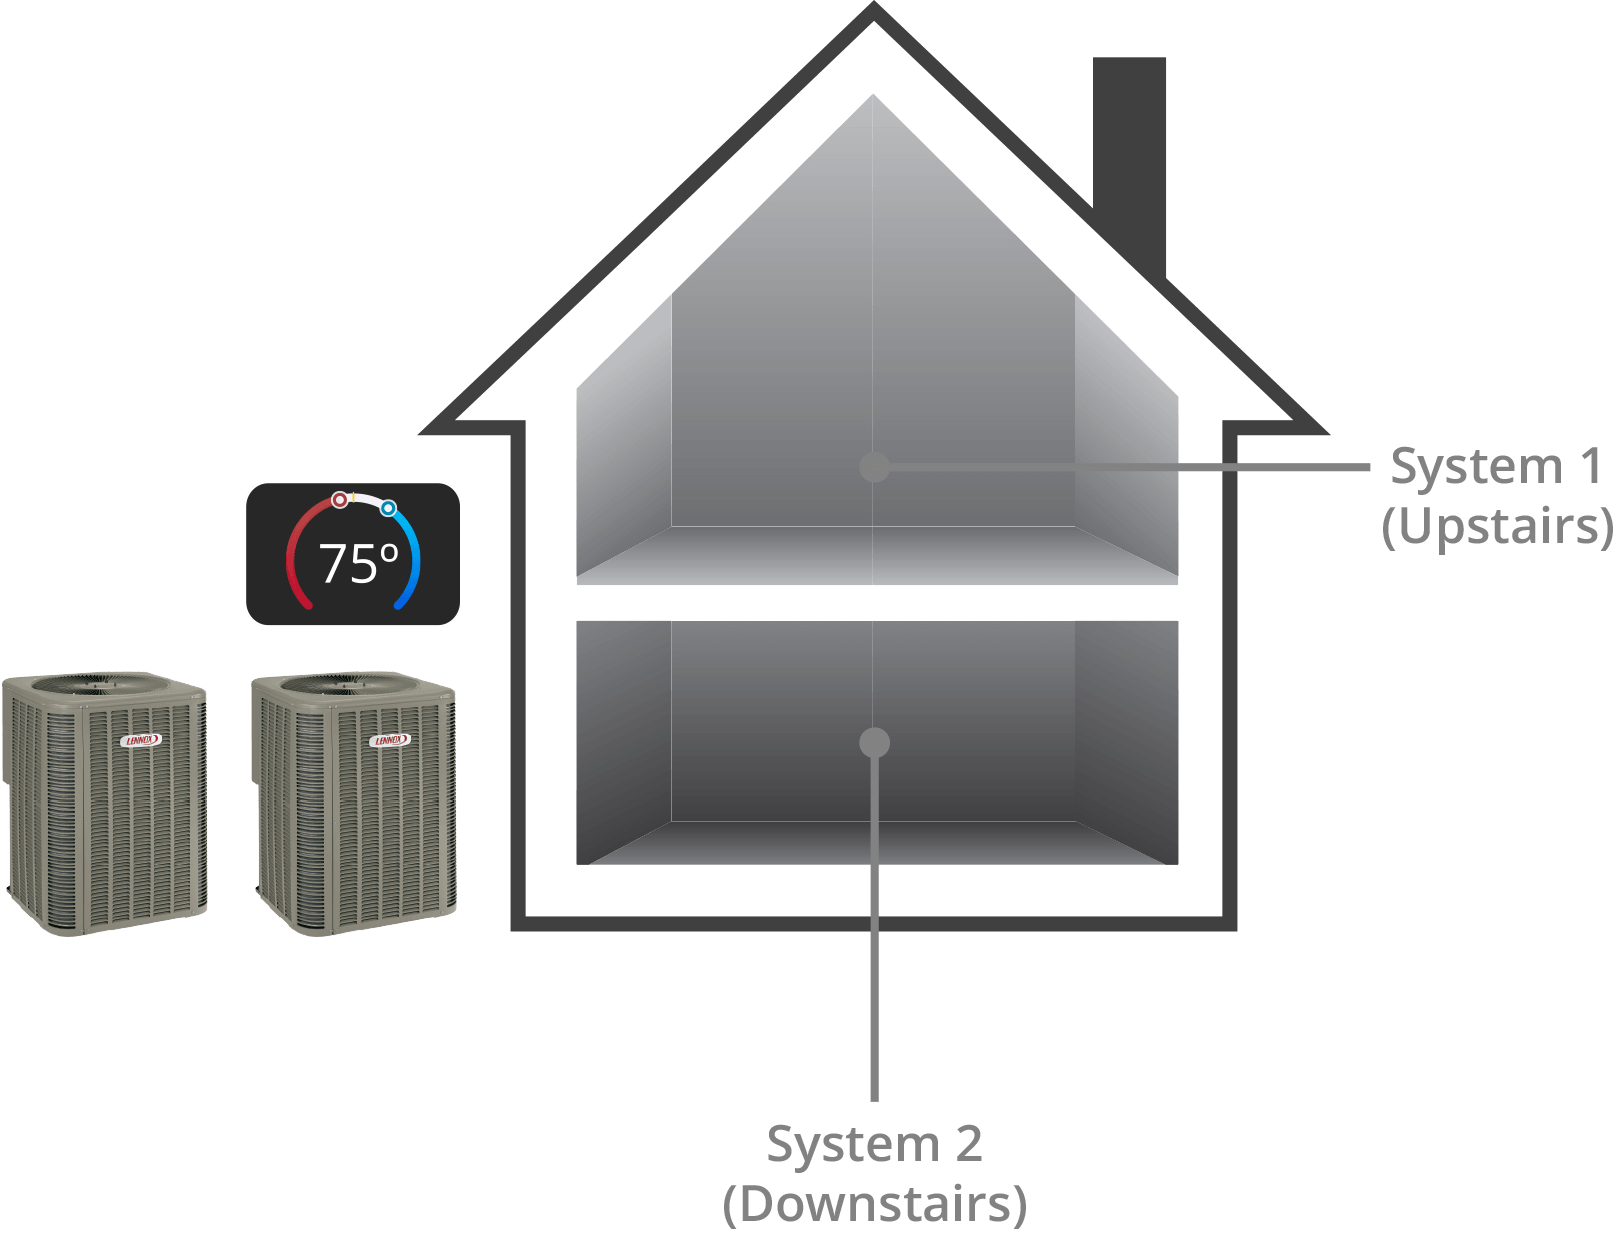
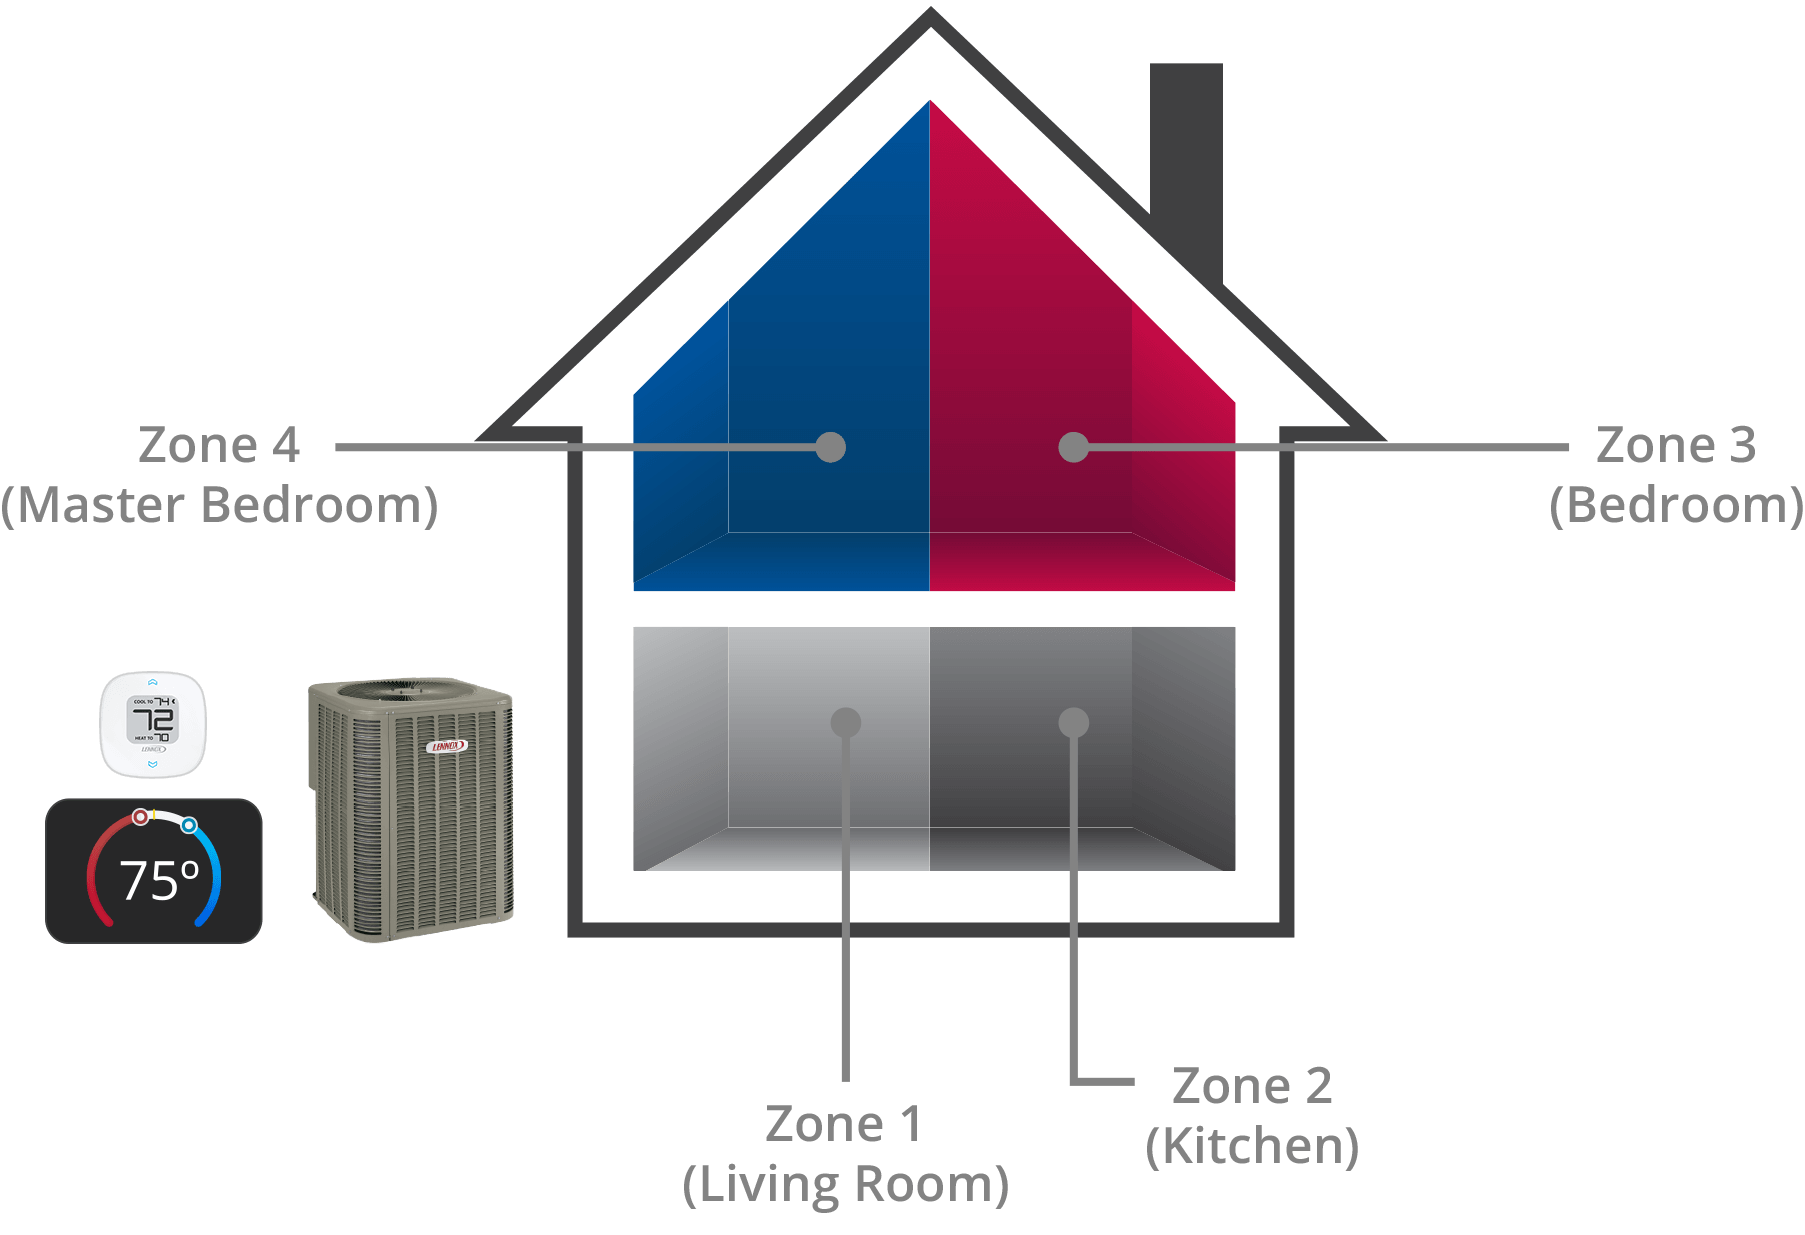
A system corresponds to the outdoor/indoor unit combo. Let’s say that you have two outdoor units. This means you have two systems. If you have purchased iHarmony zoning, then you’ll be able to control the temperature in certain areas or rooms of the house, also called zones, with the same system.
Below is a diagram showing a house with 2 systems, with each system controlling an area of the home. One system controls all rooms upstairs while the other system controls all rooms downstairs.
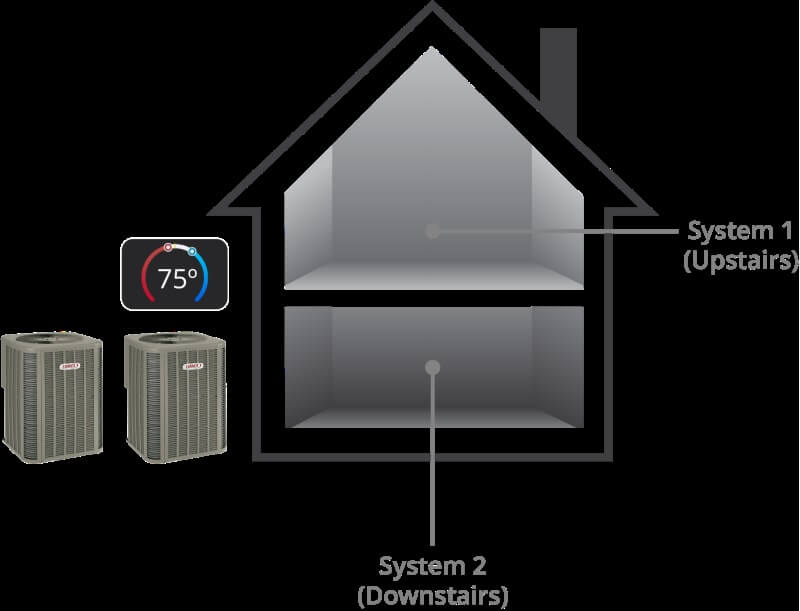
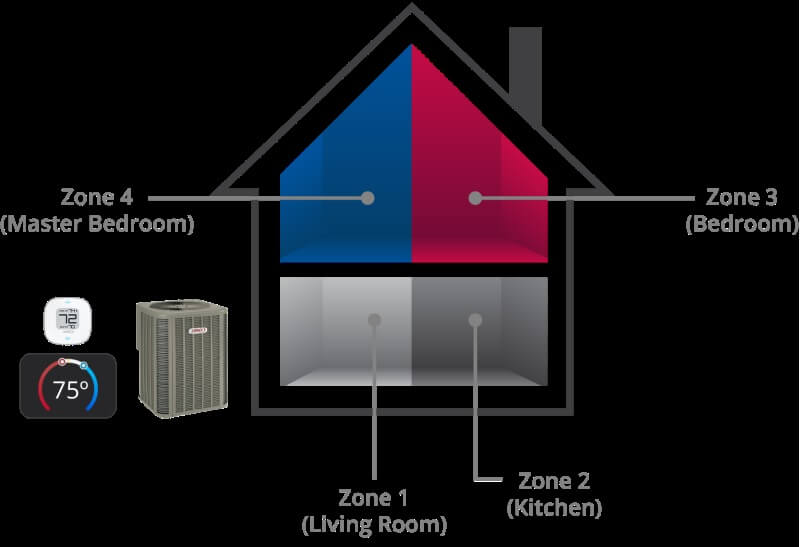
Diagram 2 below shows a home with one system and iHarmony zoning. You can control the temperature for each individual room in the house even though they share the same system. iHarmony zoning requires additional equipment (automated dampers).
-
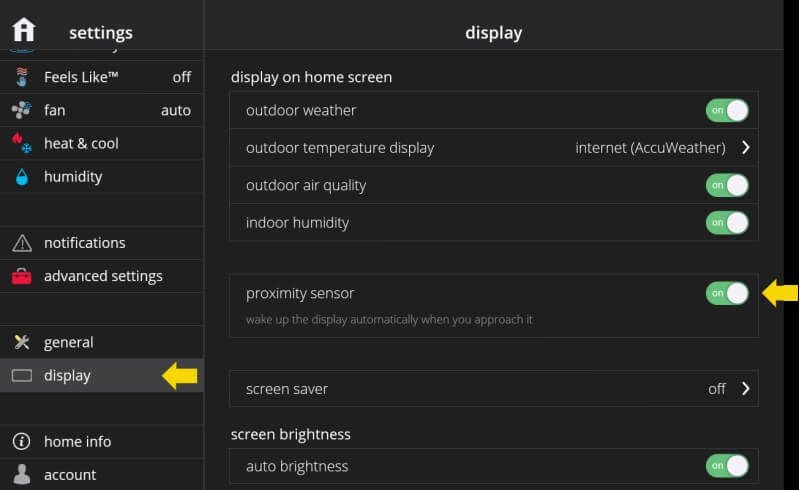
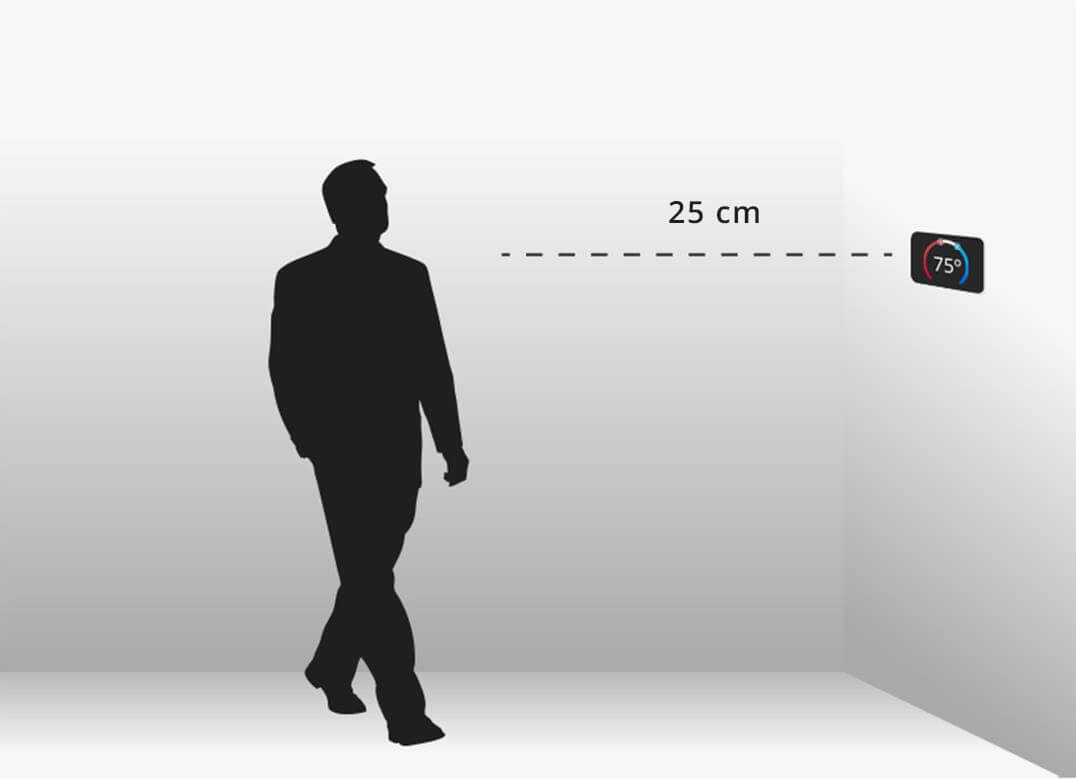
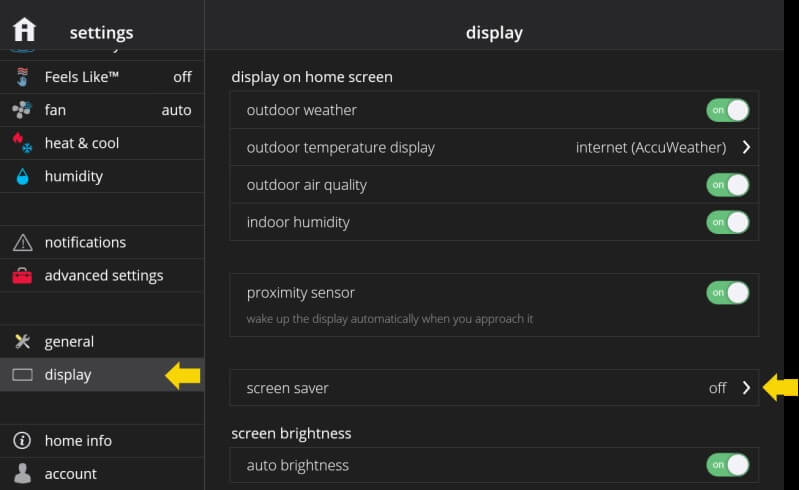
In your thermostat, you can go to menu > settings > display. Display settings are only available in the iComfort® S30 display and not in the Lennox Home App or web portal. The distance range for the proximity sensor is short, approximately 25 cm or up to an arm’s length. The proximity sensor is used to automatically wake up the display when you approach it when the screen saver is turned on.
-
The distance range for the proximity sensor is short, approximately 25 cm or up to an arm’s length.
-
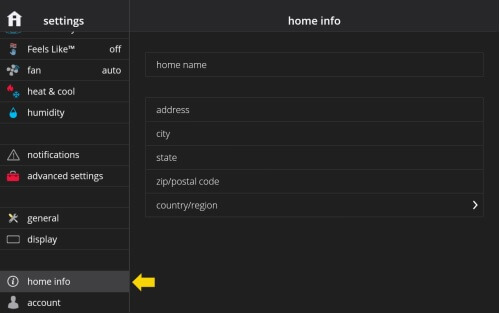
You can change or set your home location under menu > settings > home info. Having the correct home location is important because your weather information, screen saver weather background (if you have this feature enabled) and Lennox Home App/web portal show current weather information outside the home
-
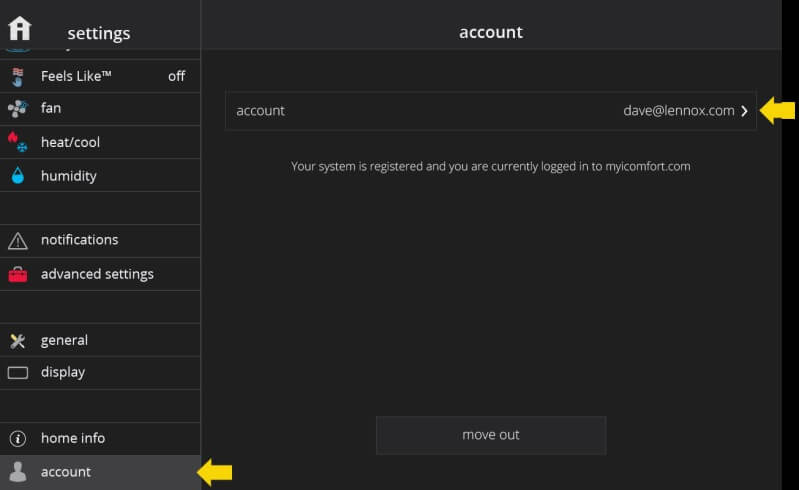
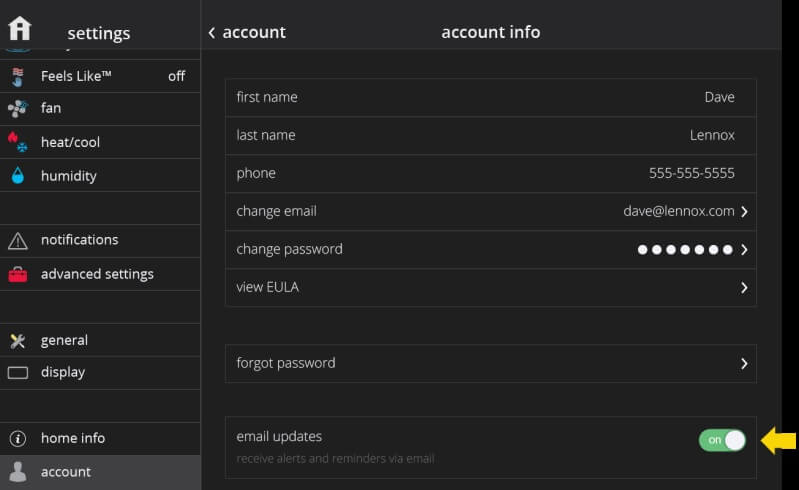
When you create an iComfort® S30 account, you’re asked to check a box if you wish to receive email updates, meaning alerts and reminders via email. You can always change this setting again under menu > settings > account > account info in the thermostat.
-
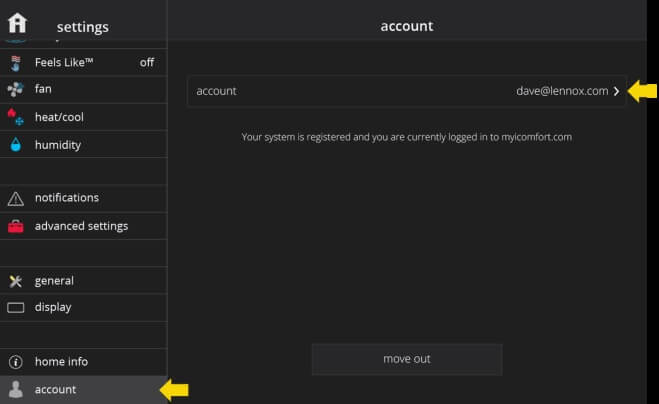
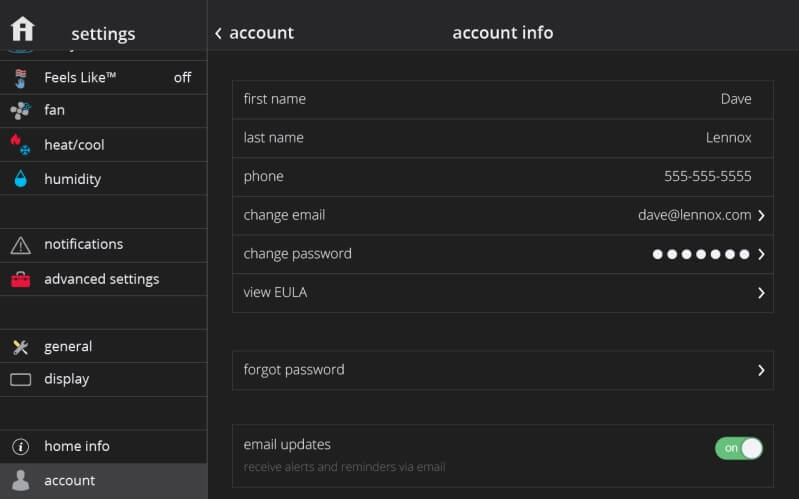
In your thermostat, go to menu > settings > account to change your account information such as name, billing address, email address, password and other settings. In your Lennox Home App or web portal, you can tap/click on your email address on the top right and then “View Account”.
-
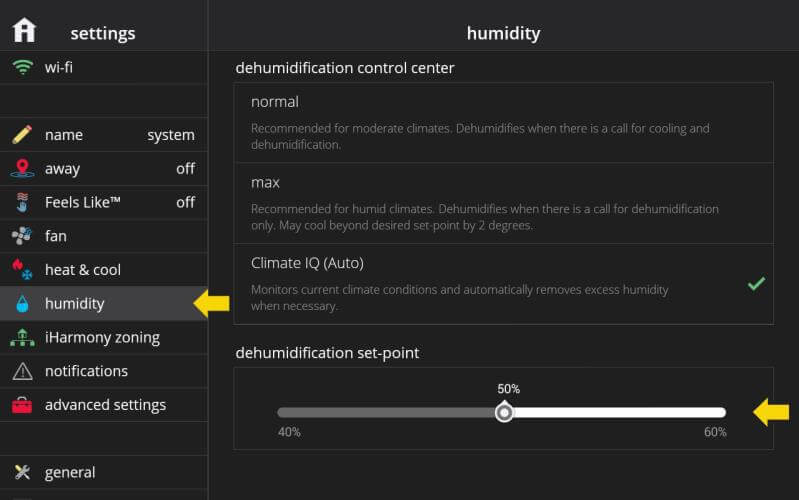
You can go to menu > settings > humidity to modify the dehumidification and/or humidification set-point(s) in your home. The slider allows you to adjust the desired percentage of humidity inside the home. The shaded/darker areas in the slider represent the allowable range of values for humidification and dehumidification.
-
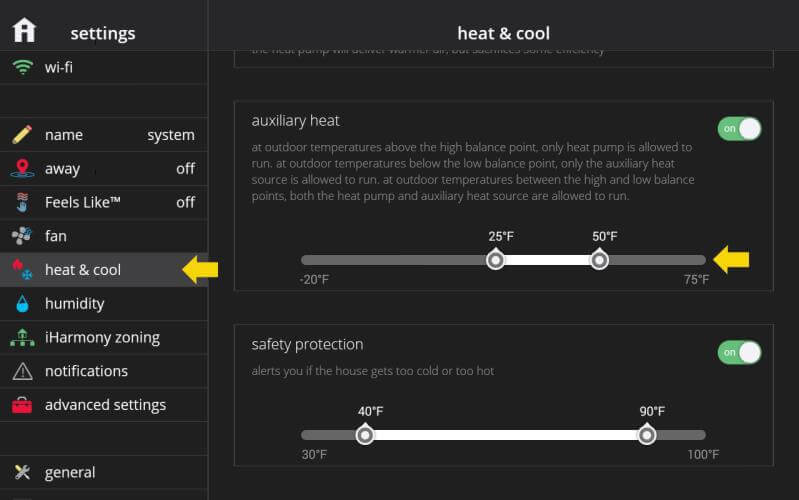
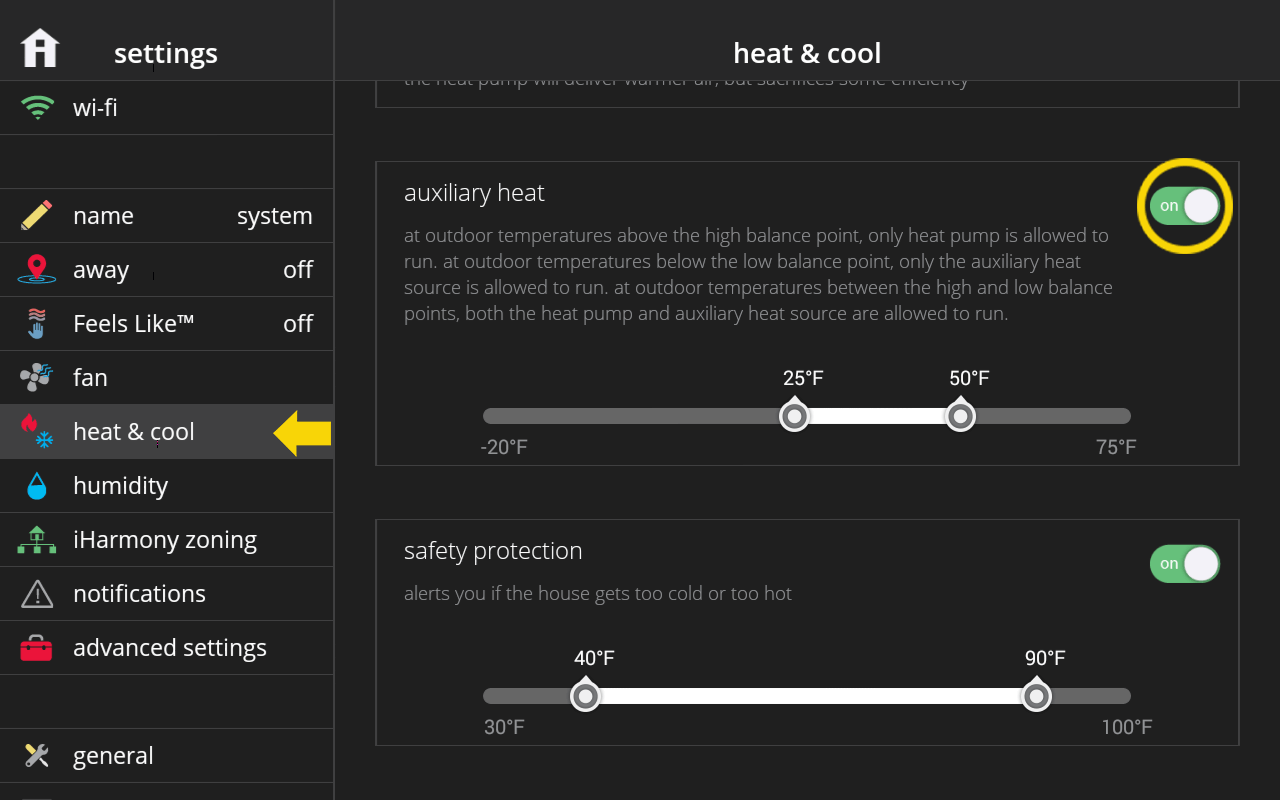
At outdoor temperatures above the high balance point, only the heat pump is allowed to run. At outdoor temperatures below the low balance point, only the auxiliary heat source is allowed to run. At outdoor temperatures between the high and low balance points, both the heat pump and auxiliary heat source are allowed to run. You can modify the high and low balance points under menu > settings > heat & cool > auxiliary heat.
-
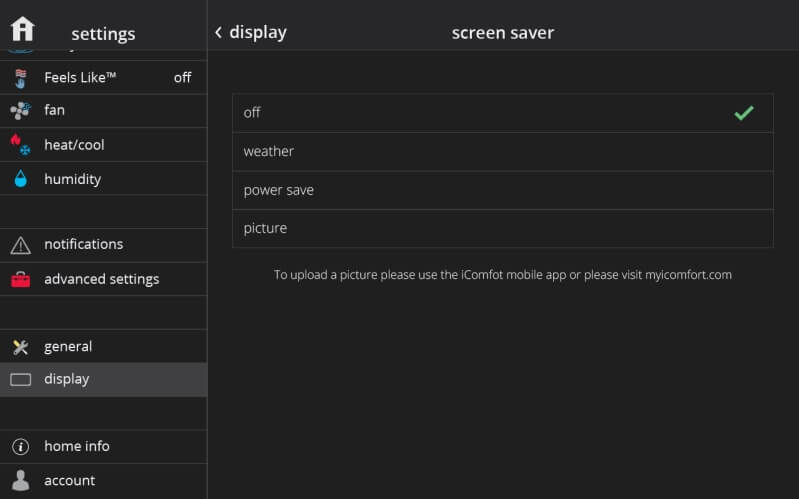
In your thermostat menu > settings > display > screen saver there are the following options available: Off (display is always on), Weather (display a background corresponding to the current outdoor weather if weather information is available and your thermostat is connected to Wi-Fi), Power Save (the screen turns off to save power - useful if the thermostat is in your bedroom and you don’t want it to bother you at night) and Picture (you can upload a picture using your Lennox Home App or via the web portal).
-
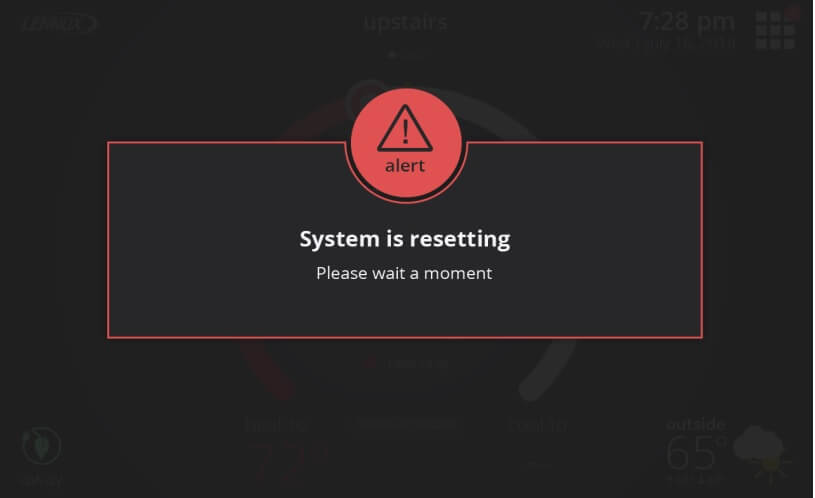
Under menu > notifications, there are the following types:
- Alert (red) - This is an issue that needs to be addressed and you should contact your dealer or Lennox immediately at 1-800-9-LENNOX. We recommend you don’t try to fix the issue yourself!
- Warning (orange) - This is more of a prognostic or diagnostic message, perhaps something to look out for or prevent in the future.
- Reminder (yellow) – This may be a reminder to change your filter or a maintenance reminder, for example.
- Info (blue) – This message is intended for information purposes only.

-
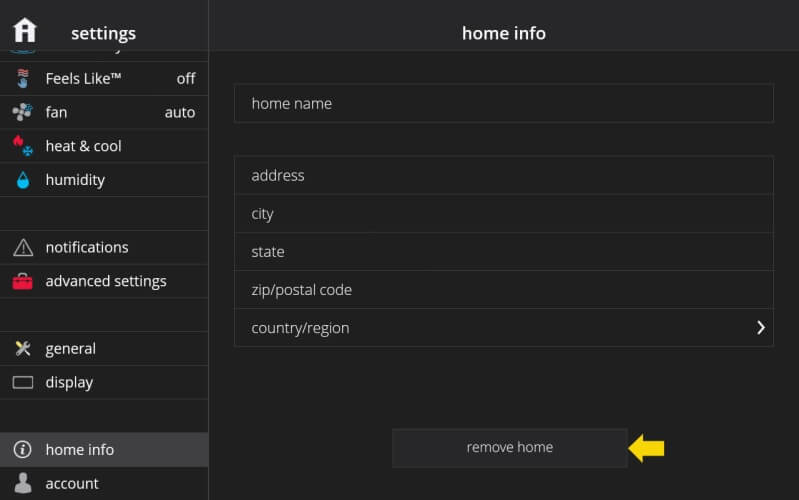
Under menu > settings > home info, there is the Remove Home button. You would use this button to remove all the thermostats in the home from your account.
-
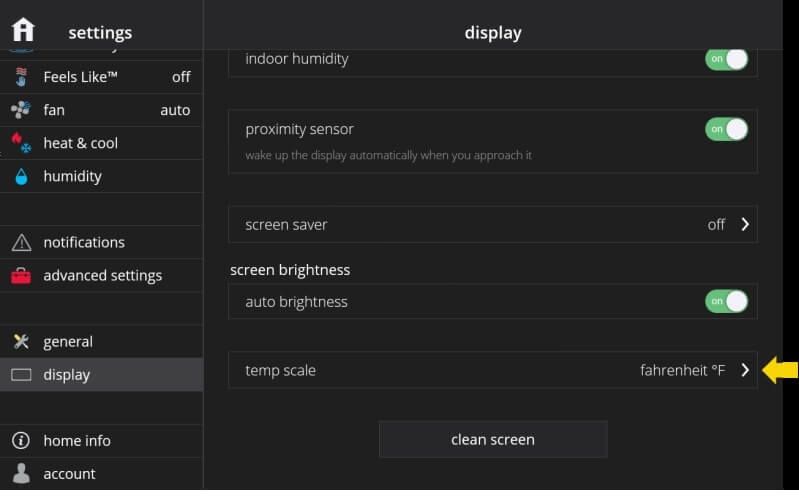
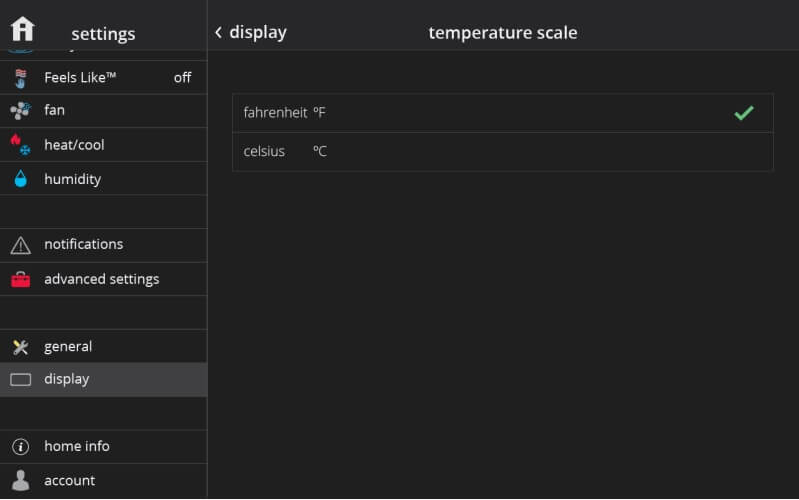
To change the temperature scale, in your thermostat, go to menu > settings > display > temperature scale. Display settings are only available on your thermostat settings (and not the Lennox Home App or web portal).
-
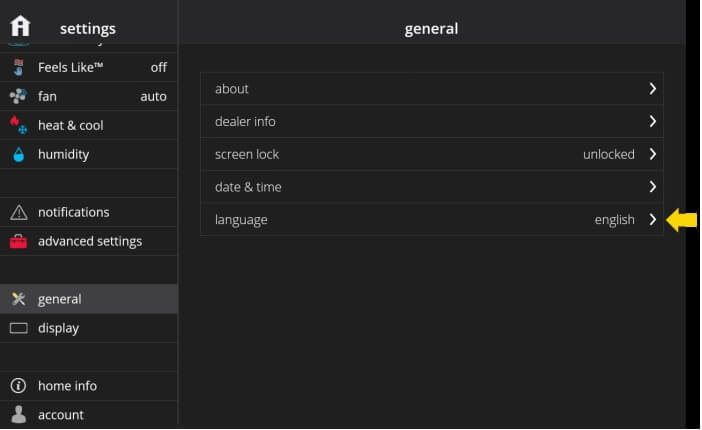
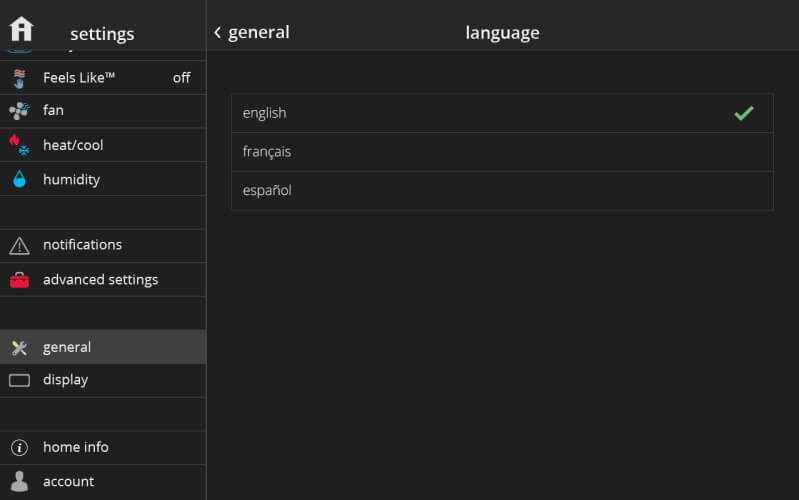
In your thermostat, Lennox Home App or web portal, you can go to menu > settings > general > language to choose between English, French, or Spanish. These are the only languages supported at this time.
-
A zone corresponds to an area or room of your house where you can independently control the temperature from other zones. A zone maps 1:1 to a system or an iHarmony zone.
-
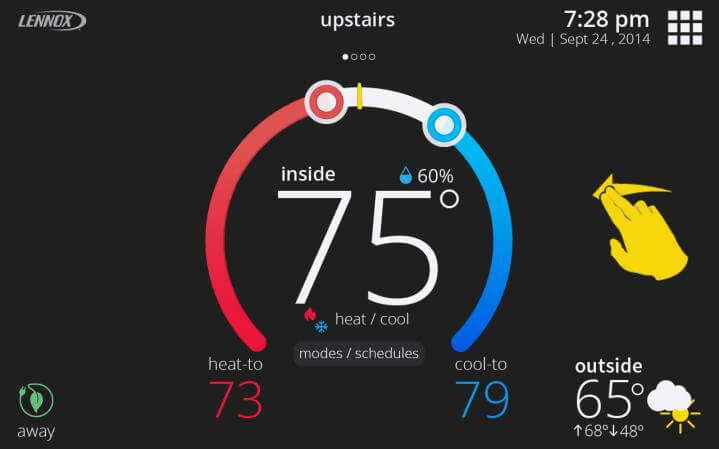
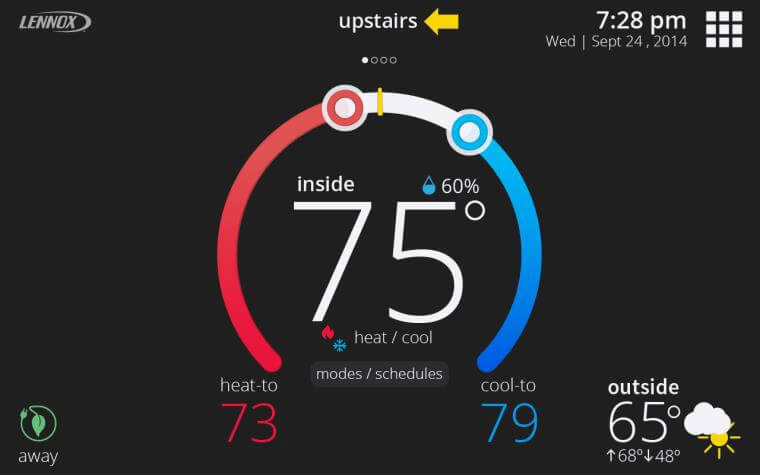
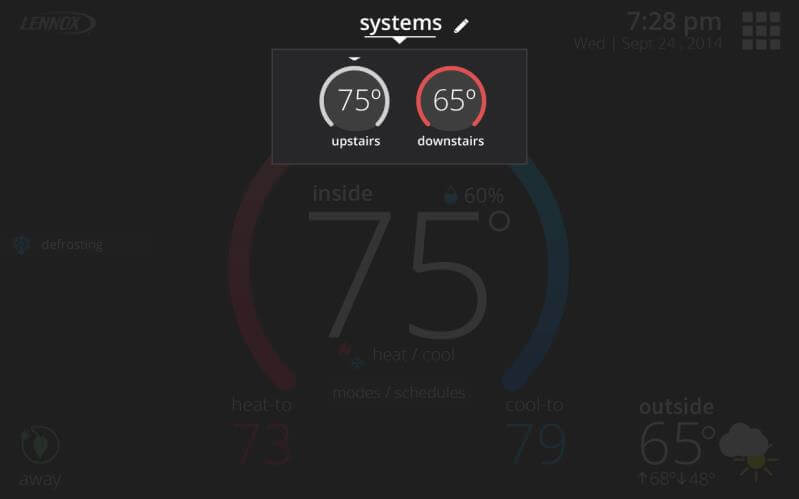
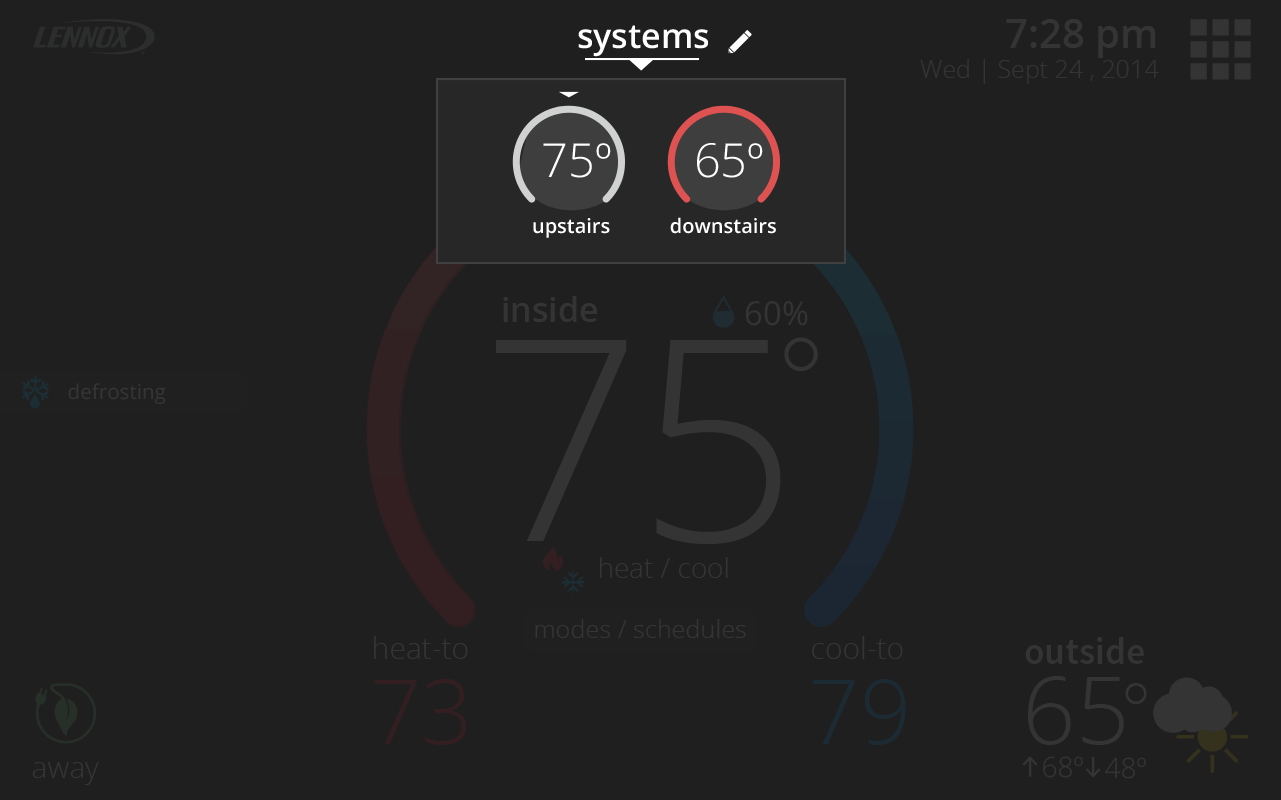
In the thermostat, mobile, or web portal, on the home screen you can swipe left or right to navigate zones/systems. You can also tap on the zone name above the temperature control (a.k.a., horseshoe) to see a pop-up with the list of zones (or systems) in your home.
-
A system corresponds to the outdoor/indoor unit combo. Let’s say that you have two outdoor units, this means you have two systems. If you don’t have iHarmony zoning to control the temperature in every room of the house, then the two systems will appear as two zones on your thermostat's display, and the system name will appear above the temperature set-point control (a.k.a., horseshoe) on the home screen.
-
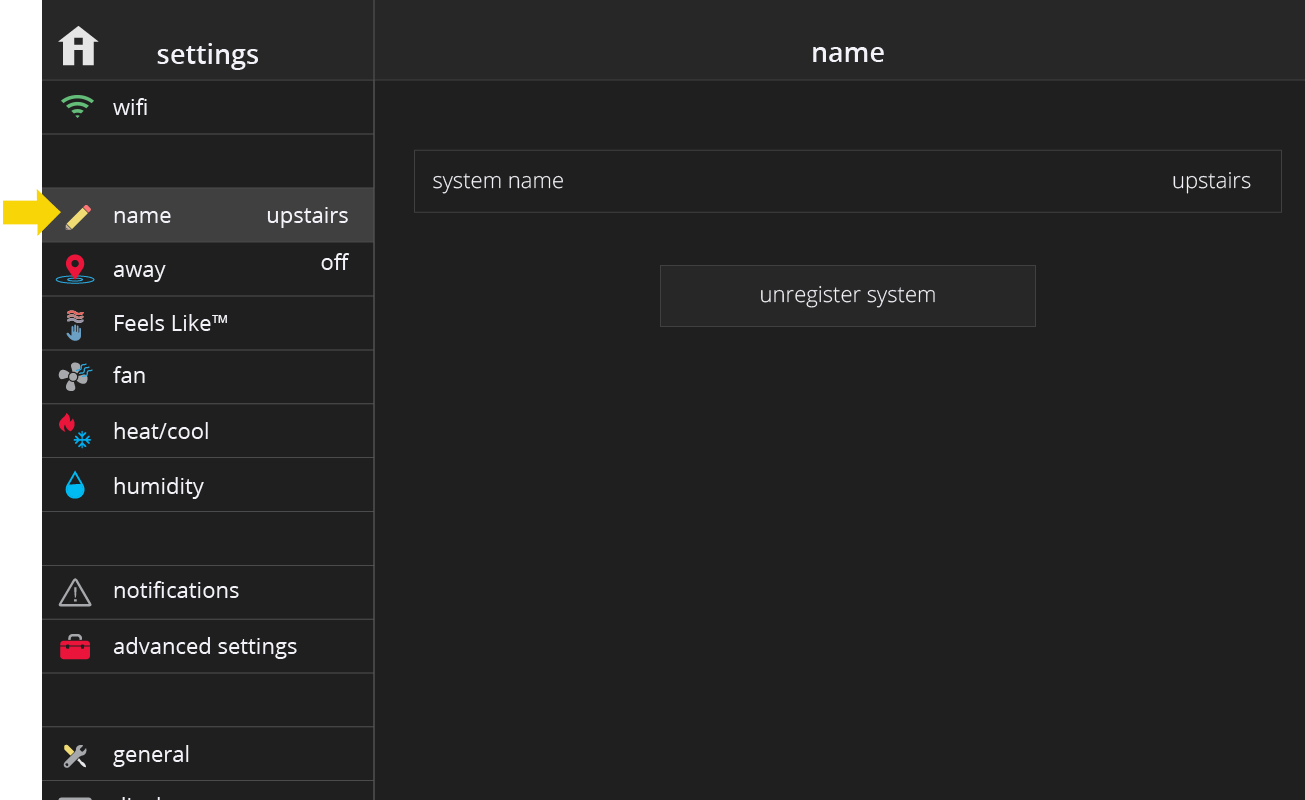
You can change your system name in your thermostat under menu > settings > system.
-
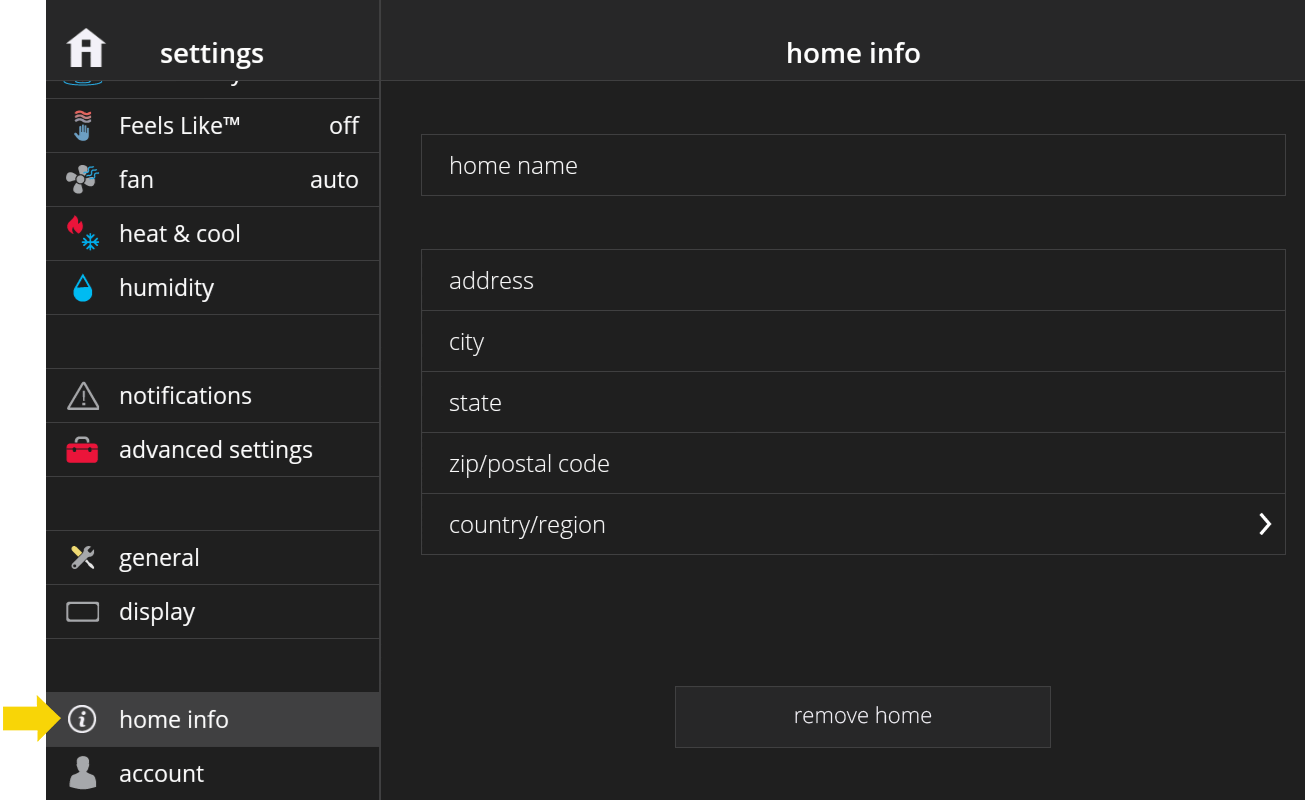
You can change the home name and address in your thermostat, Lennox Home App, or web portal, under menu > settings > home info.
-
You’ll be asked to create a home or choose an existing home when adding an iComfort® to your account. You automatically add an iComfort® to your account when you sign in or create an account using your thermostat under menu > settings > account.
Alternatively, you can add your new iComfort® S30 thermostat to your account by using the web portal or Lennox Home App, by entering a pin you generate on the thermostat.
To generate the pin, go to your thermostat, then go to menu > settings > account and at the bottom of the page press the "Generate Pin" button. You’ll be given a number that is unique for a one-time use.
When you enter the pin on the web portal or Lennox Home App, you’ll be automatically signed-in on your thermostat.
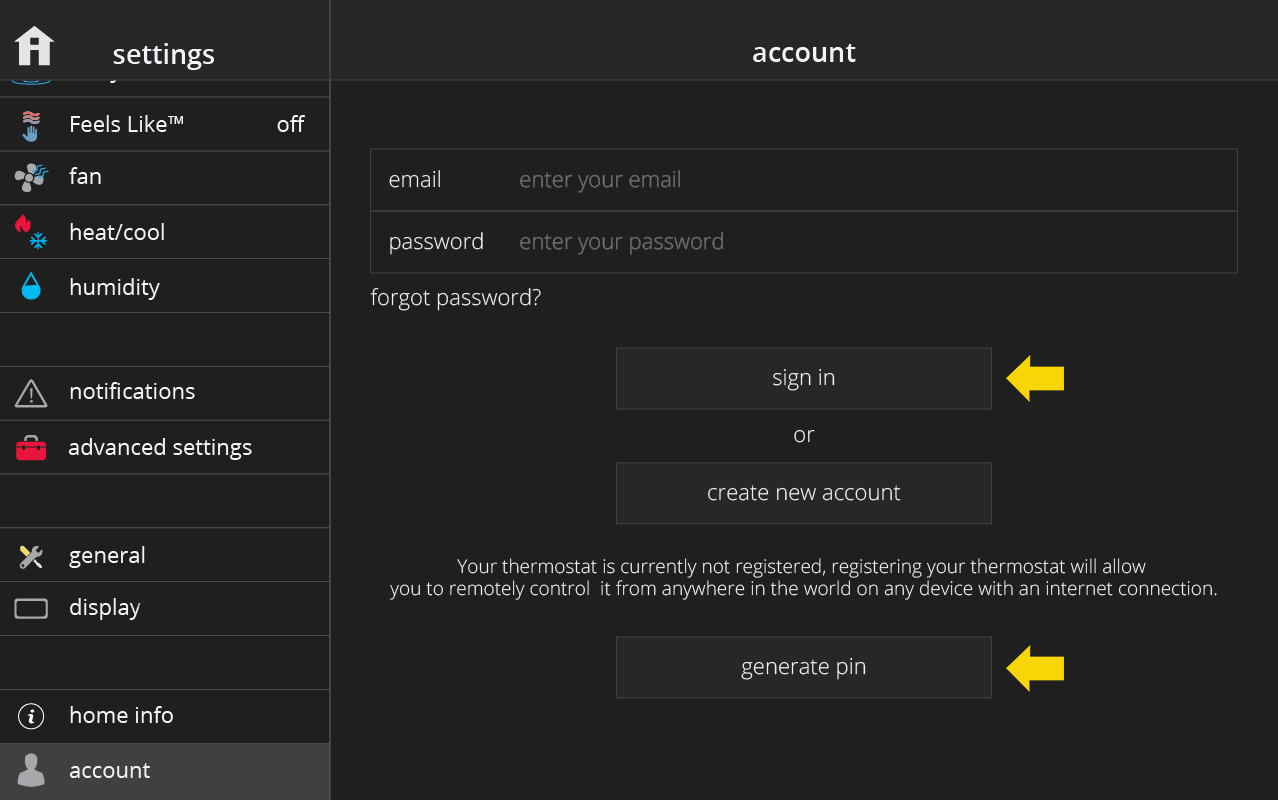
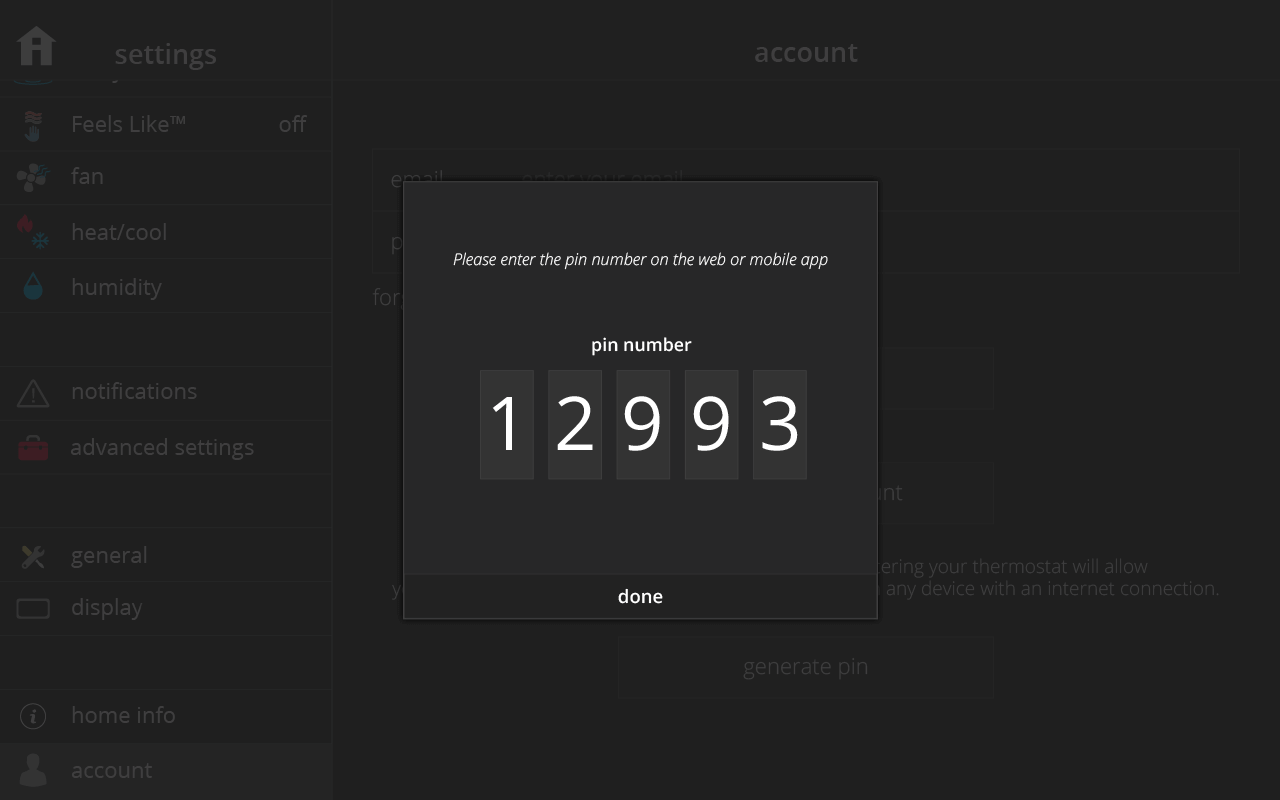
Steps to entering pin on a mobile platform:
- Press the thermostat icon with “+” button and your will enter the "Add iComfort®" screen.
- Enter the pin generated on the thermostat and then tap the "Add" button.
- Lastly, choose an existing home if you already have one or tap the "Add New Home" to create a new home.
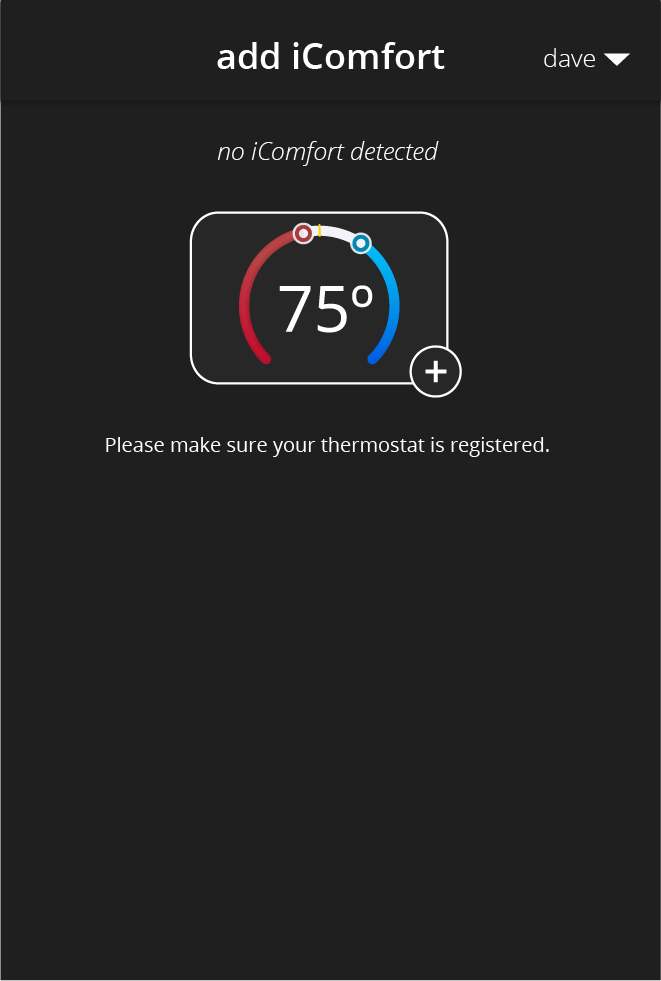
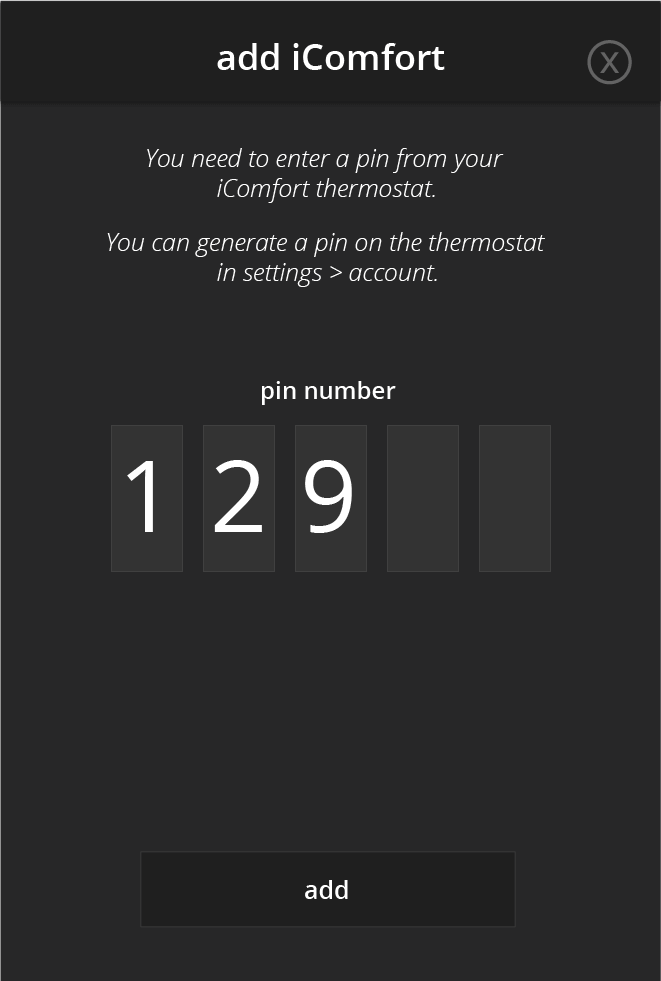
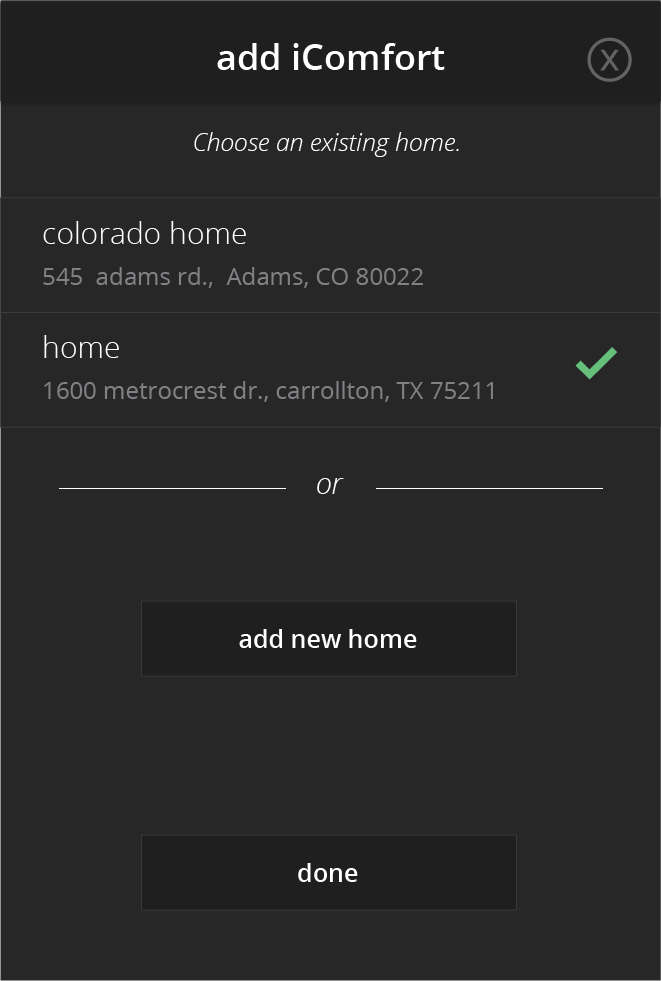
- Press the thermostat icon with “+” button and your will enter the "Add iComfort®" screen.
-
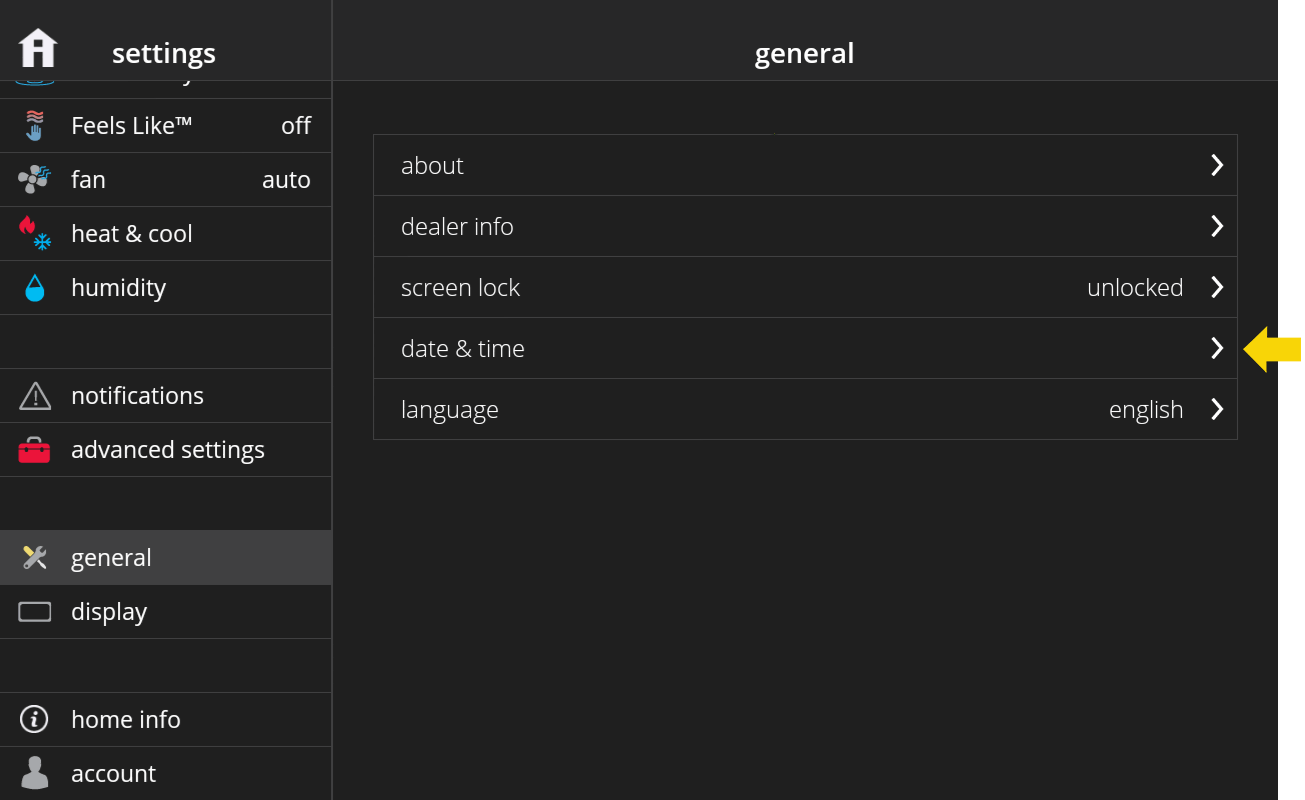
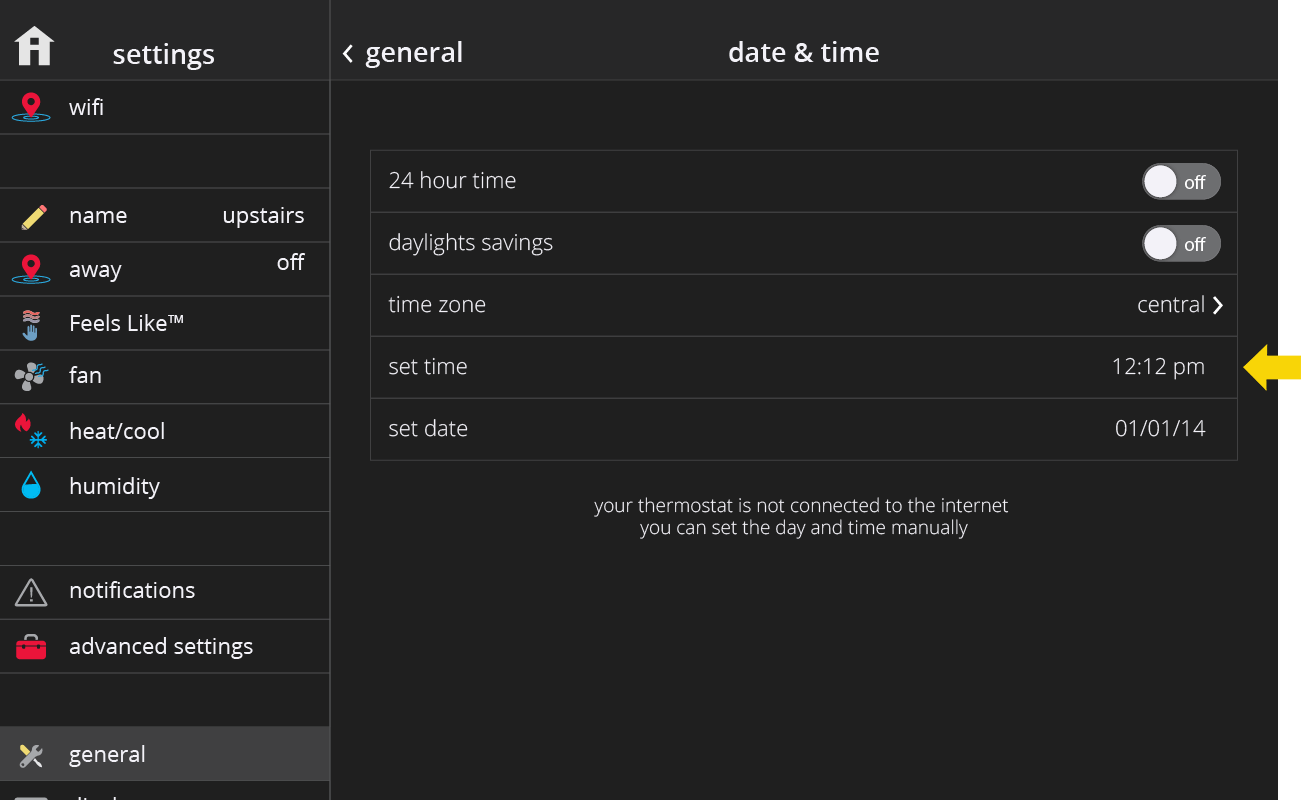
Date and time typically come from Lennox if your thermostat is connected to Wi-Fi. If your thermostat is not connected to Wi-Fi, then you can set the date and time manually by going into your thermostat to menu > settings > general > date & time.
-
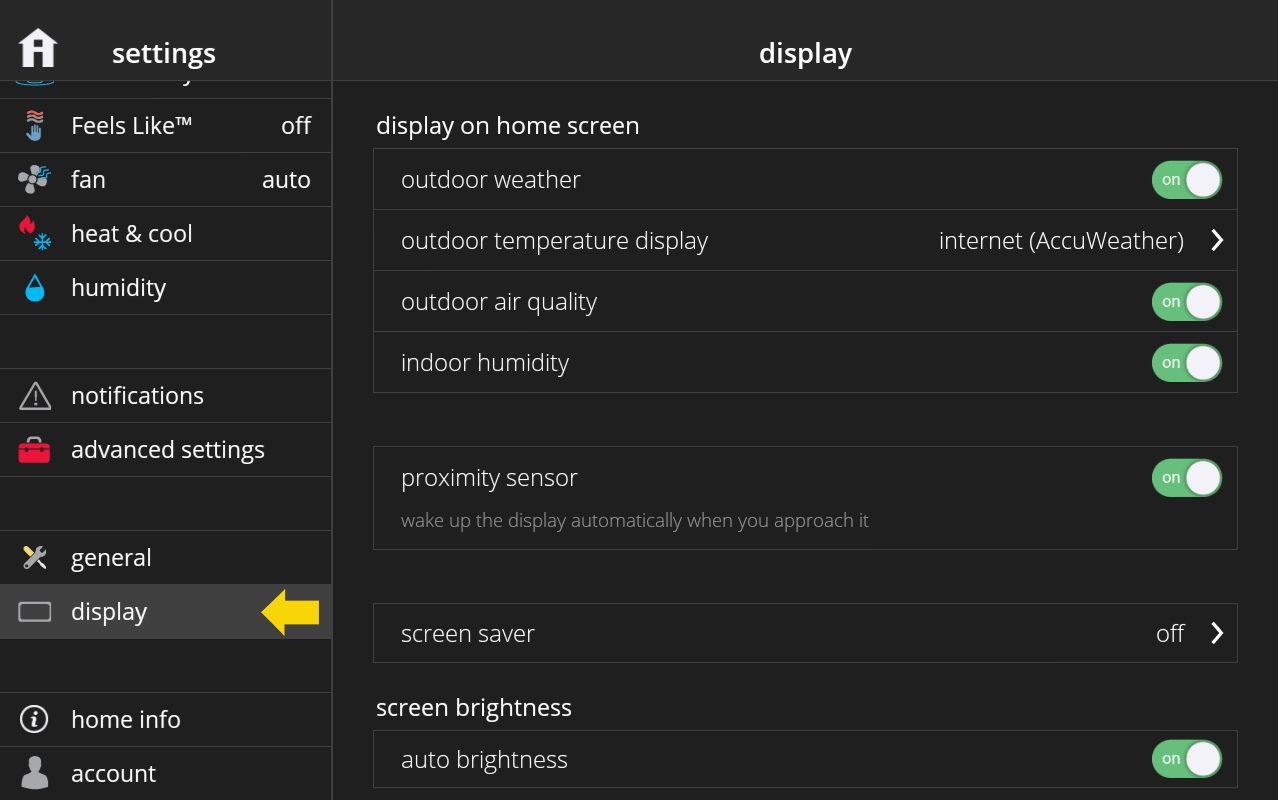
You can change your thermostat’s display settings from the thermostat under menu > settings > display. Display settings are only available in the display itself and they are not available on the web portal or Lennox Home App.
-
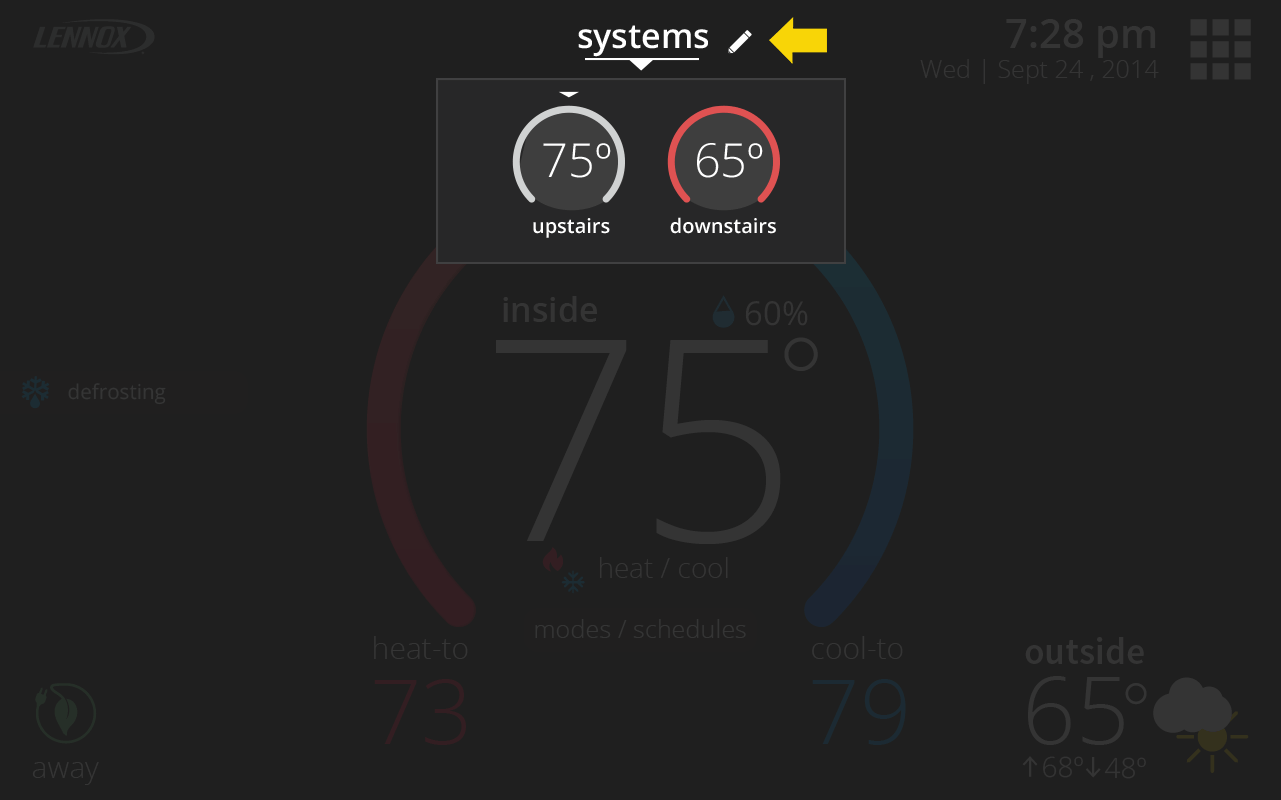
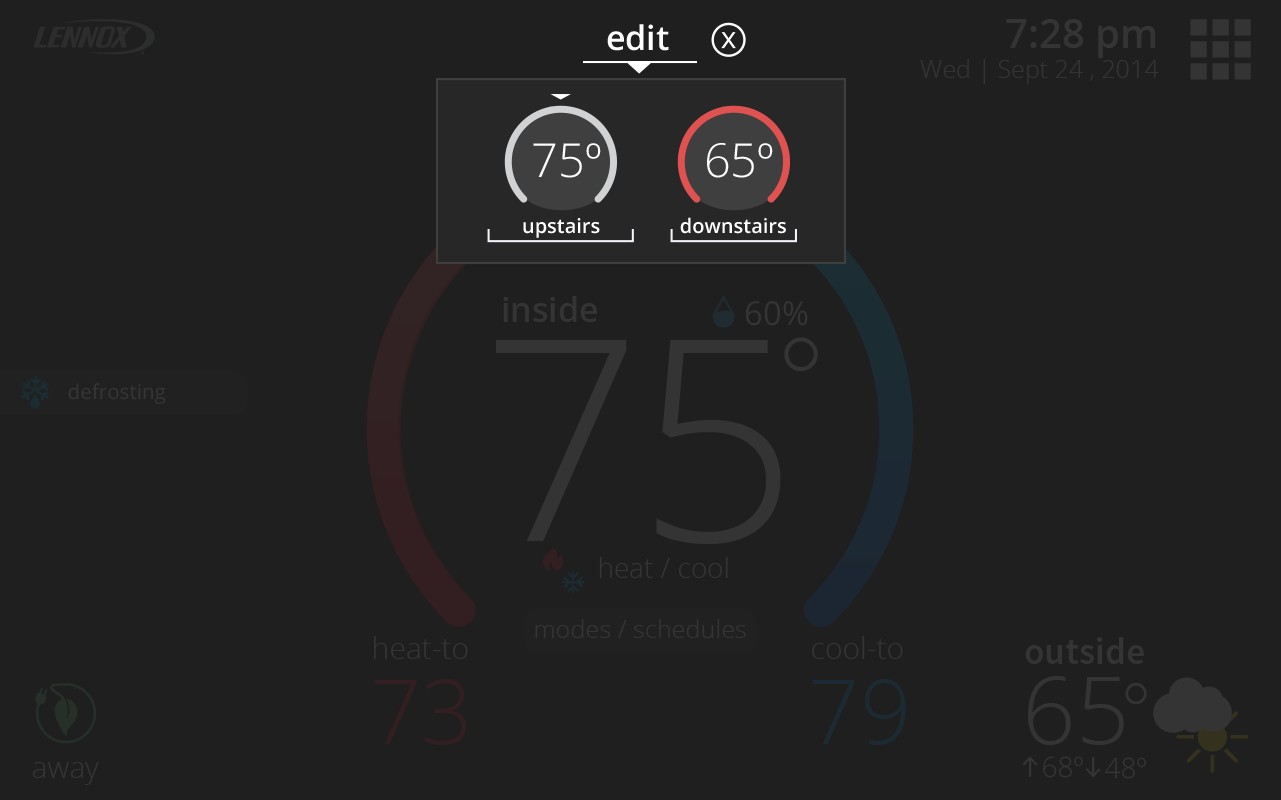
The zone name can be changed by tapping the zone name and then tapping the pencil icon (edit) next to “Zones”. Alternatively, you can change the zone name under menu > settings > iHarmony zoning and choosing the zone you would like to rename.
-
You can go in your thermostat, Lennox Home App, or web portal, to menu > settings > general > dealer info > dealer access to set the level of access you wish to grant to your dealer.
-
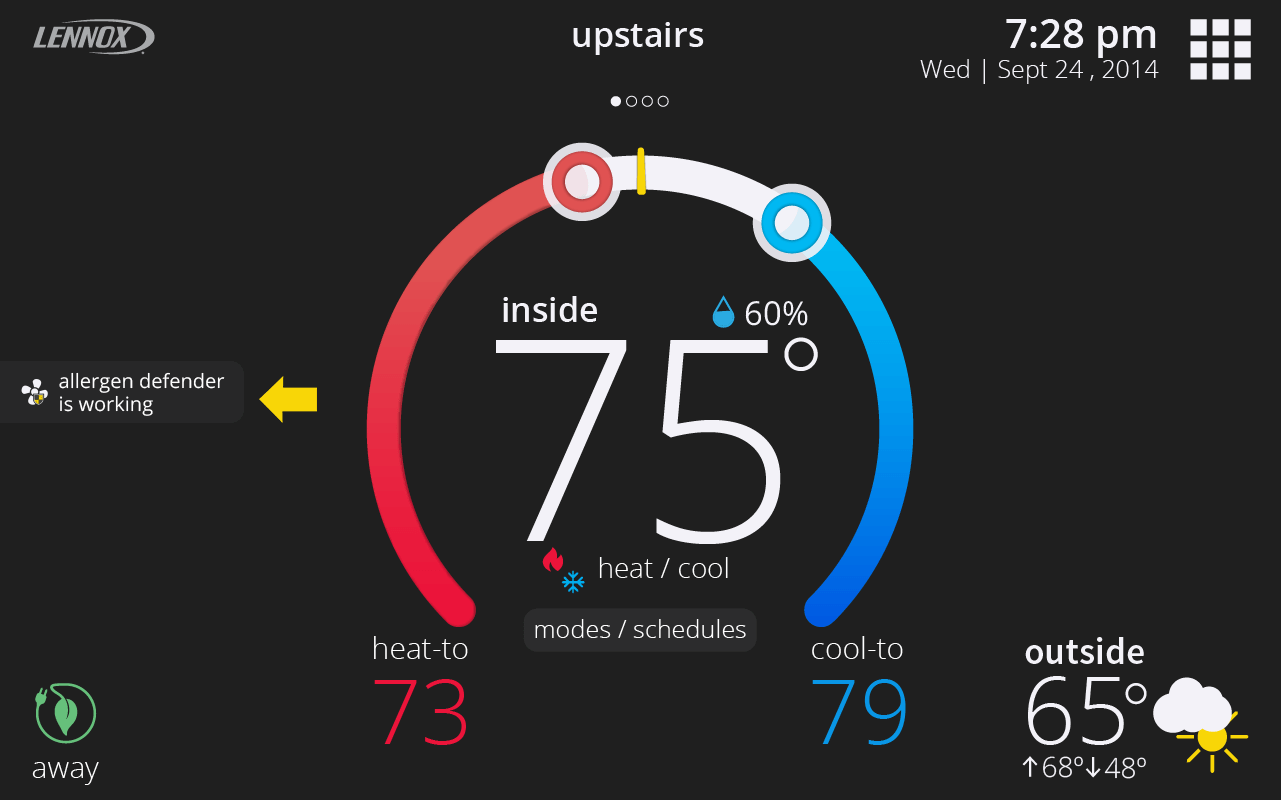
This is a fan mode that you can choose in the modes/schedules screen. When enabled, the fan automatically kicks in when the system detects high levels of allergens in the air. When Allergen Defender is working, you’ll see a status message on the home screen saying “Allergen Defender is working”.
-
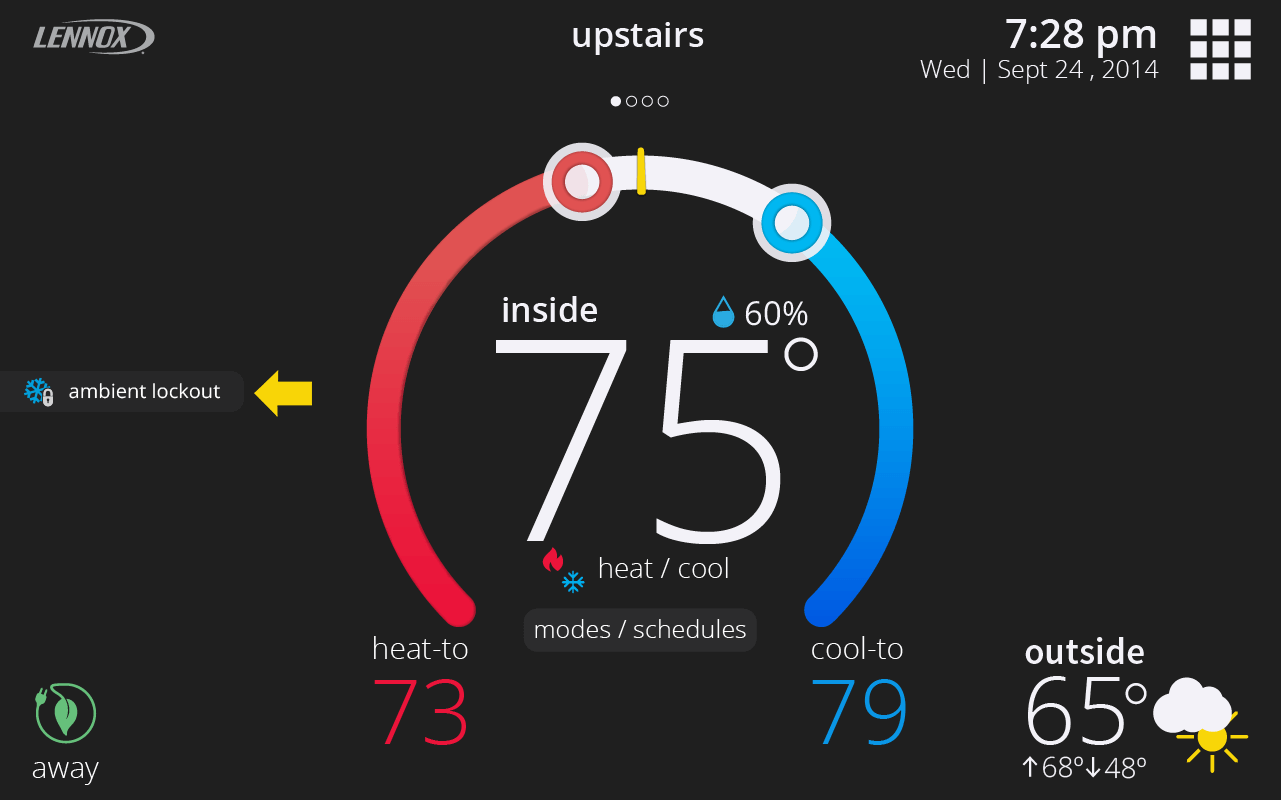
This is an internal safety feature that prevents the unit from running when it detects it is too cold outside to run. When this occurs, you’ll see a status message on the home screen that says “Ambient Lockout”.
-
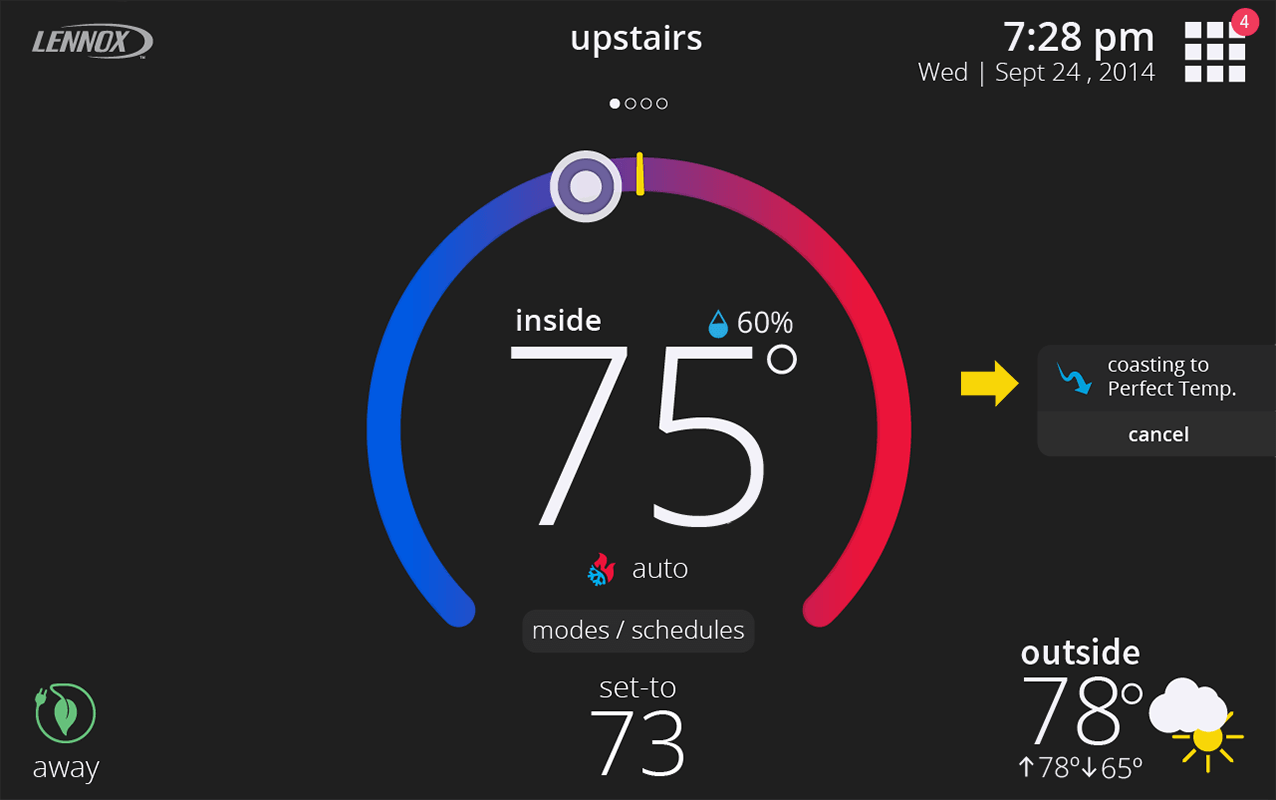
When Perfect Temp. is turned on, coasting allows the current temperature to reach the desired single set-point without the system doing any work based on the current outdoor temperature. When coasting, you’ll see a status message on the home screen, with either a blue down arrow (when current temperature is greater than desired set-point) or an up red arrow (when current temperature is less than desired set-point).
-
Auxiliary heat is electric resistance heat. Under menu > settings > heat & cool, you can turn on auxiliary heat so that you can specify the low and high balance points of when you would like the auxiliary heat to kick-in.
-
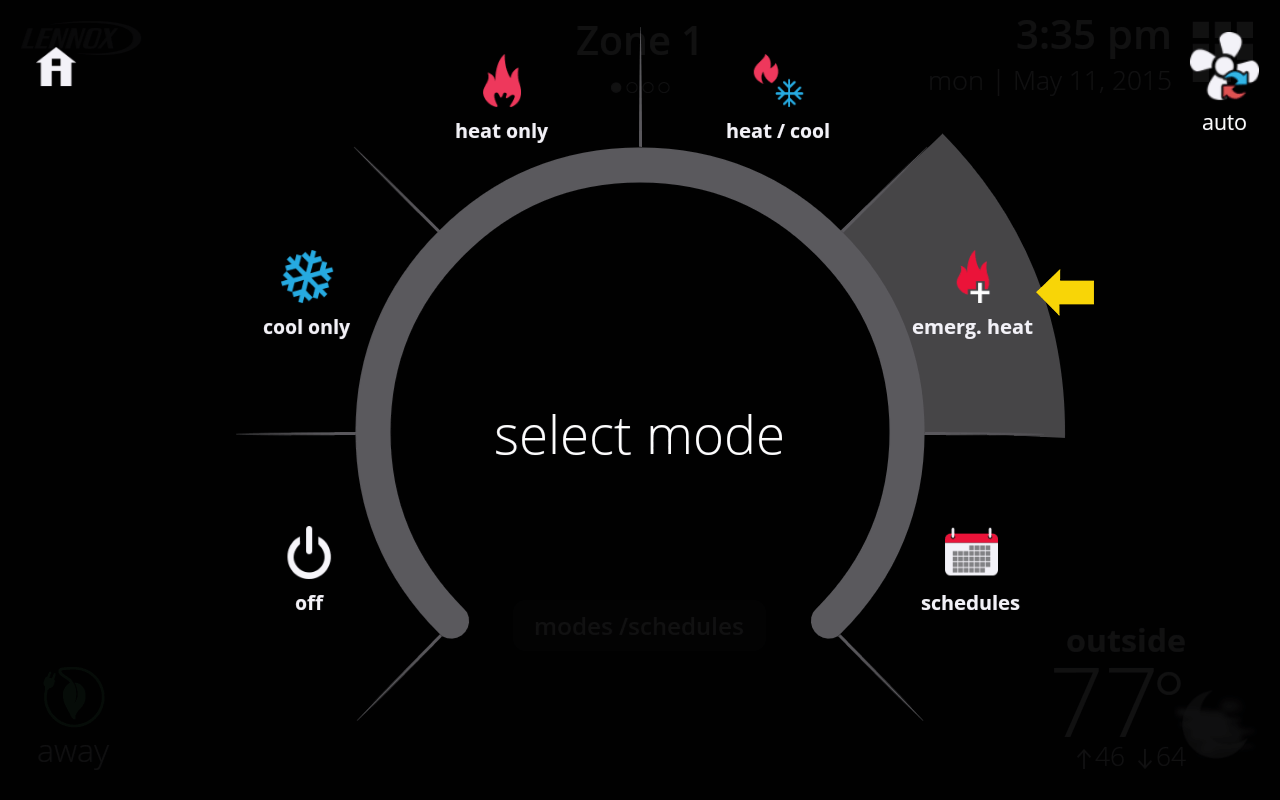
Emergency heat is when you use your supplemental heat (2nd stage) by itself, without the use of your heat pump (1st stage heat). This option is not available for non-heat pump systems.
Auxiliary heat (only on heat pump systems) is when the 1st stage heating equipment cannot keep up with the space heating demand and a 2nd stage call for additional heat is required. With an Air Handler with electrical heat, when 2nd stage runs it will run in conjunction with 1st stage. With Dual fuel when 2nd stage runs, it will turn off 1st stage heating and run only on 2nd stage.
If your AUX lockout temp is 40°F/4.4°C, then auxiliary heat will come on when the outdoor air temperature drops below 40°F/4.4°C. With Heat Pump Balance, you don't have to worry about the AUX lockout temperature. -
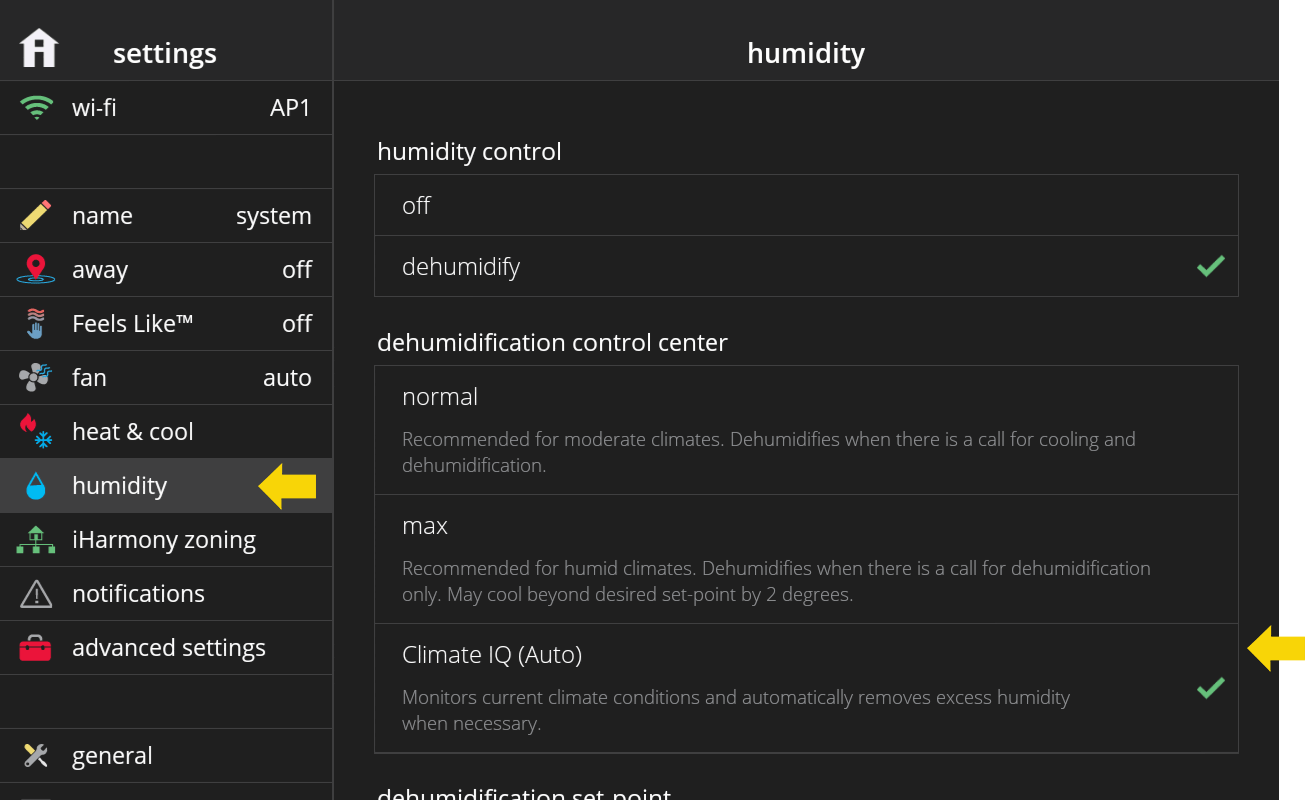
Climate IQ monitors current climate conditions and automatically removes excess humidity when necessary. Climate IQ works with all Lennox outdoor communicating equipment. This includes the: XC/XP25, XC/XP21, XC/XP20, XC/XP18, XC/XP17 units. To find Climate IQ go to settings > humidity > Climate IQ.
-
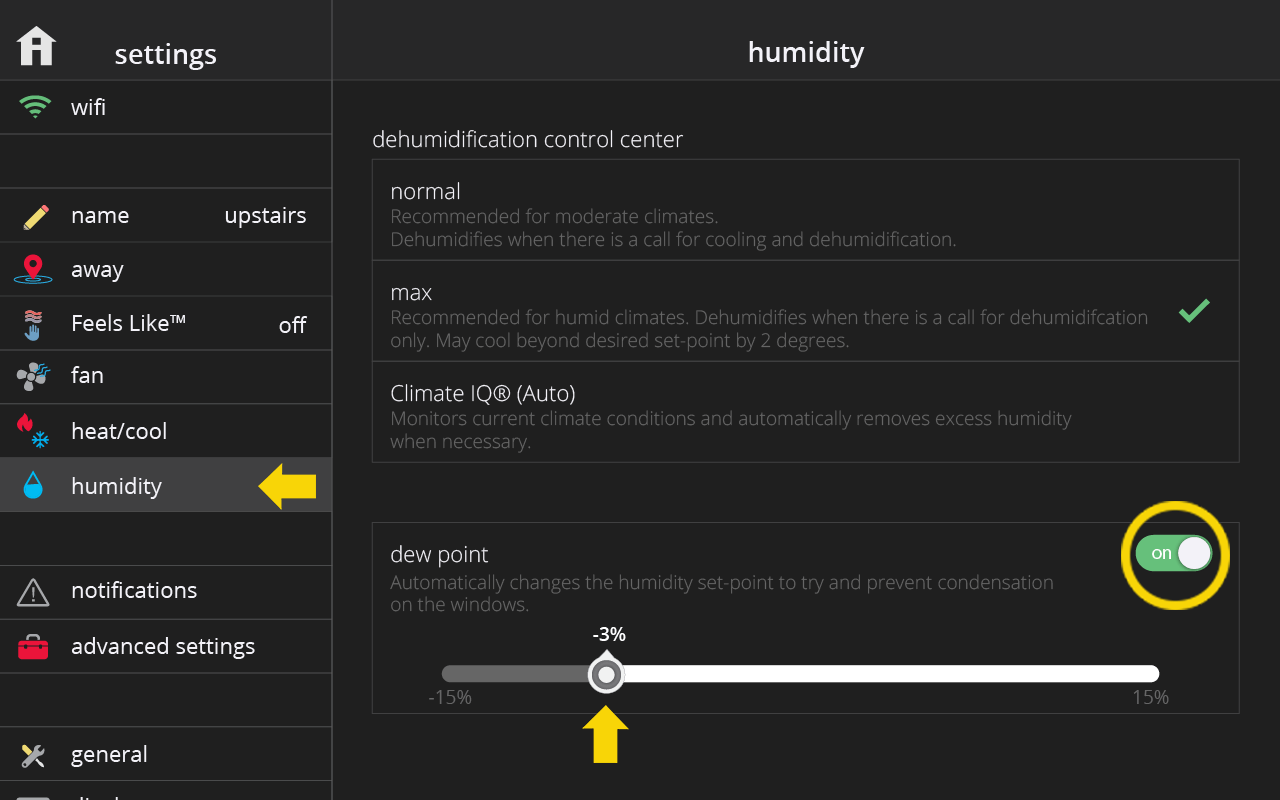
Dew Point is a humidity setting under menu > settings > humidity to automatically change the humidity set-point to try to and prevent condensation on the windows. Dew Point adjustment mode will change the humidification set point based on the outdoor temperature and your user-defined dew point adjustment setting.
-
All heat pumps operating in northern climates (below 35°F) normally need a supplemental heating source. Usually this is in the form of electric heating provided by the indoor unit. Other sources could be gas, oil, or hot-water back-up systems as well. The supplemental heat is also referred to as "second-stage" or "back-up" heating, with "first-stage" being the heat pump only. Emergency heat is when you use your supplemental heat (2nd stage) by itself, without the use of your heat pump (1st stage heat). The Emergency heat option is not available for non-heat pump systems.
If this feature available to you, you can find it and turn it on by going to modes/schedules > emerg. heat.
-
The iHarmony® zoning system allows you to change the temperature throughout the house or change it in specific areas or rooms of the house. To learn more about and purchase iHarmony zoning, go to: http://www.lennox.com/products/comfort-controls/iharmony/
-
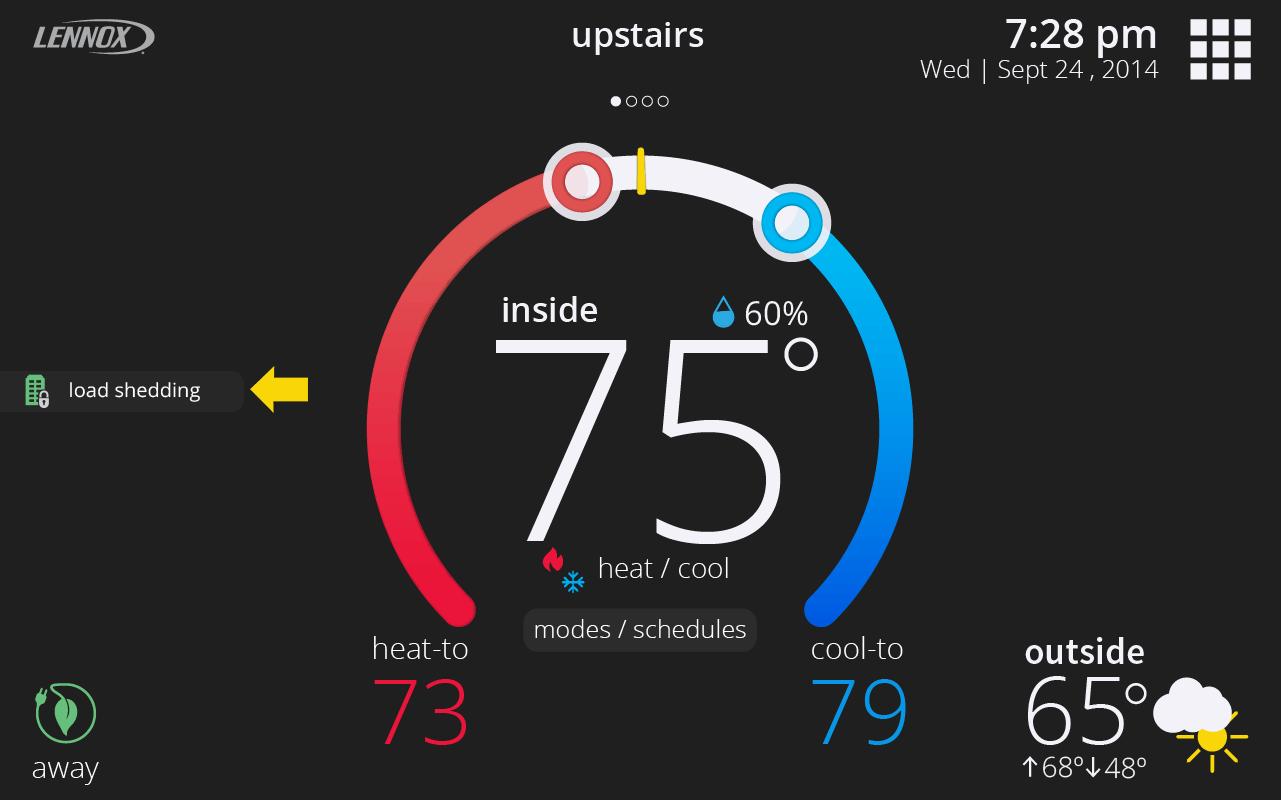
You may see a status message on the thermostat home screen that says “Load Shedding”. This means that your energy company has interrupted or is affecting the supply of electricity in your area or home to reduce the demand on the power grid. The duration of load shedding depends on your region, your energy company and your service contract.
-
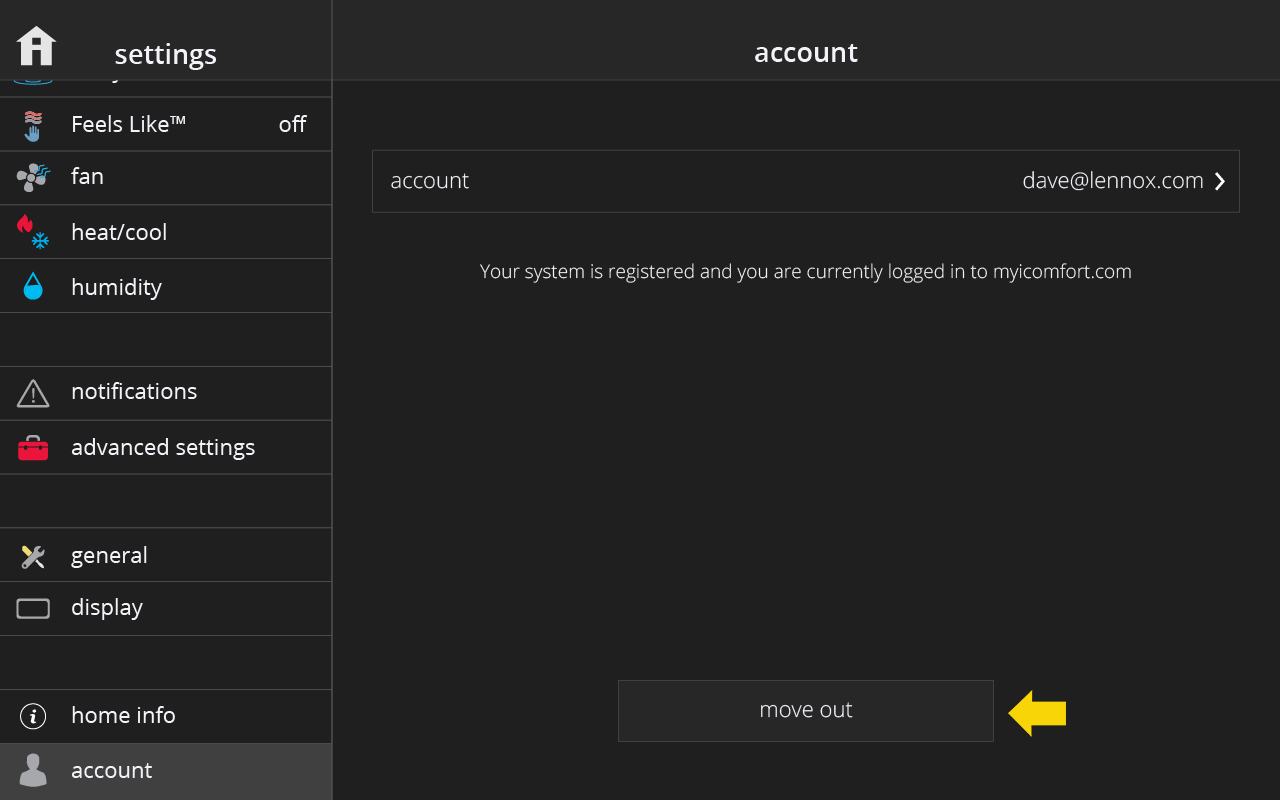
When you’re moving out of your home, you can remove the iComfort® S30 thermostat(s) in your home from your account and sign-out of the thermostat all at once with the move out button under menu > settings > account. If you’re the new homeowner, you can still “Move Out” the old homeowner so that you can create your own iComfort® S30 account. Having an iComfort® S30 account allows you to control your thermostat remotely from the web portal and Lennox Home App and it also allows you to utilize other advanced features of your iComfort® S30 Smart Thermostat such as Smart Away and Schedule IQ.
-
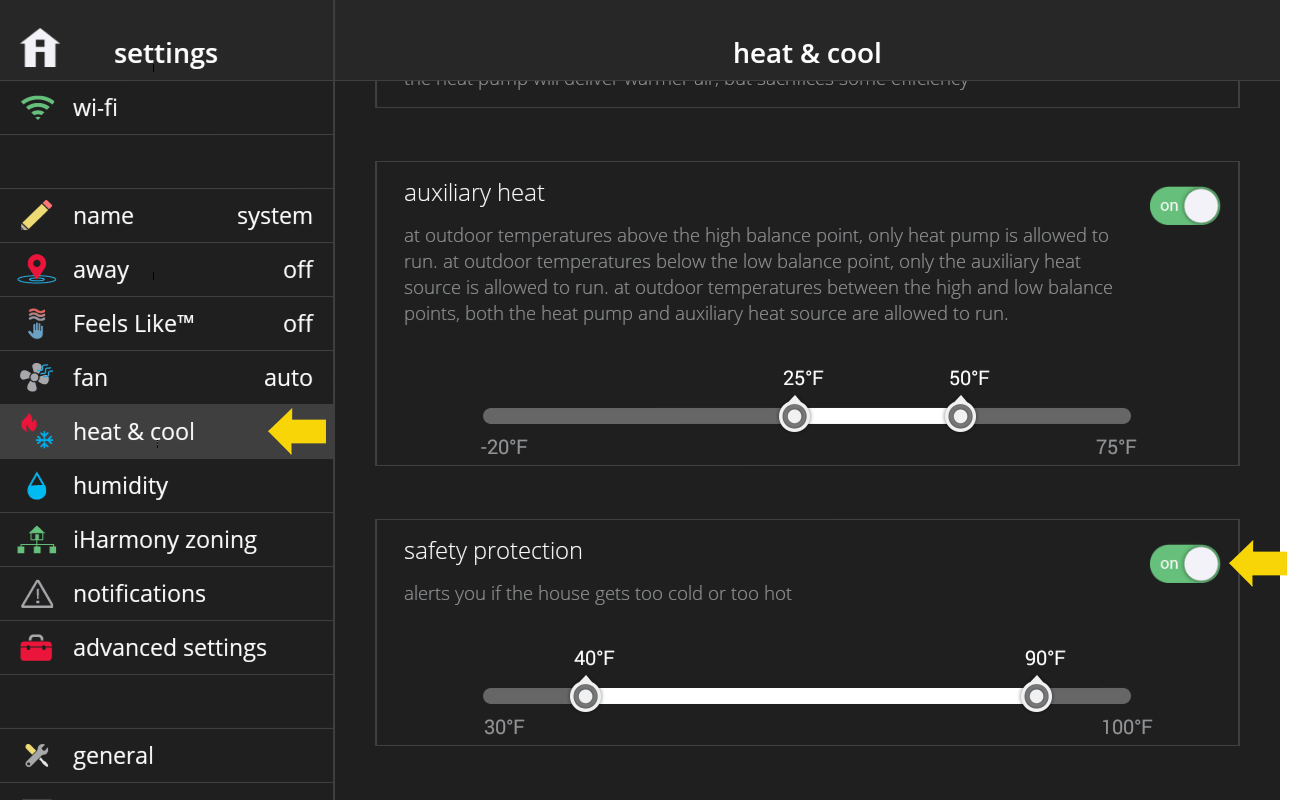
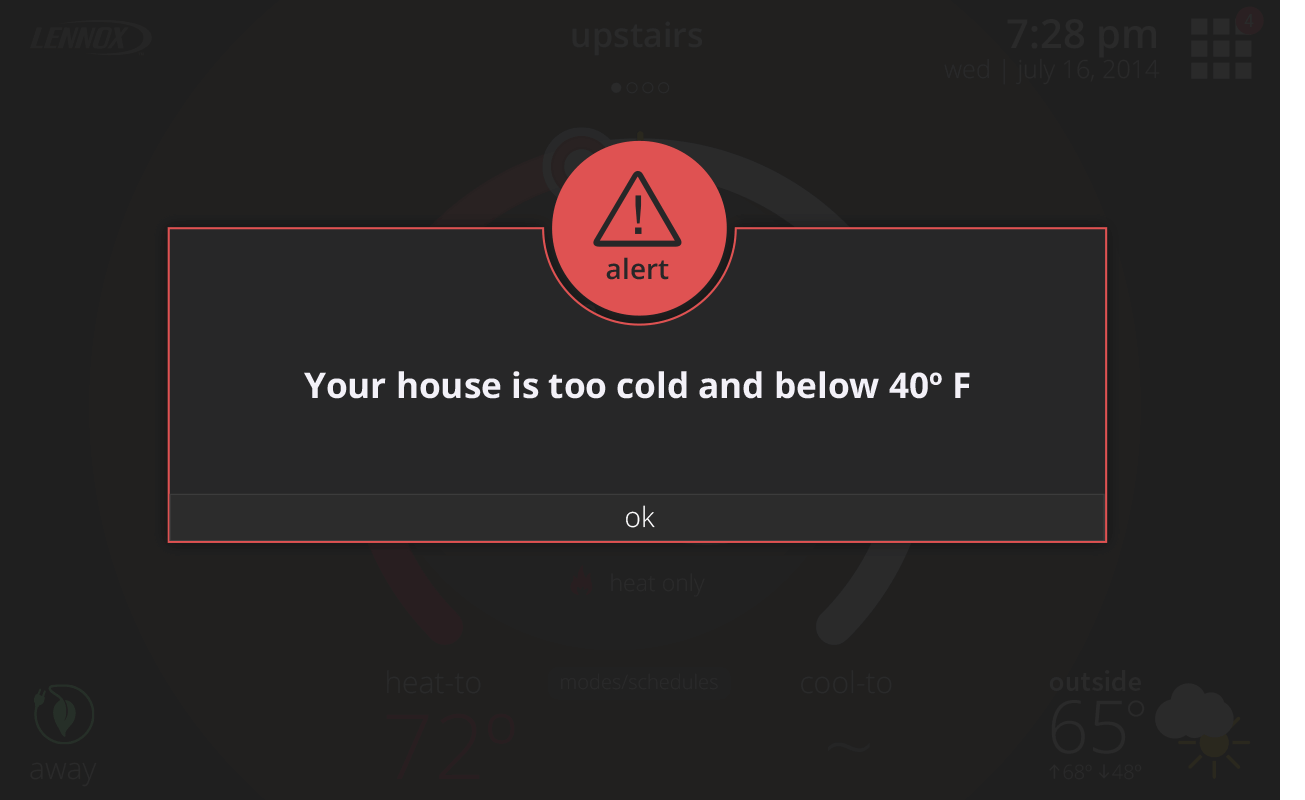
iComfort® S30 alerts you if the house gets too cold or too hot, so you have a chance to do something about it. You can set the minimum and maximum temperatures the house must reach for you to get notified under menu > settings > heat & cool > safety protection.
-
Yes, just make sure to turn on the safety protection feature under menu > settings > heat & cool.

-
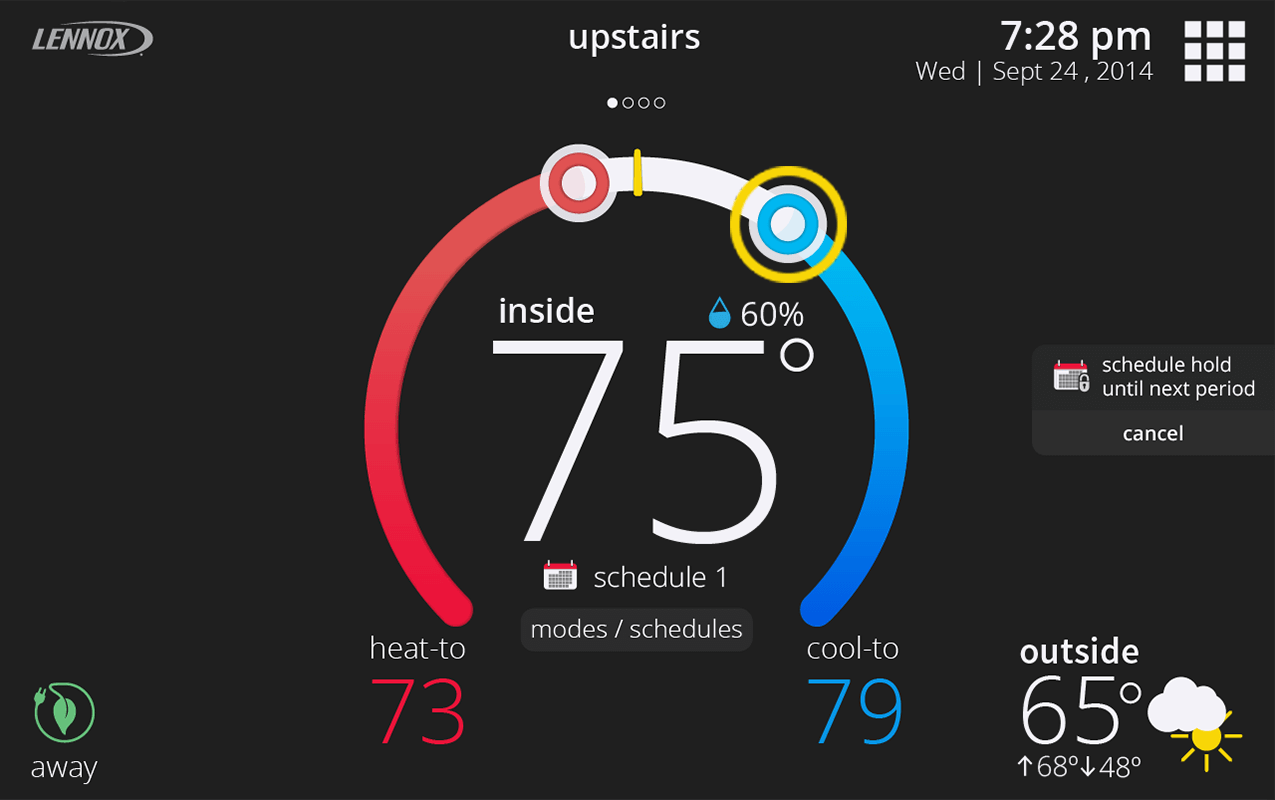
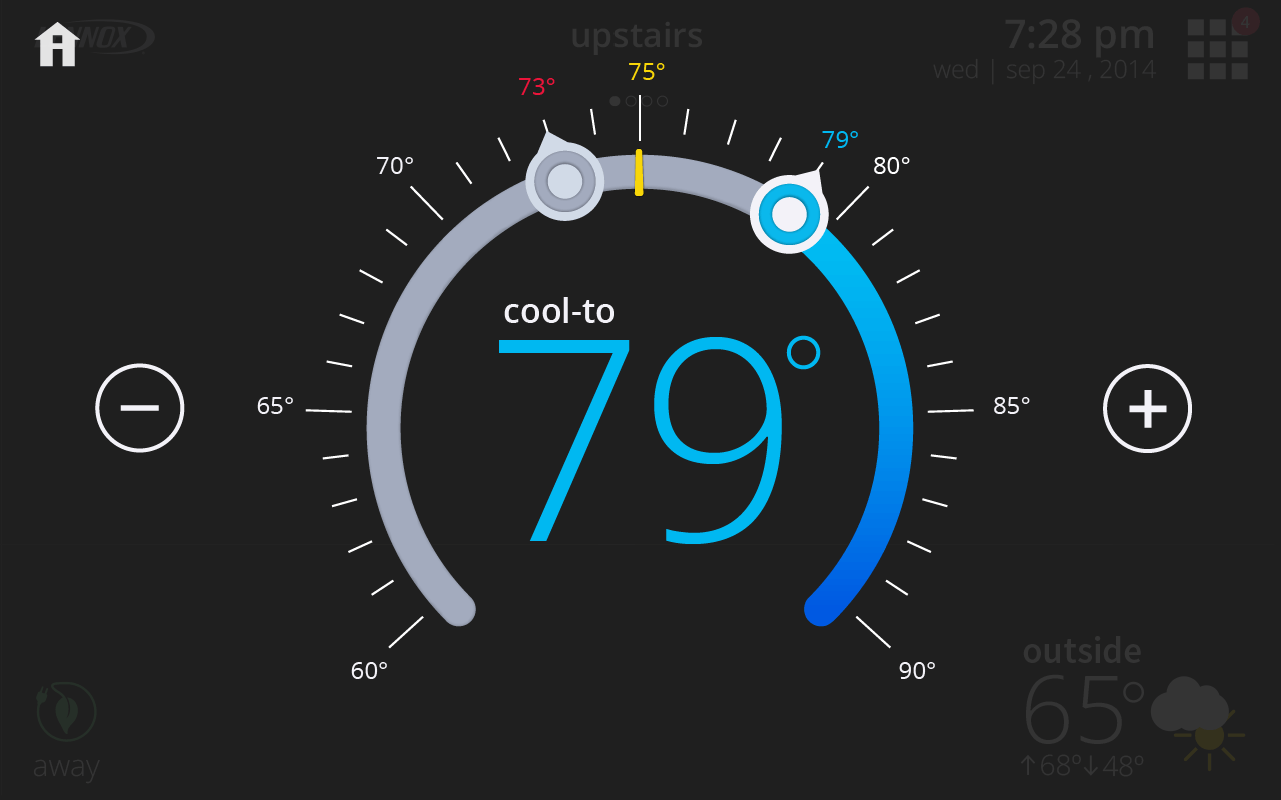
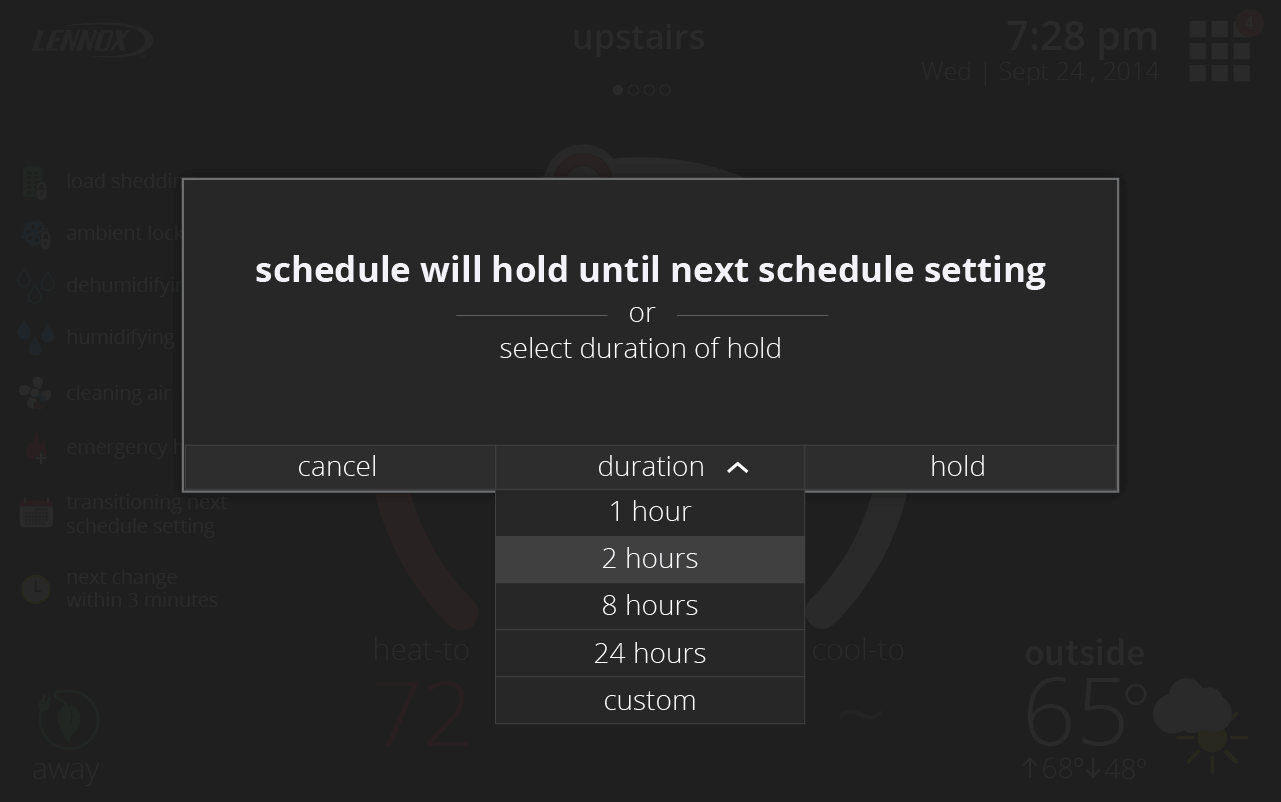
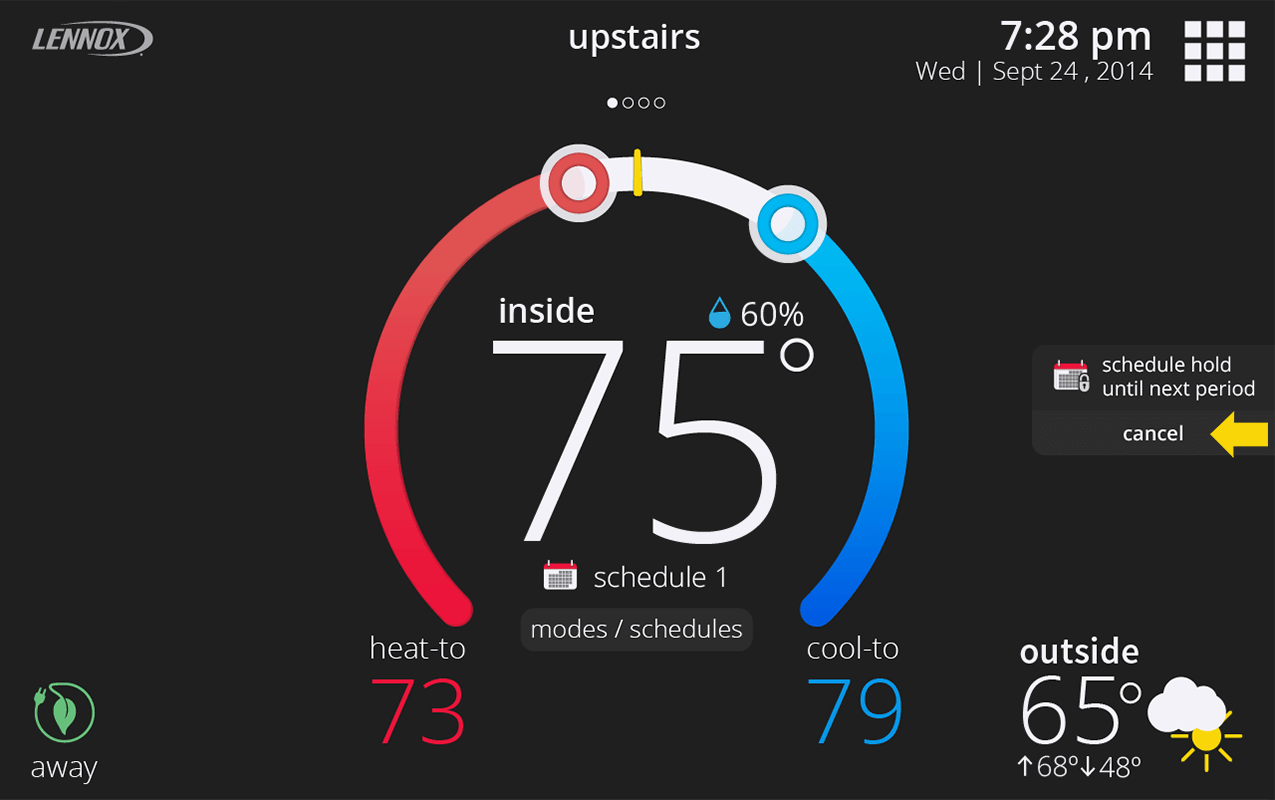
When a schedule is selected, the home screen indicates which schedule is running. In this mode, changing a temperature set-point by pressing on a knob or set point below will cause you to overwrite the current schedule settings. Therefore, a prompt dialog will appear asking you for how long to overwrite the schedule. You can select 1 hour, 2 hours, 8 hours, 24 hours or a Custom option. If you select Custom, a time/date appears and you have the option of setting the hold for any length of time. After a hold is set, the dialog disappears and a “Schedule Hold” status message will appear on the home screen along with a cancel option should you choose to revert back to the schedule.
-
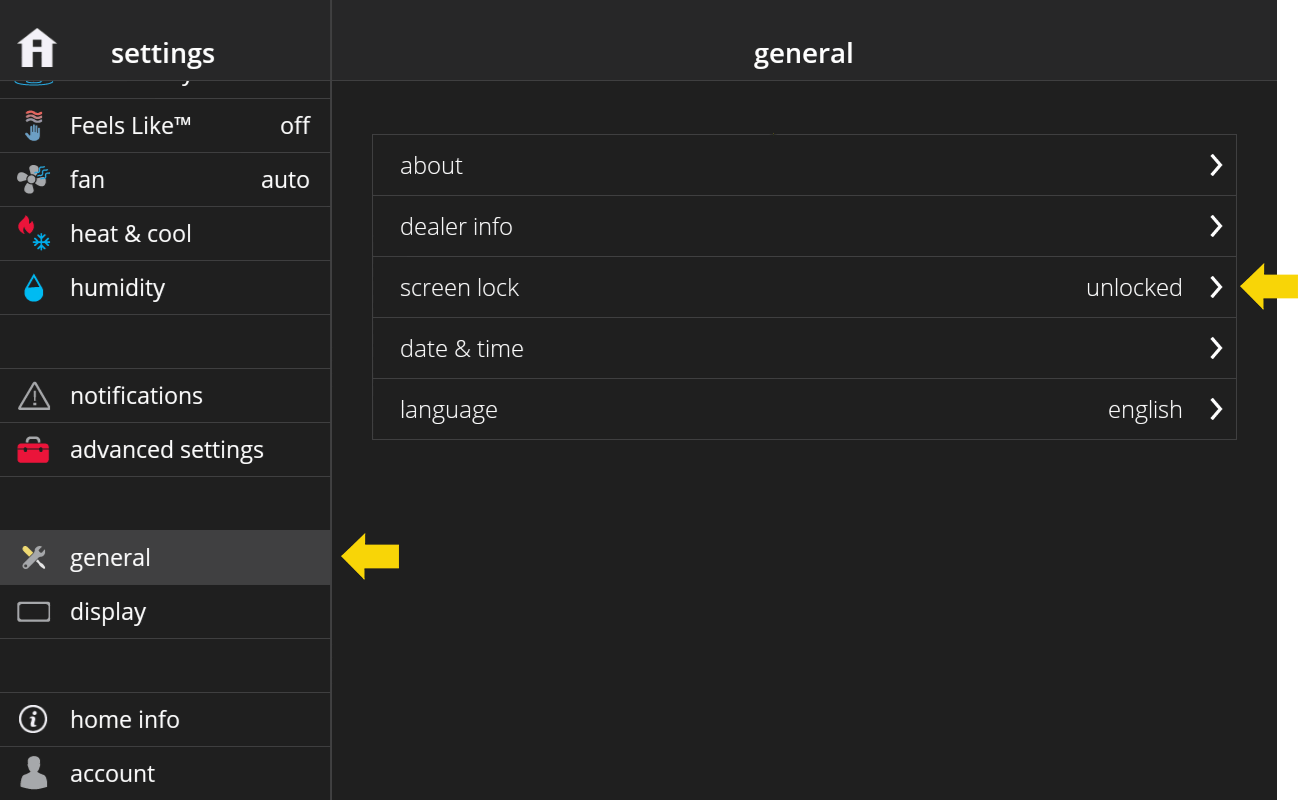
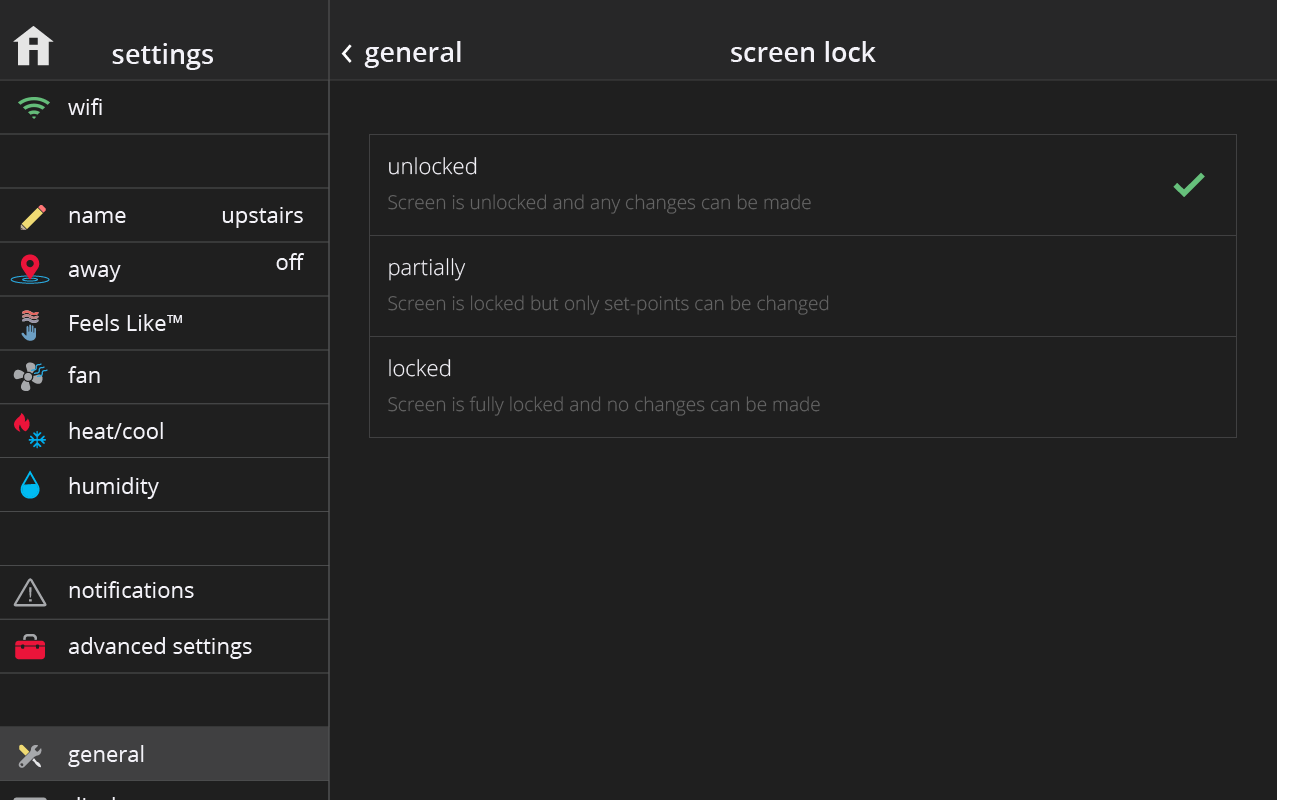
The screen lock feature of the iComfort® S30 located under menu > settings > display may help you with this. The options are: Unlocked (default), Partially Locked (where you can allow others to only adjust the set-points but nothing else) and Locked (where no changes can be made and the thermostat is in display only mode). When the thermostat screen is locked, the lock icon appears on the home screen. To unlock it, press and hold the lock icon
Partially
Locked
-
You can add a new iComfort® S30 Smart Thermostat to your account by simply logging into the new thermostat with your existing account. Alternatively, you can add your new iComfort® S30 Smart Thermostat to your account by using the web portal or Lennox Home App, by entering a pin you generate on the thermostat.
To generate the pin, go to your thermostat, then go to settings > account and at the bottom of the page press the "Generate Pin" button. You’ll be given a number that is unique for a one-time use.
When you enter the pin on the web portal or Lennox Home App, you’ll be automatically signed-in on your thermostat.
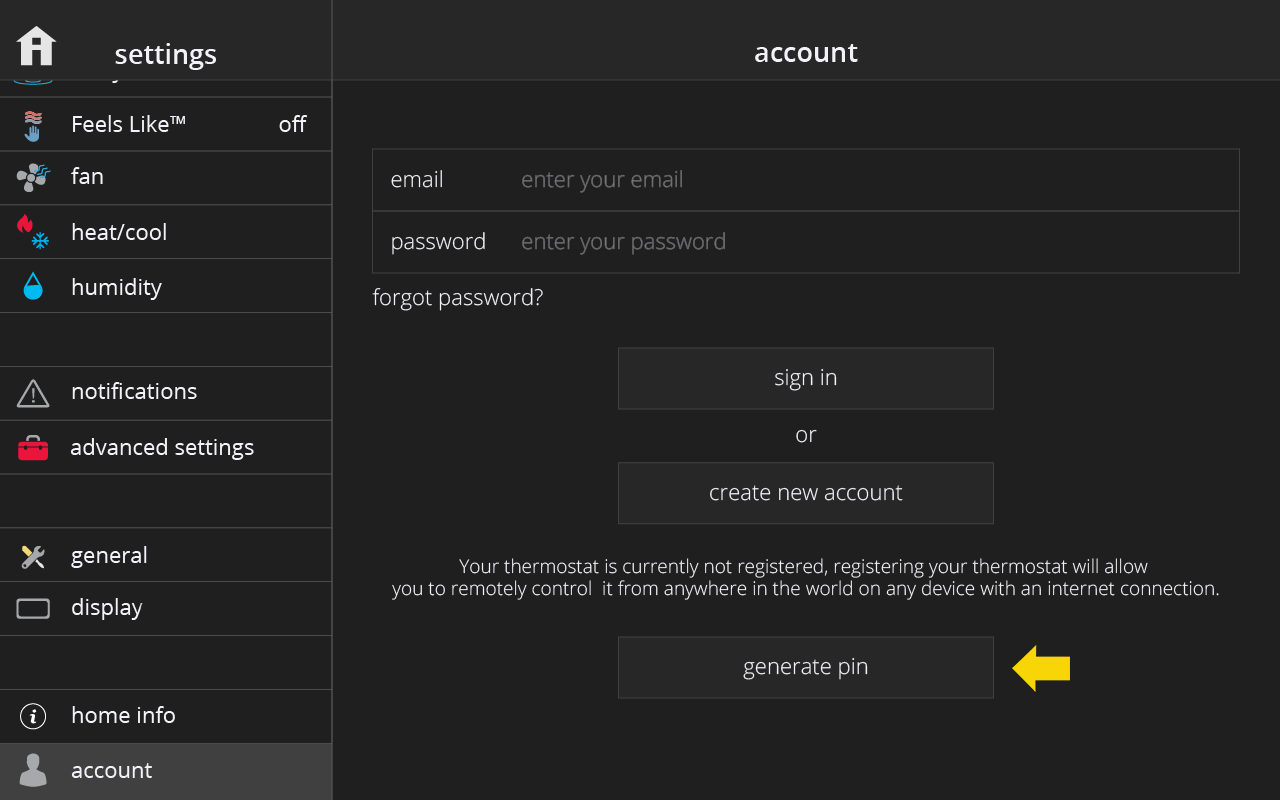
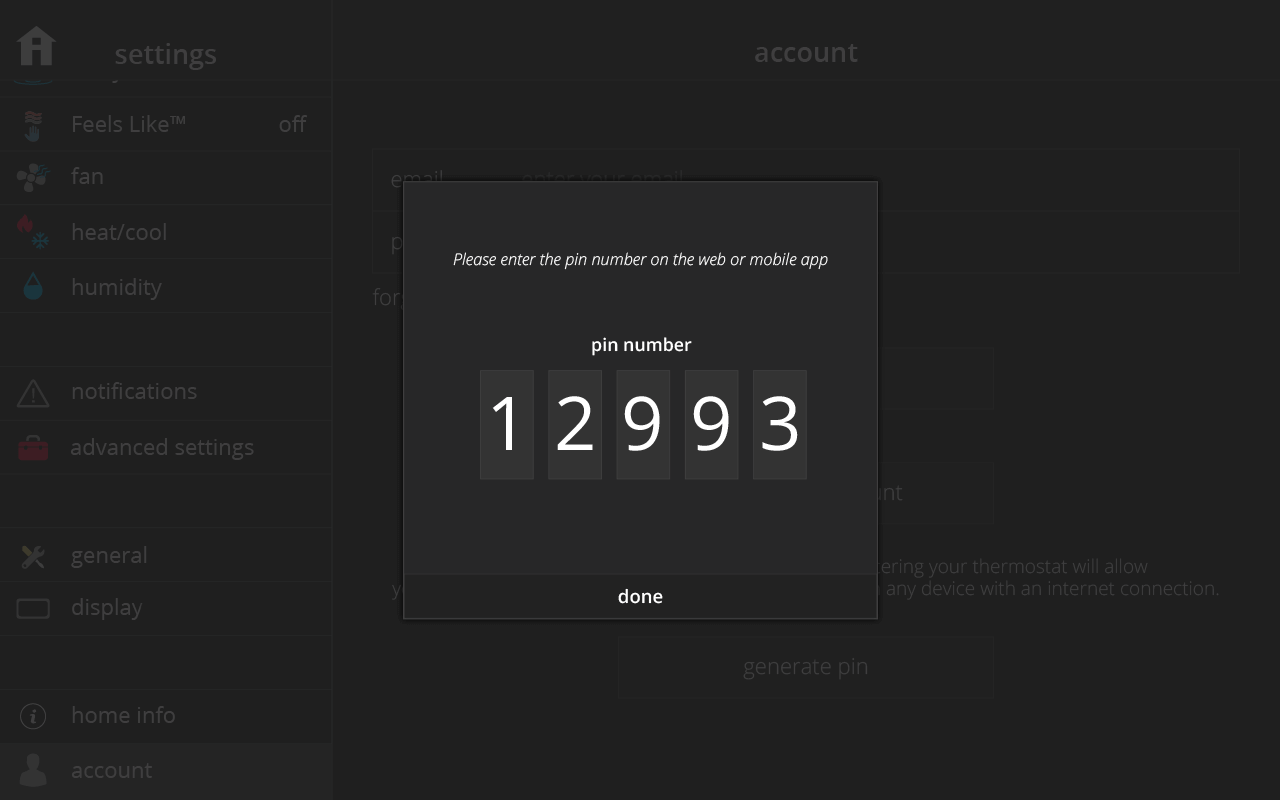
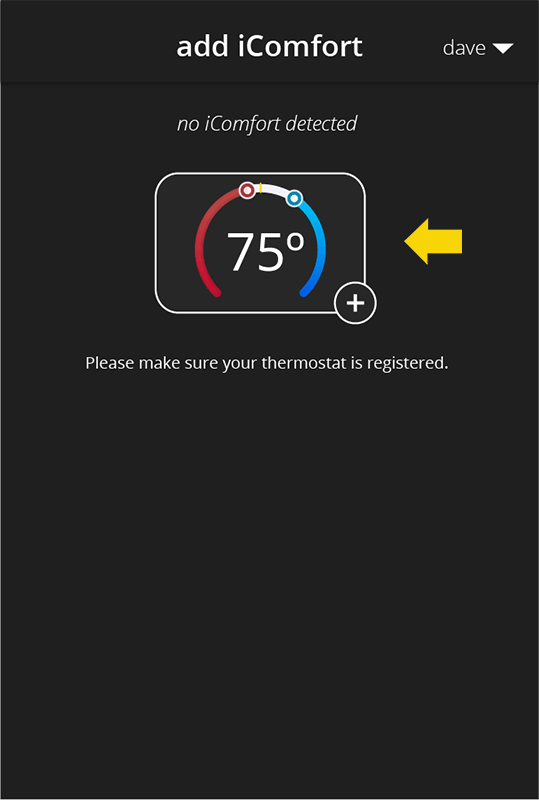
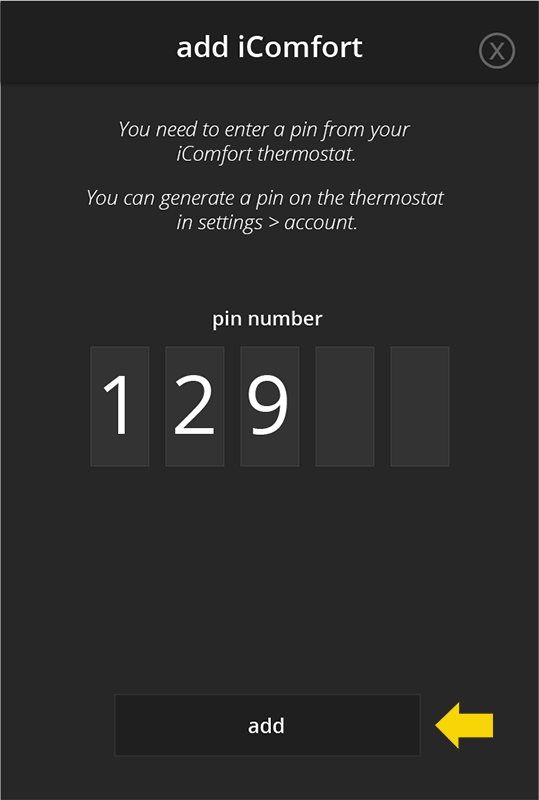
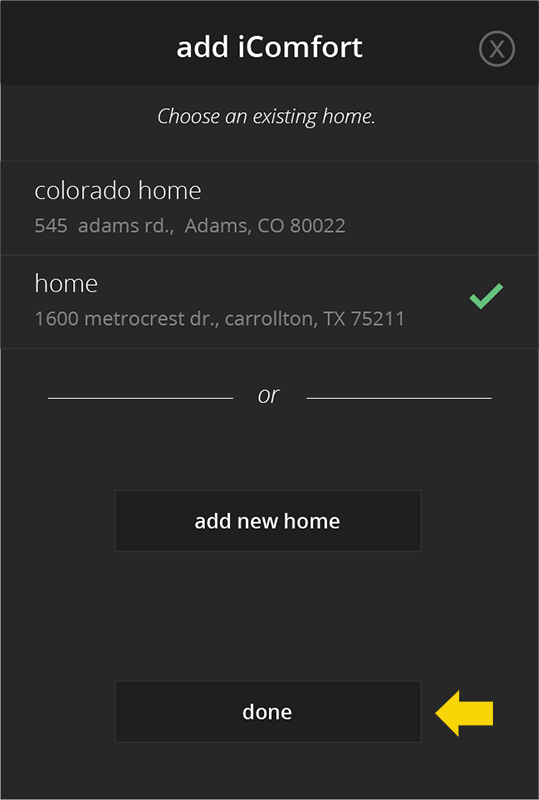
Steps to entering the pin on a mobile platform:
1. Press the thermostat icon with “+” button and your will enter the "Add iComfort®" screen.
2. Enter the pin generated on the thermostat and then tap the "Add" button.
3. Lastly, choose an existing home if you already have one or tap the "Add New Home" to enter a new home.
-
Yes, by default, iComfort® reminds you when it is time to replace the filter, humidifier pad, UV bulb, or when it is time for maintenance. Your dealer configured these reminders for you during installation, but you can always modify the reminder settings for how often you want to be reminded under menu > settings > notifications in the reminders section.
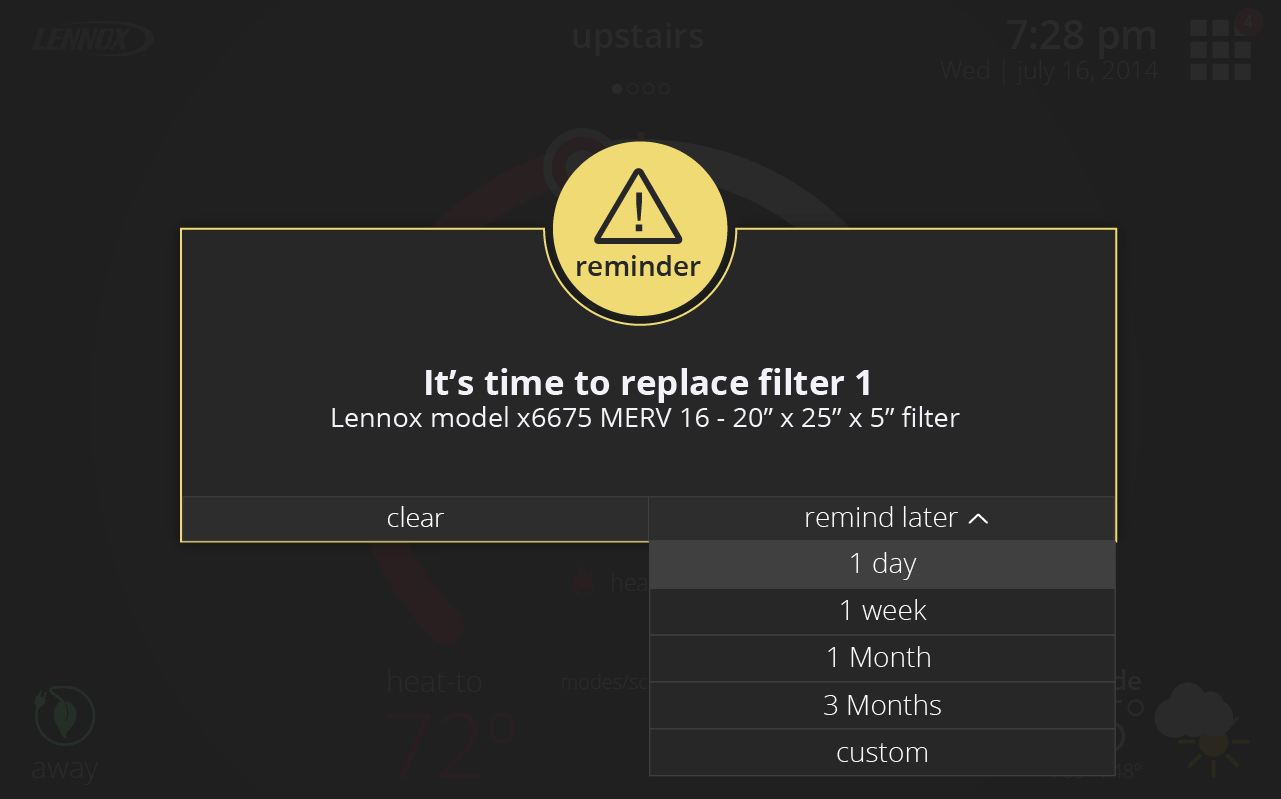
Here is an example of how you receive a reminder. You can choose to be reminded later if you have not yet changed your filter, for example.
-
Your thermostat maintains comfort by automatically adjusting how hard your HVAC system works and for how long it operates. Your monthly summary report displays the average demand for each component in your system.
Demand is a number from 0 – 100%, where 100% is the maximum heating or cooling your system can provide. For example, a system running at 50% cooling demand is delivering half of its maximum cooling capacity. Demand provides better insight than runtime alone because it factors in what level of heating or cooling the system was operating. This is important for multistage and variable capacity systems that use multiple levels of heating or cooling. Using lower levels of heating or cooling can result in longer runtimes, but it is more efficient. ? Heating demand can usually increase as the outdoor temperature drops. As you transition from fall into winter, you will typically see your heating demand increase. Similarly, in the spring heating demand will typically decrease as the weather warms up. Your report includes the average outdoor temperature for each month, enabling you to compare your change in heating demand to the change in temperature.
Cooling demand will typically increase as the outdoor temperature increases. Cooling demand will usually be the highest in the peak of Summer and drop off as temperatures decrease.
Single Stage
Single stage systems have only one operating capacity, on at 100%. Therefore the thermostat simply adjusts demand by changing runtime.
Two Stage
Two stage systems have two operating stages. The thermostat will first attempt to maintain comfort by operating only the lower stage. When the system cannot maintain comfort with the lower stage, it will begin to operate the higher stage.
Variable Capacity
Variable capacity systems continuously adjust the heating or cooling capacity from its minimum to its maximum capacity. The thermostat will maintain comfort by continuously adjusting the capacity of the system.
Electric Heat and Fan Demand calculations always assumes 100% capacity when on. -
Smart Alert monitors the following:
- Thermostat set-point setting
- Temperature reading
- Whether the temperature is going away from set-point or toward the set-point (system unable to keep up with demand)
- Local climatological design temperatures
- System run times
Let's say you are in Dallas, Texas. It is insanely hot. The typical hottest day of the year is 104. But today it is 110 degrees out. The system is working as hard as it can, but it just can't seem to cool the house down to the desired set point of 70 degrees.
In this situation, a Smart Alert will not be triggered. The system takes into your zip code, the current weather conditions and compares that versus the historical hottest day of the year. If the current outdoor temp is close to or exceeds the historical hottest day of the year, the alarm will be suppressed.
Why does it operate it this way?
Systems that are slightly under sized may not be able to keep up on these extreme days and would generate an alarm even when nothing is wrong. This SMART feature would eliminate the false alarm and help prevent the nuisance call on the hottest day of the year.
If you look at another example, where it is only 85 and the system is working as hard as it can, but can't keep up. Then a Smart Alert will be triggered.
Please keep in mind that this feature is not available with iHarmony zoning systems.
- Thermostat set-point setting
-
The performance report display on-demand performance data from your iComfort® S30 system for the last 10 days. It is divided into 3 sections:
1. The all-in-one graph
2. The table below
3. The hide/show panel on the right
The graph displays the variables that are turned on in the hide/show panel. The table below the graph displays the details for the day/hour selected in the graph. In order to customize the data that you see, you can:
1. Select day or hour at the top
2. Choose which variables to display on the graph by turning them on/off on the hide/show panel
3. Move the knob to view a specific day / hour
The temperature and humidity values represent the average for the day / hour. When hour is selected, the system mode and fan mode are those at the beginning of the hour. If the hide/show panel is not displaying in your web browser view, you are instead getting the menu button on the top right. If you tap on it, the hide/show panel will display. This is because your window size is not wide enough.
What variables can I turn on/off in the hide/show panel?
The variables you can control depend on the equipment that you have installed and the current operation of your system. For example, only customers that have electric heat will see electric demand as a variable. Here is a list of all the possible variables for an iComfort® S30 system:
If the system is having issues obtaining data for a variable, it is not displayed on the graph, and instead it shows in this panel with a warning icon.
Please refer to the related questions below for the meaning of "demand" and "runtime".
Video URL: https://youtu.be/ss2ZdDUKGy4 -
The monthly performance report contains a summary of how hard the system worked (runtime and demand) for the past month and compares it to the previous month. Please refer to the related questions below for the meaning of runtime and percent demand. The report also contains other helpful information such as how much time your system spent on away mode, your home's average indoor temp., the average outdoor temperature for your zip code, and when your next filter replacement is due.
-
-
-
When the thermostat screen is locked, the lock icon appears on the home screen. To unlock the screen, just press and hold the lock icon
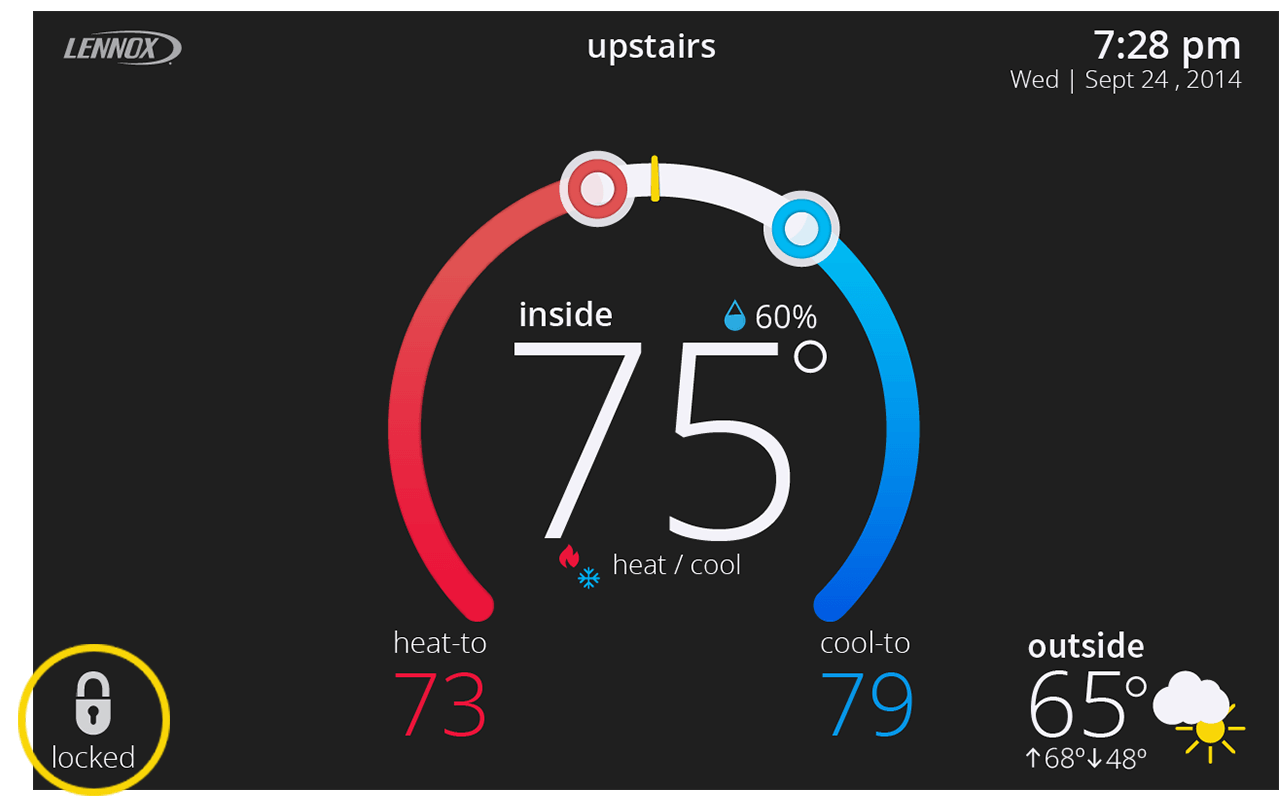
Once your screen is unlocked, everything should return to normal and allow you to change set-points, mode, etc.
2: Tap Edit Schedule button on the Select modes screen -
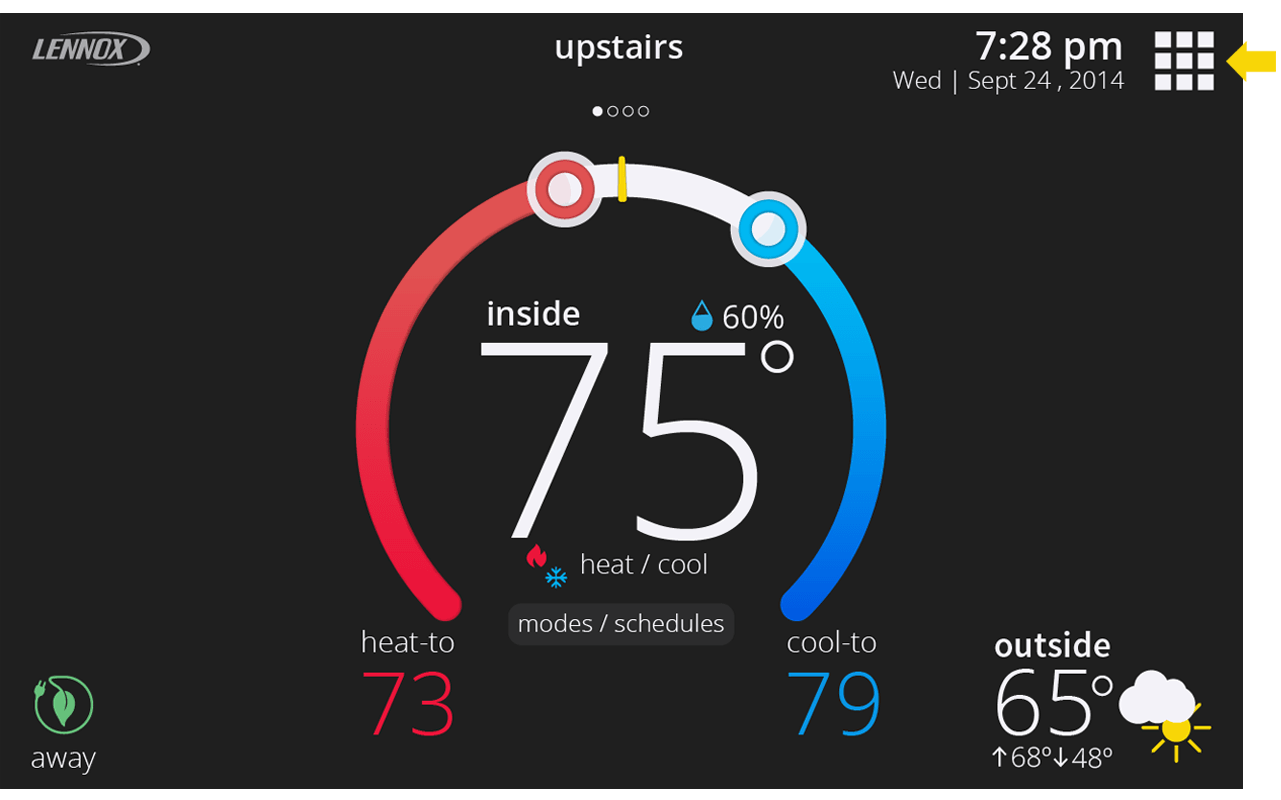
If your system is in Away Mode, the menu button and settings are not accessible.
Home Screen (normal view with menu button)
Home Screen (in Away without menu button)
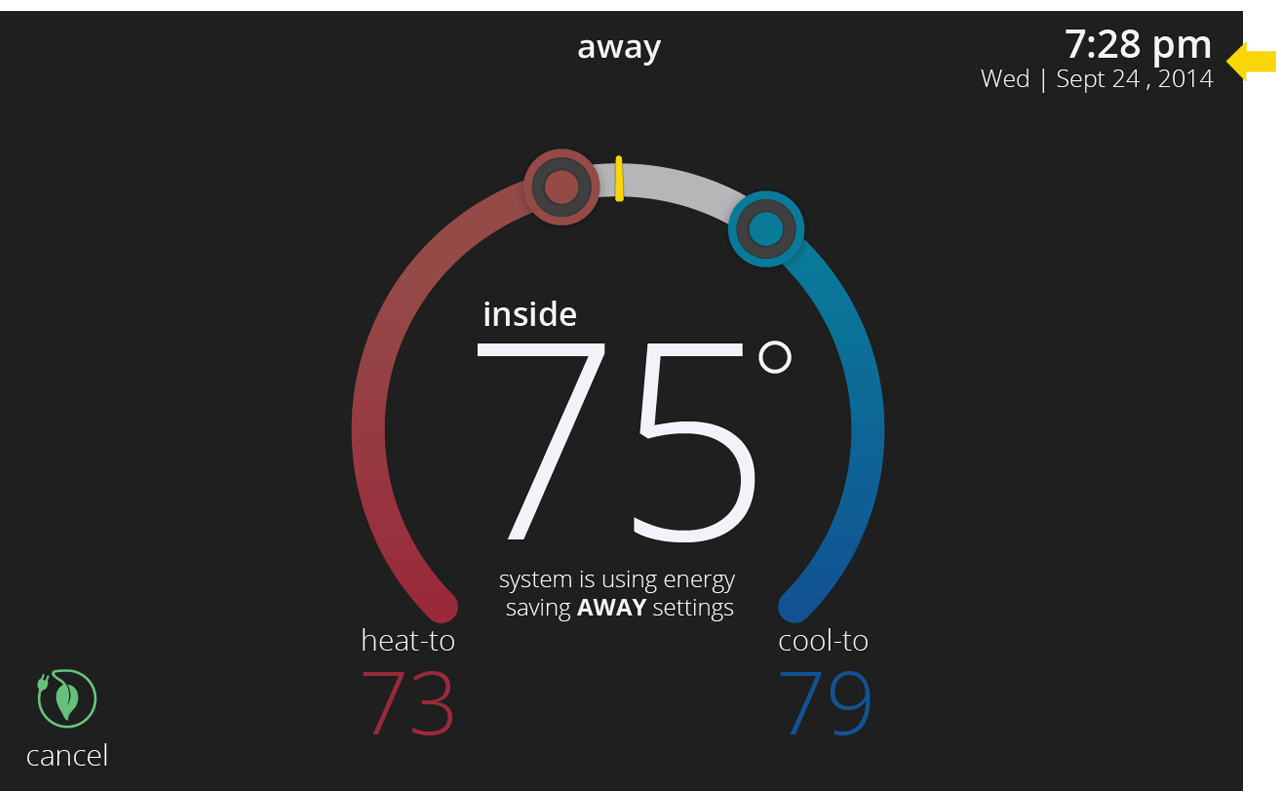
To exit Away mode, tap on the “cancel” button in the bottom left corner of the screen. -
Settings are applied to an individual system. When you go to menu > settings, you’re viewing and changing the settings for that one system. You may have more than one system in your home, such as one for upstairs and one for downstairs. If so, you may need to change a particular setting for each system. These settings will then apply to all zones within that system.
-
You may notice that the fan button is disabled or grayed out in the select modes screen (screen 1). This is because Perfect Temp. is turned on. If you tap on the disabled fan icon, you’ll see a pop-up describing why (screen 2).
(screen 1)
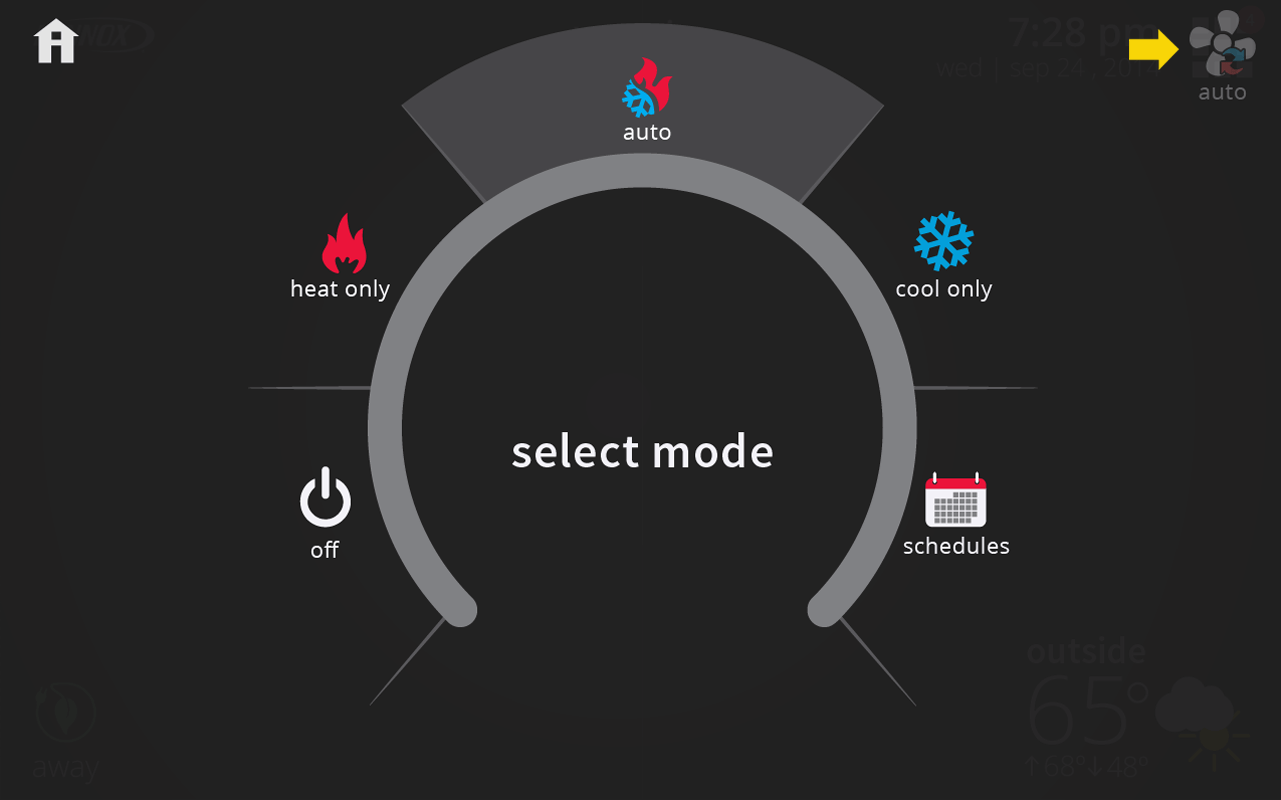
(screen 2)
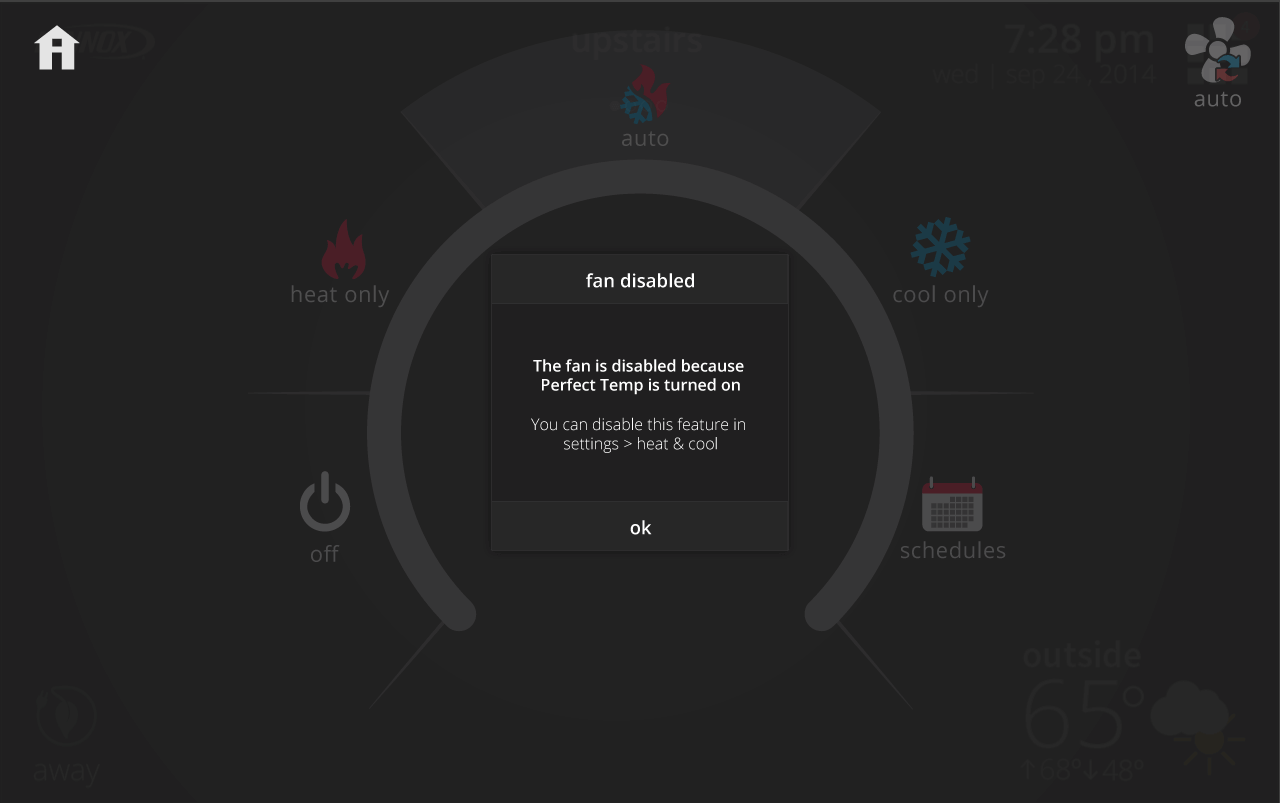
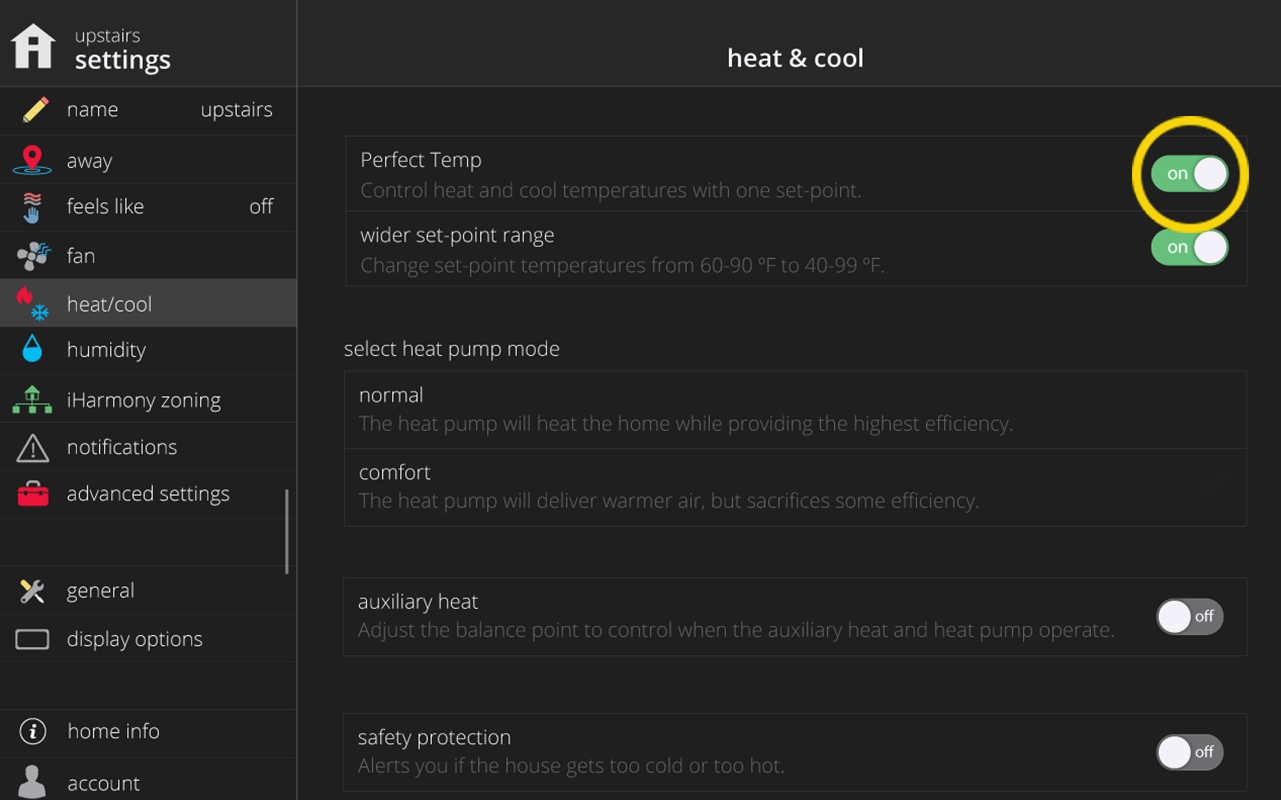
To re-enable the fan button, please go to settings > heat & cool > and turn off Perfect Temp.
-
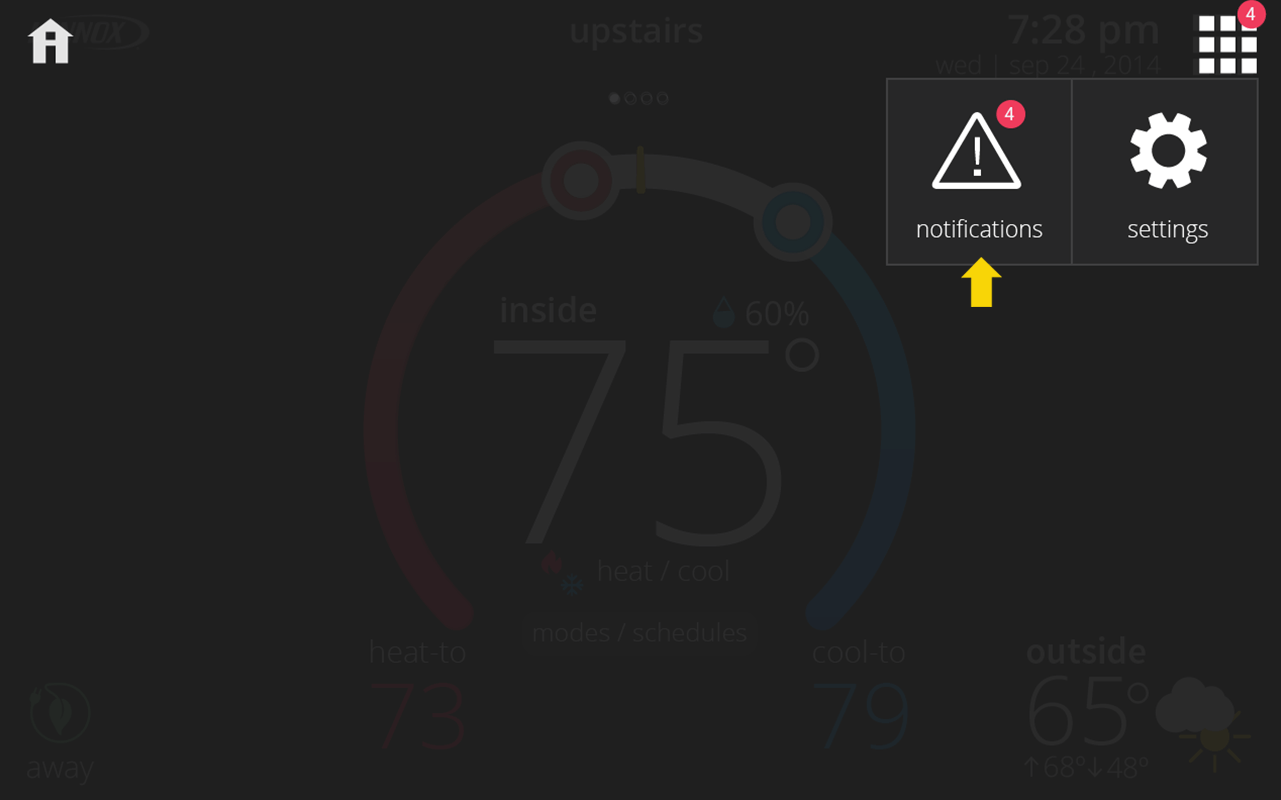
The most basic step towards troubleshooting your system is to check for alerts or warnings that are currently active. Tap the menu button, and then select the notifications button to view them
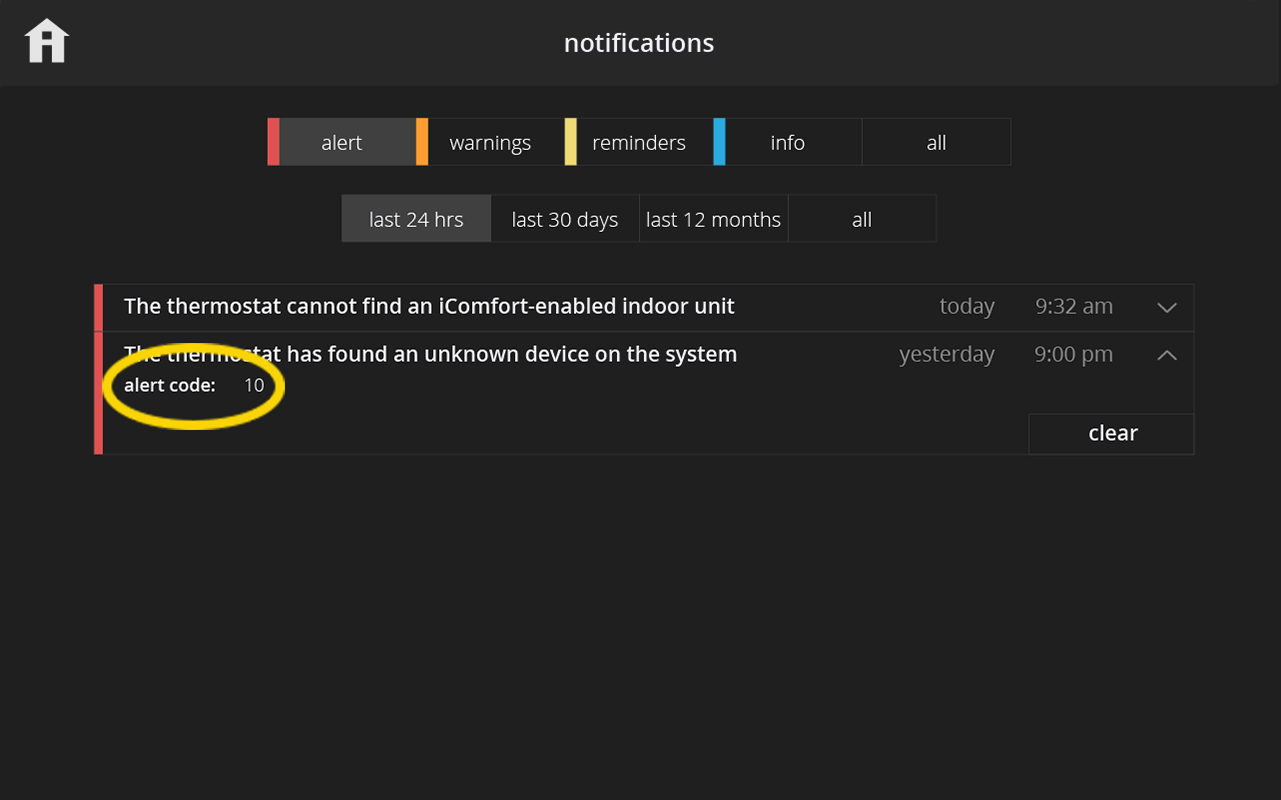
Notifications are color coded to indicate their importance, with red being most critical, followed by orange and so on. After selecting the notification, write down the alert or warning code. You can check what it means here: What does this alert or notification mean?
If needed, you can contact your dealer (menu > settings > general > dealer info) or Lennox (at 1-800-9-LENNOX) to get any issue resolved as soon as possible. -
Here are the different types of alerts and what they mean:
- Service Urgent - An alert that notifies you that your HVAC system is in a no heat, no cool or no ventilation status. As a result, your system is not heating or cooling your home. These alerts require service by a licensed HVAC Contractor within 24 hours to fix the issue.
- Service Soon - An alert that notifies you that your HVAC system is in a partial heat, partial cool or partial ventilation status. As a result, your system is still heating or cooling your home. However, it is not running properly and could mean that your system is not meeting the temperature set point or your desired level of comfort. These alerts require service by a licensed HVAC Contractor within 24 - 48 hours to fix the issue.
- Maintenance - A notification your HVAC Contractor sets in your thermostat for planned maintenance or service intervals. These notifications can be for replacing a filter or UV bulb, for a 'tune–up’ or for cleaning a piece of your HVAC system.
-
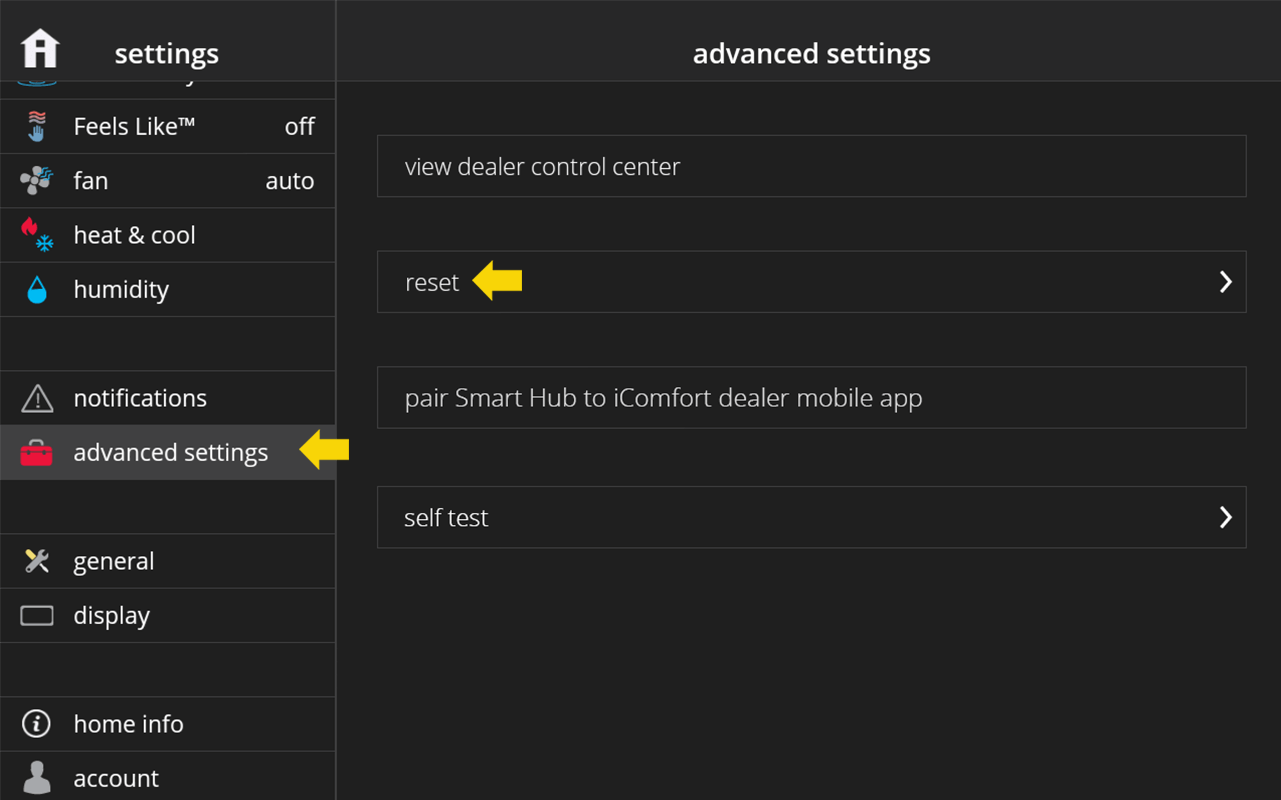
1. In the thermostat, go to menu > settings > advanced settings, and press the reset button.
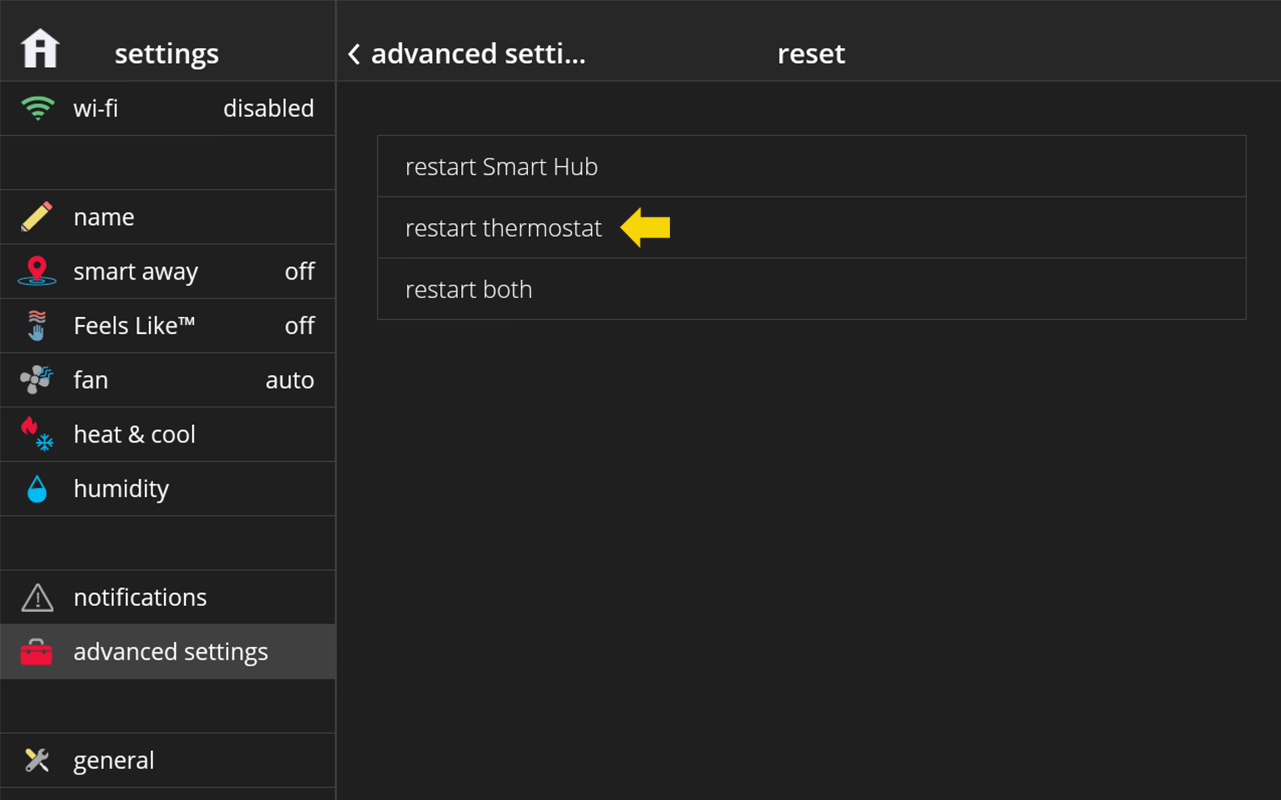
2. Press the “Restart Thermostat” button.
-
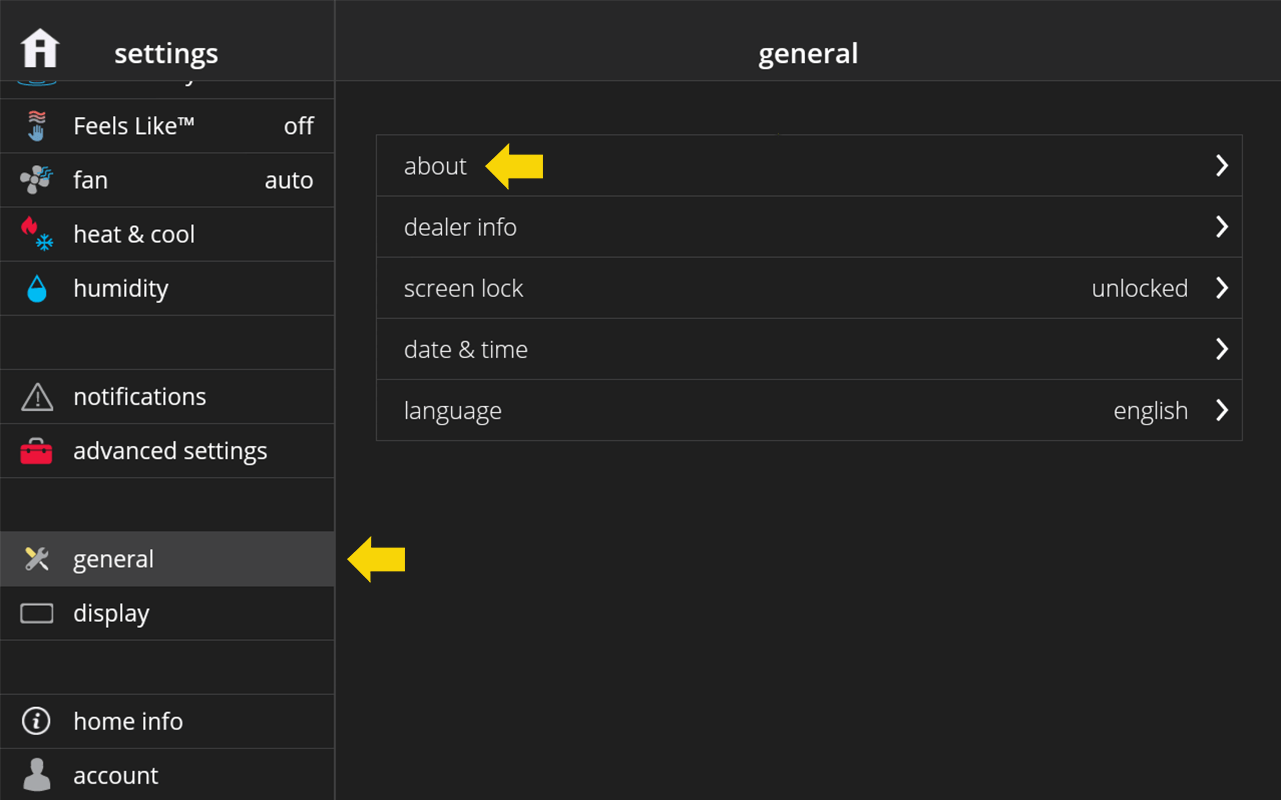
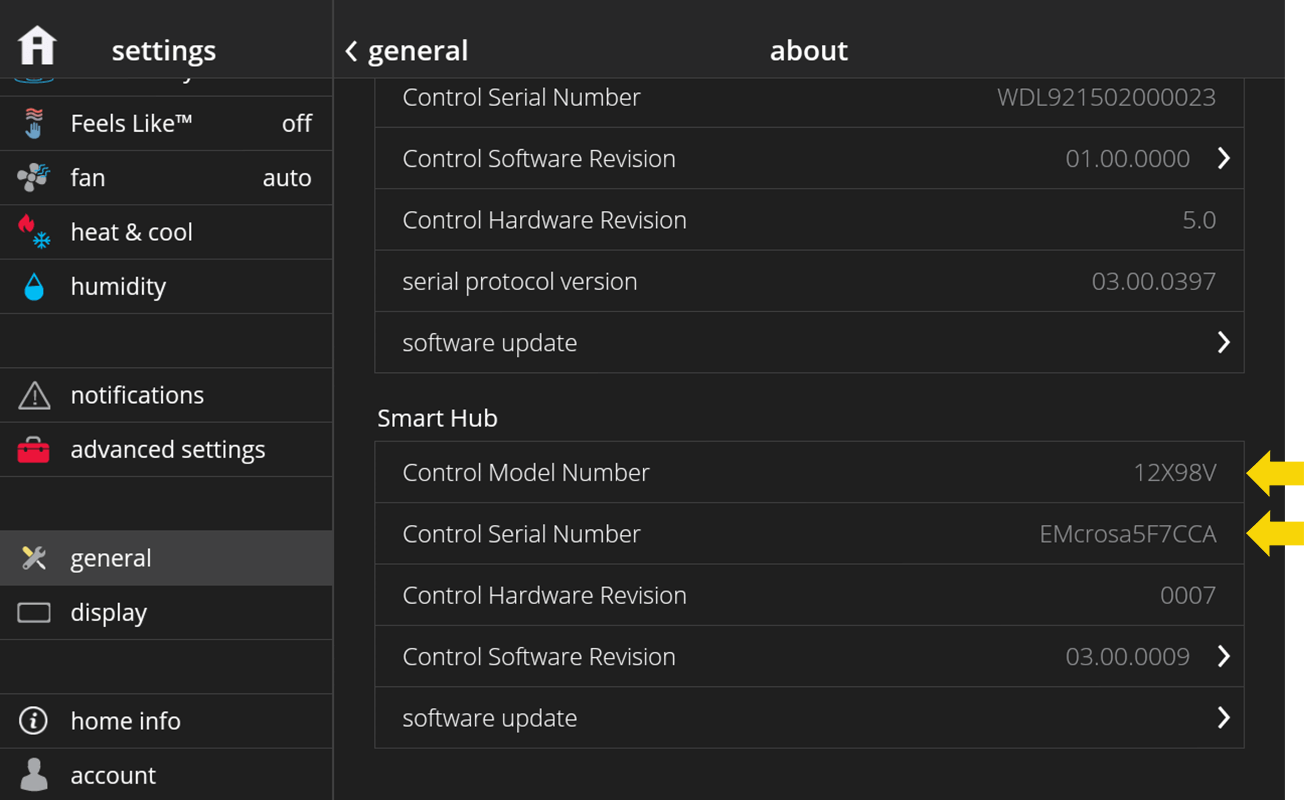
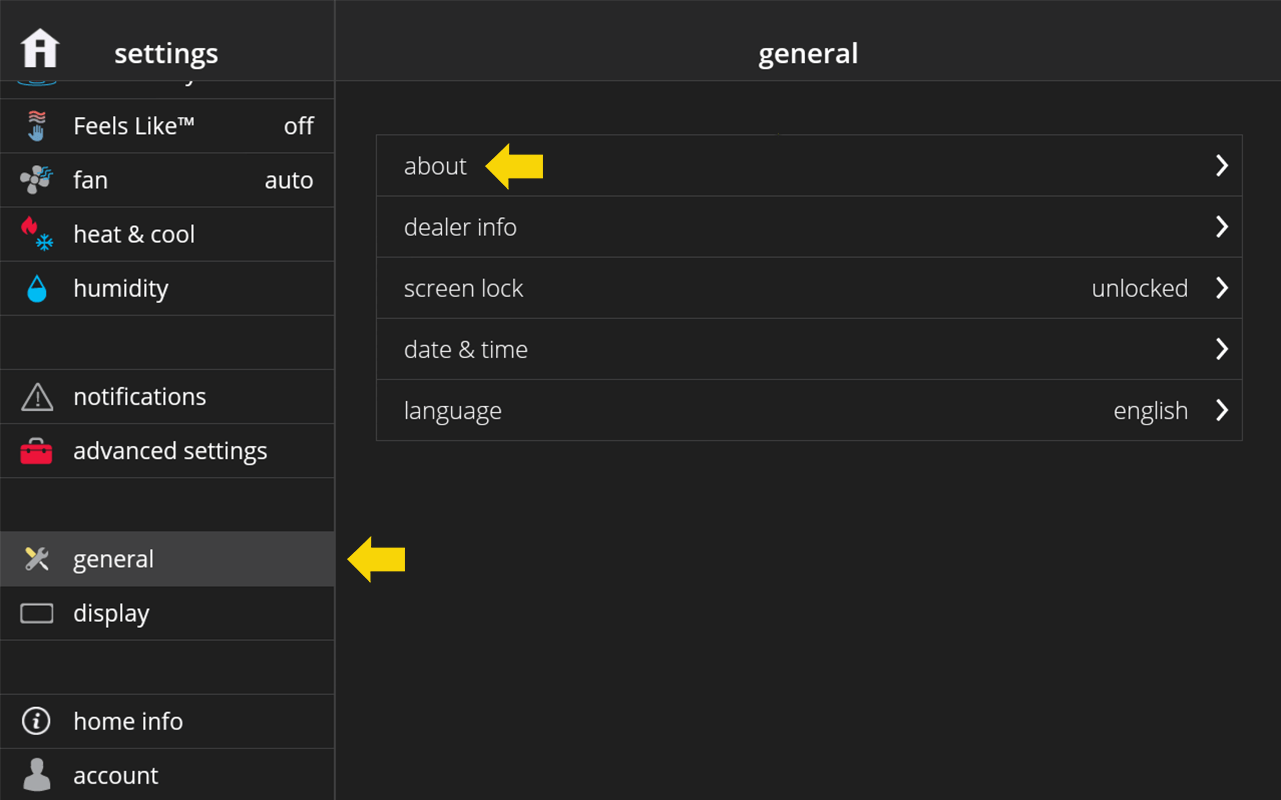
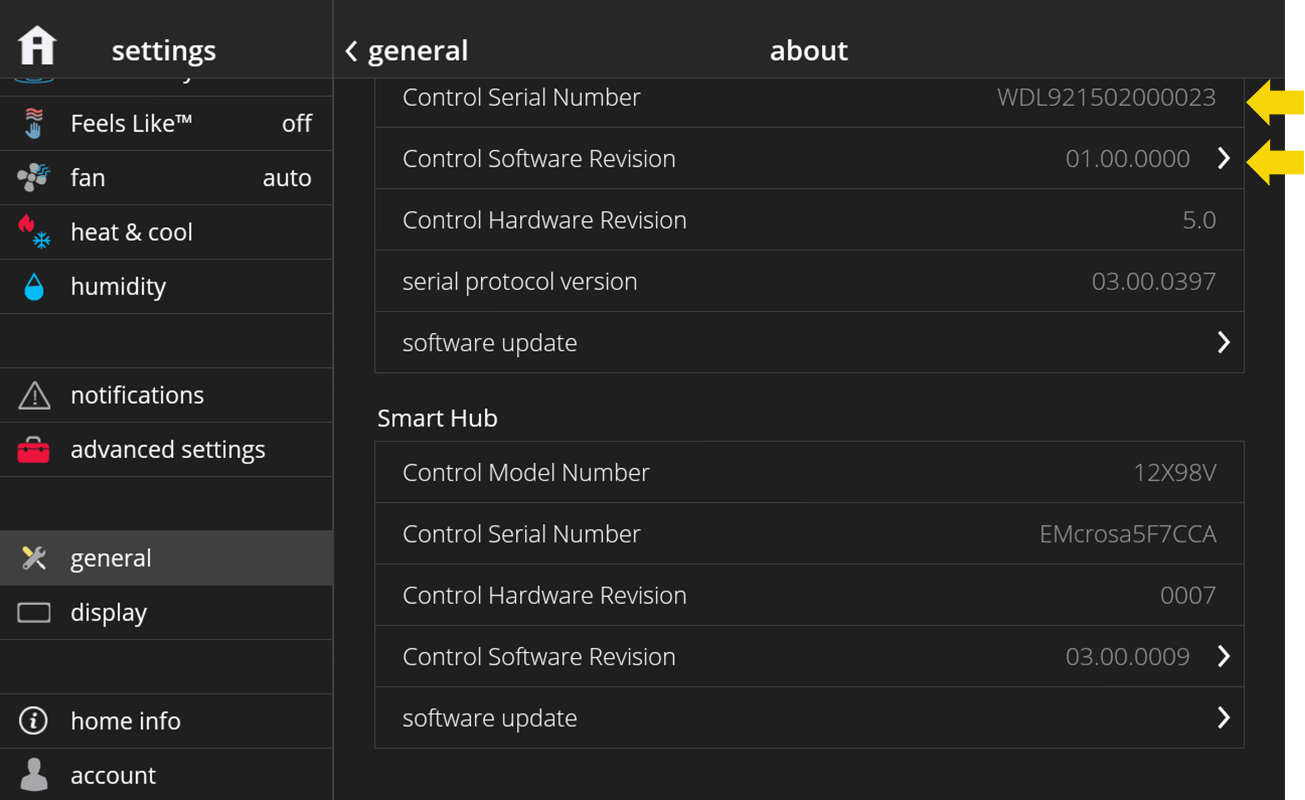
In the thermostat, go to menu > settings > general > about to view the Smart Hub software version and model number.
-
In the thermostat, go to menu > settings > general > about to view the thermostat software version and model number.
-
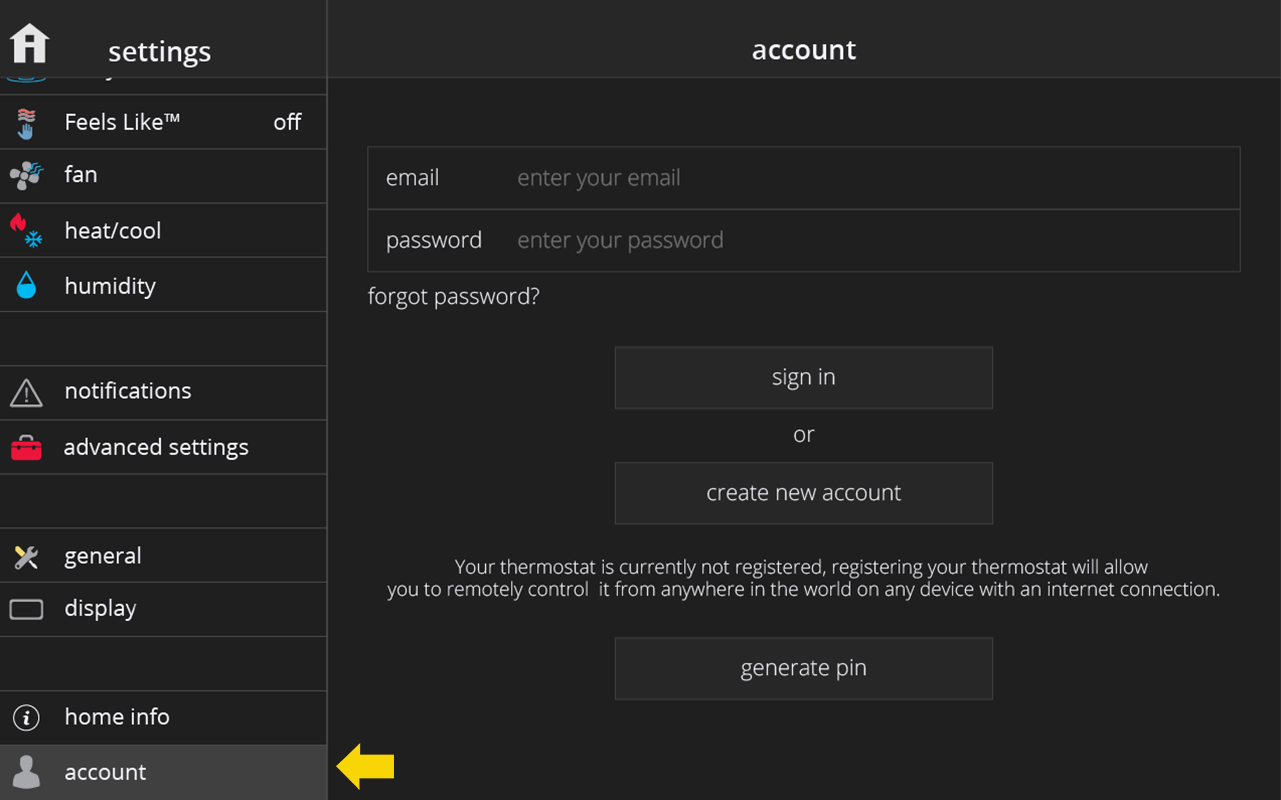
From the removed thermostat, login using your iComfort® S30 credentials under menu > settings > account. Logging in will automatically add the iComfort® S30 Smart Thermostat to your account again.
-
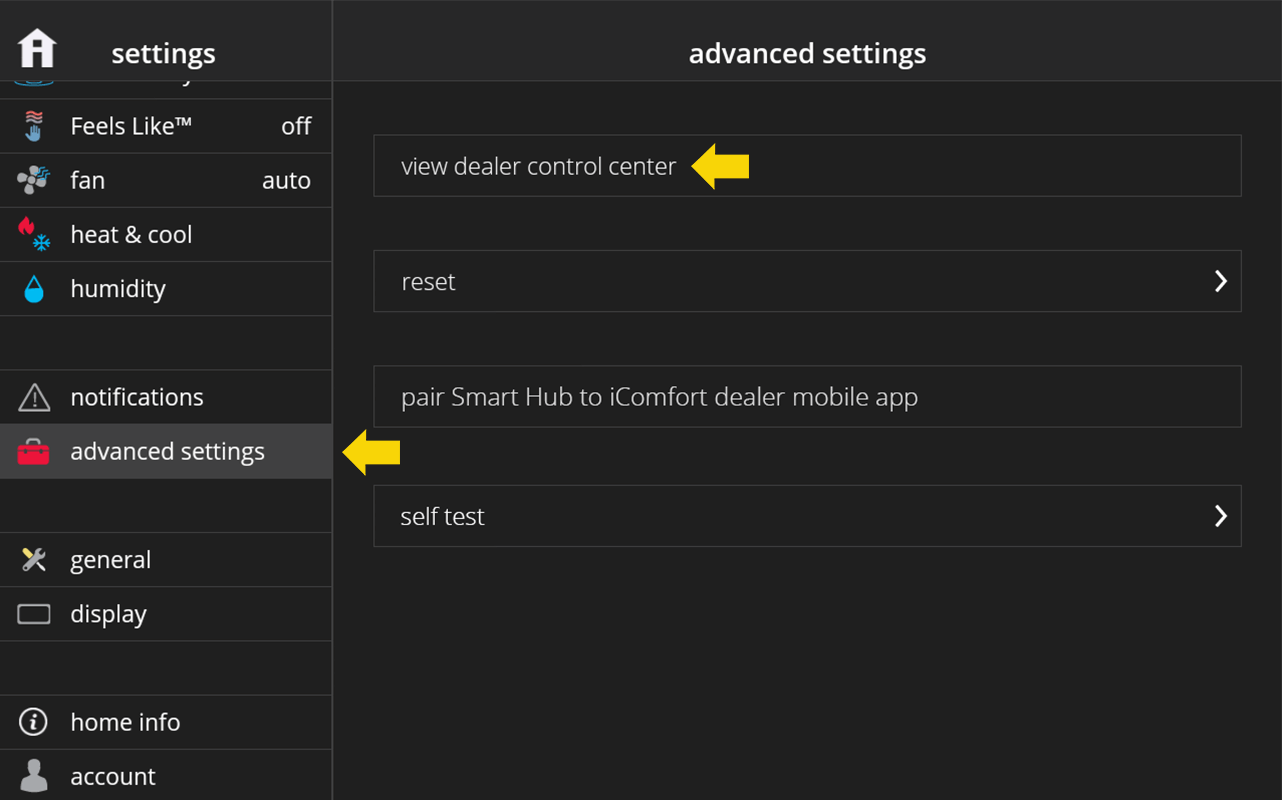
These are dealer only configuration settings screens in the thermostat. It is not recommended that you enter the dealer control center to view or modify HVAC settings unless you’re a dealer or trained professional technician.
What is the Dealer Control Center under Advanced Settings?
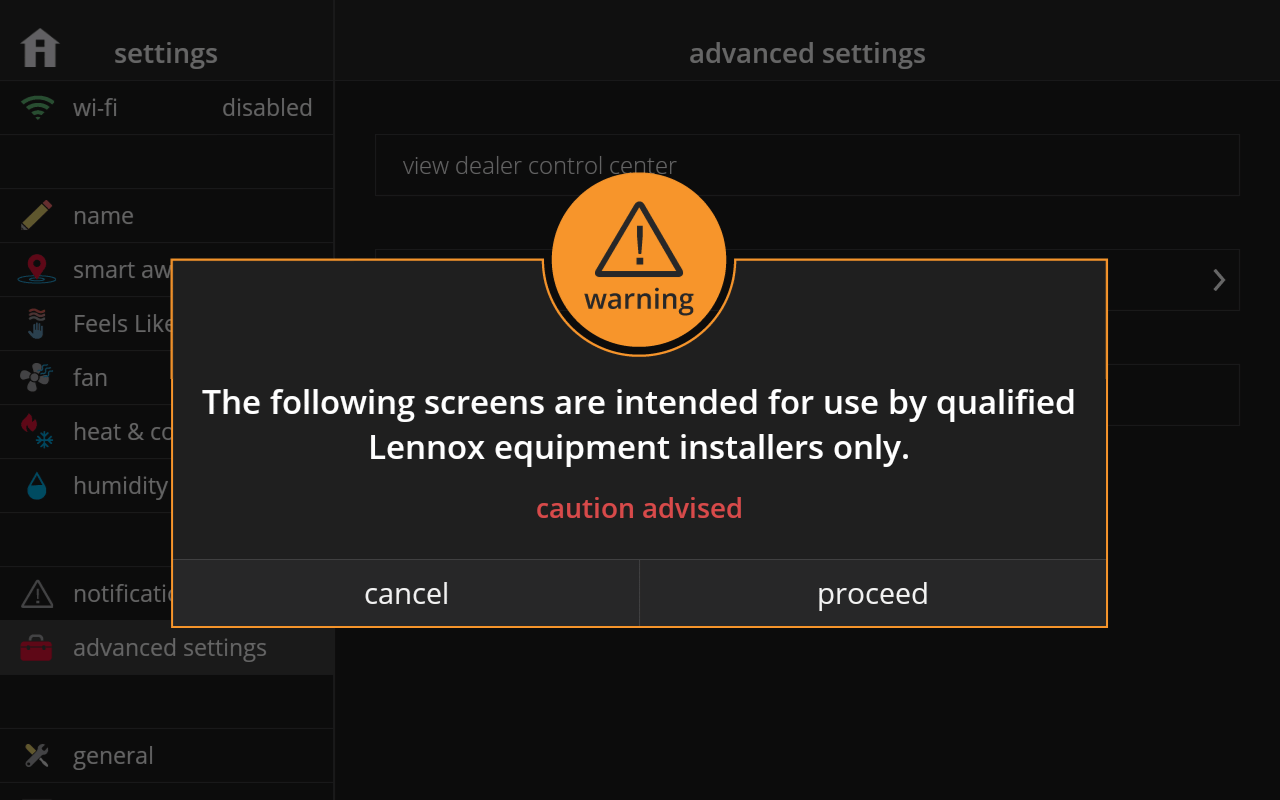
If you’re not a trained professional technician or authorized Lennox dealer and you modify “dealer only” advanced settings for your HVAC system, Lennox and your dealer are not responsible for any damage you may cause to your equipment as a result of any changes you may have done in the dealer control center. -
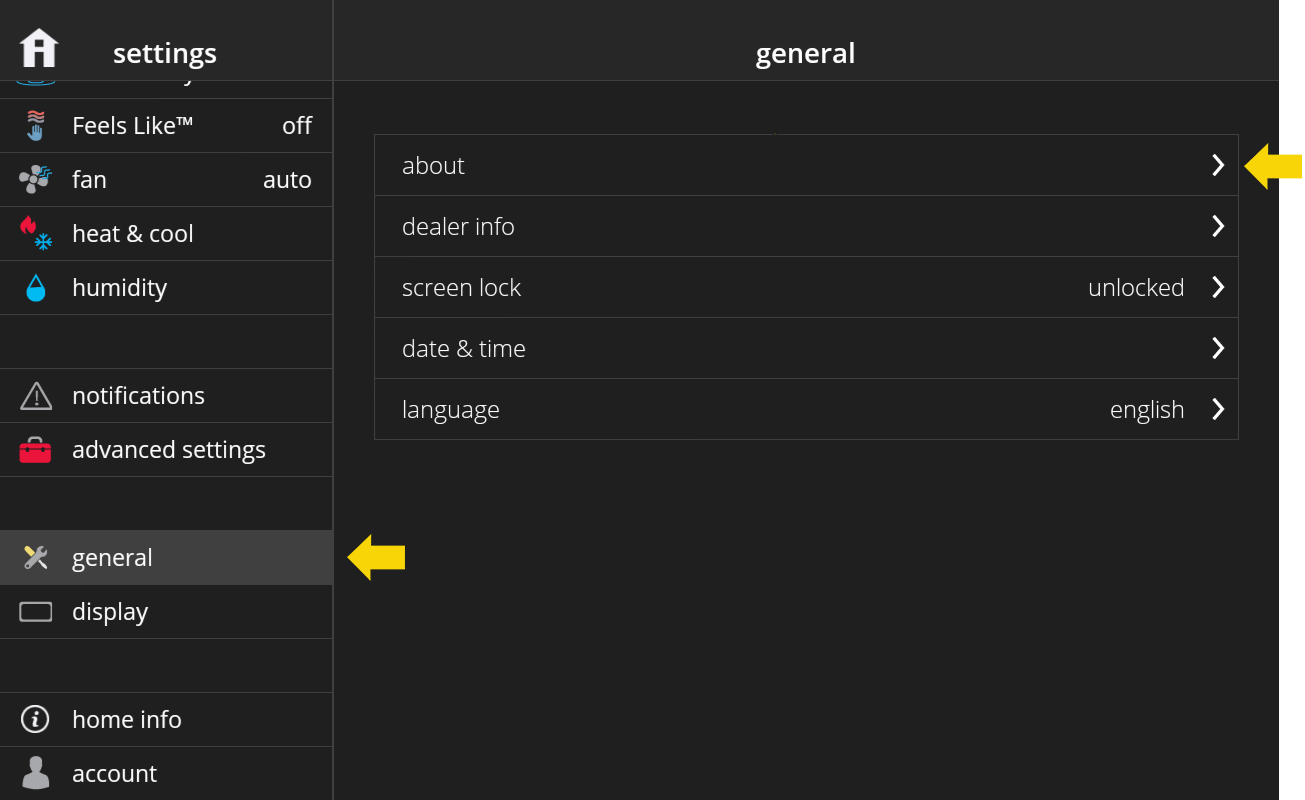
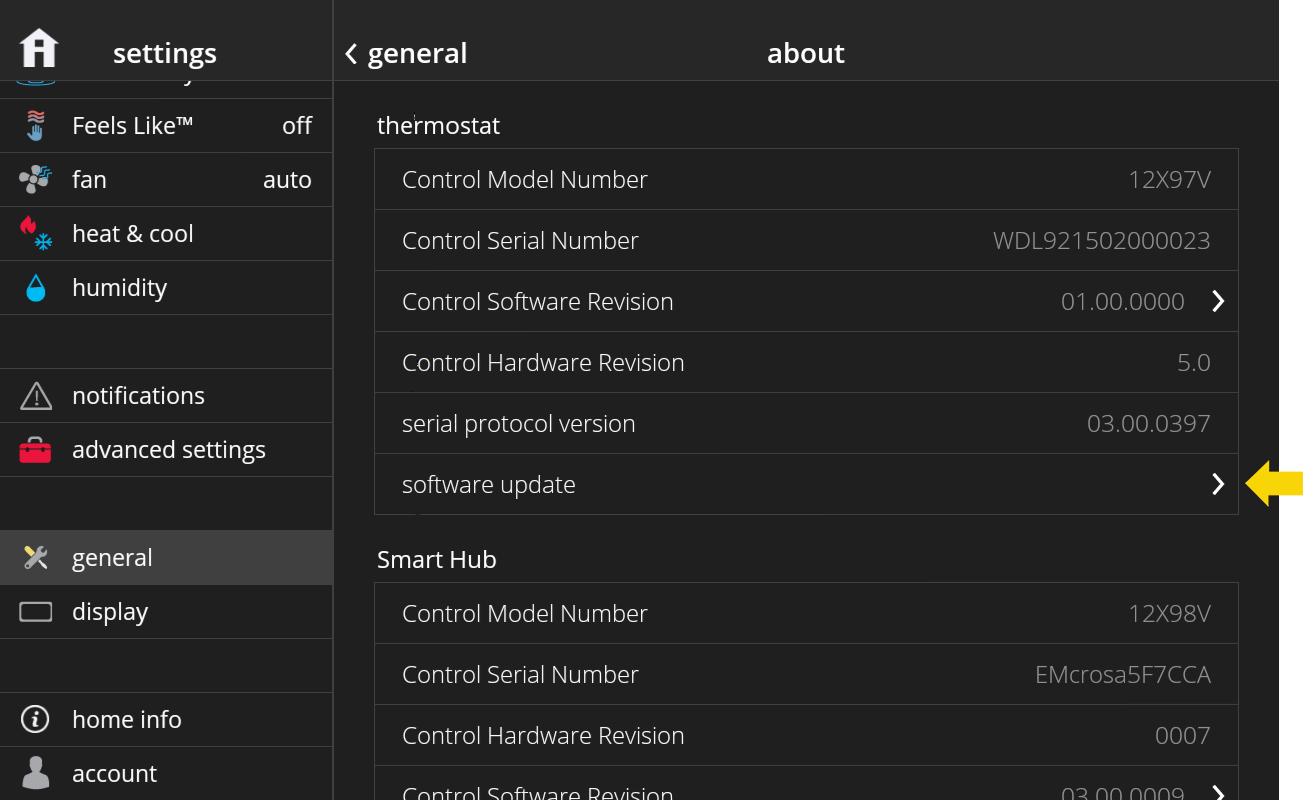
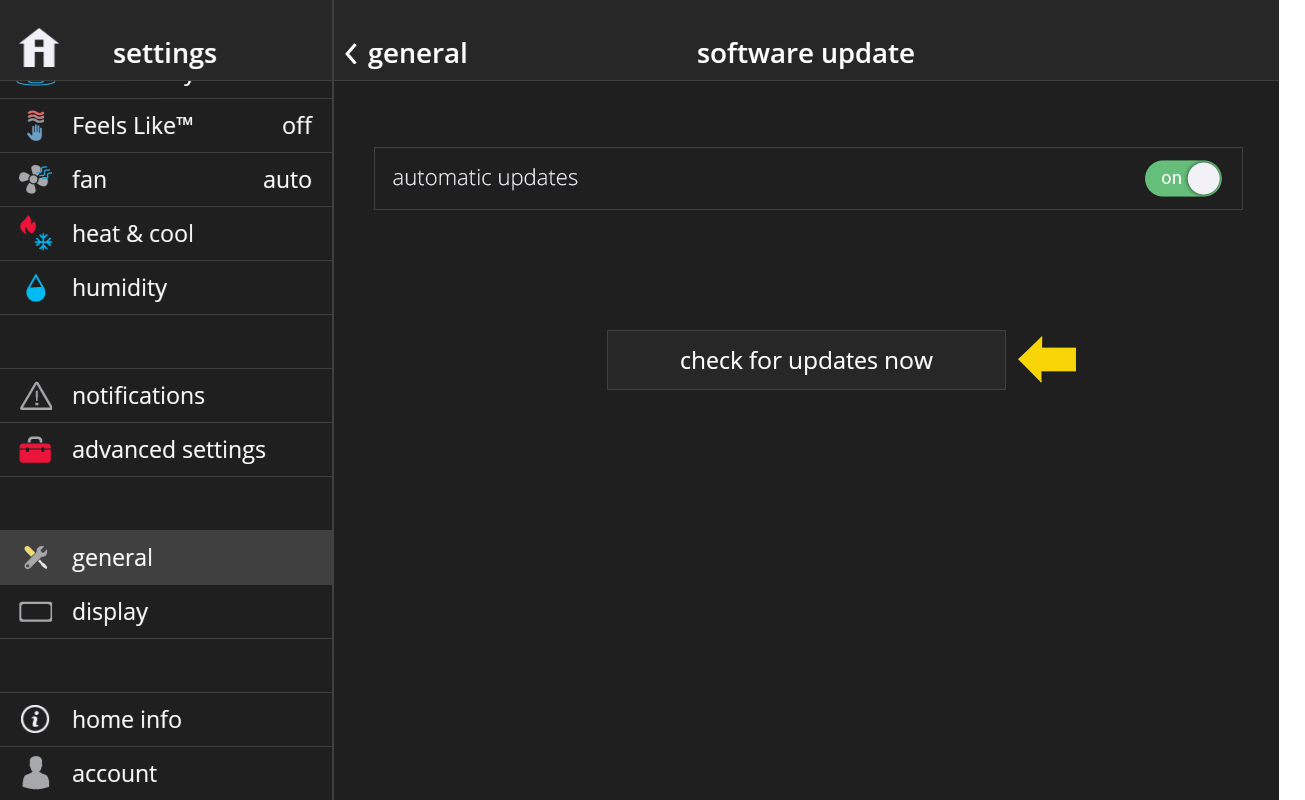
The thermostat automatically checks for software updates every 24 hours for you. In case you just installed iComfort® S30 and do not wish to wait for the automatic update, you can go to menu > settings > general > software update and tap the “check for updates now” button.
-
1. In your iComfort® S30 display, go to menu > settings > advanced settings and tap on "view dealer control center". If you have trouble finding the menu button or settings or the dealer control center
2. Once in the dealer control center, tap on Equipment
3. Once in the Equipment screen, make sure Smart Hub is selected on the left panel
4. Select the level of Smart Alert:
- Disabled - No monitoring of Comfort Fault Alarms.
- Conservative - Will wait longer to display any Comfort Fault Alarms. Minimum chance of false alarm being shown.
- Medium (Parameter Default) - Development team used over 10,000 iComfort® systems to develop Comfort Fault Alarm algorithm with no false alarms.
- Aggressive - Will Shorten time to display any Comfort Fault Alarms. Slight possibility of seeing a false alarm.
- Disabled - No monitoring of Comfort Fault Alarms.
-
Most HVAC systems are one stage systems. These systems provide only one level of cooling or heating, on at the maximum heating or cooling capacity. The thermostat controls the temperature in your house by turning the one stage system on and off. During times when only a small amount of cooling is needed, your system will be on for 3 minutes and off for 15 minutes.
Single stage systems have only one operating capacity, on at 100%. Therefore the thermostat simply adjusts demand by changing runtime. Therefore, a single stage system operating at 50% demand, runs 50% of the time.
Lennox sells the following one-stage equipment:
- ML193 - High-Efficiency Gas Furnace
- ML180 - Standard-Efficiency Gas Furnace
- ML195 - High-Efficiency Gas Furnace
- EL180E - Efficient Gas Furnace
- EL195E - High-Efficiency Gas Furnace
- SL18XP1 - Single-Stage Heat Pump
- SL18XC1 - Single-Stage Air Conditioner
- XP14 - Single-Stage Heat Pump
- 14HPX - Single-Stage Heat Pump
- ML13XC1N
- EL13XC1N
- ML193 - High-Efficiency Gas Furnace
-
Two-stage cooling means the air conditioner or heat pump has a compressor with two levels of operation: high for hot summer days and low for milder days. Since the low setting is adequate to meet household-cooling demands 80% of the time, a two-stage unit runs for longer periods and produces more even temperatures.
Two stage systems have two operating capacities, typically 50% and 100%. The thermostat will first attempt to maintain comfort by operating only the lower (50%) stage, since it is more efficient. When the system cannot maintain comfort with the lower stage, it will begin to operate the second stage.
- A two stage system operating at 25% demand will run the first stage 50% of the time. Runtime would be 50% for this case.
- A two stage system operating at 50% demand runs first stage 100% of the time. Runtime would be 100% for this case.
- A two stage system operating at 75% demand run first stage 50% of the time and second stage 50% of the time. Runtime would be 100% for this case.
- A two stage system operating at 100% demand runs second stage 100% of the time. Runtime would be 100% for this case.
Lennox sells the following two stage equipment:
- EL280 - Two-Stage Gas Furnace
- EL296V - Variable-Speed, Two-Stage Gas Furnace
- EL296E - High-Efficiency, Two-Stage Gas Furnace
- SL280V - Variable-Speed, Two-Stage Gas Furnace
- XP16 - Multi-Stage Heat Pump
- XC16 - Multi-Stage Air Conditioner
- XC21 - Multi-Stage Air Conditioner
- XP21 - Multi-Stage Heat Pump
- ML14XC1
- EL16XC1
- A two stage system operating at 25% demand will run the first stage 50% of the time. Runtime would be 50% for this case.
-
"Variable speed" refers to the fan motor inside the air handler - the indoor part of an air conditioner that moves cooled or heated air throughout the ductwork of your home. An air handler is usually a furnace or a blower coil.
Unlike conventional single-speed motors, a variable speed motor runs at a wide range of speeds to precisely control of heated and cooled air throughout the home.
Variable capacity systems continuously adjust the heating or cooling capacity from 40%-100% of maximum capacity. The thermostat will maintain comfort by continuously adjusting the capacity of the system. When the demand is below the minimum capacity of the variable capacity system, the system will cycle on and off while running at the minimum capacity.
- A variable capacity system operating at 80% demand will run continuously at 80%. Runtime would be 100% for this case.
- A variable capacity system operating at 40% demand will run continuously at 40%. Runtime would be 100% for this case.
- A variable capacity system operating at 20% demand will run at the minimum capacity of 40% for 50% of the time. Runtime would be 50% for this case.
- SLP98V - Variable-Capacity Gas Furnace
- XC25 - Variable-Capacity Air Conditioner
- XP25 - Variable-Capacity Heat Pump
- XC20 - Variable-Capacity Air Conditioner
- XP20 - Variable-Capacity Heat Pump
- A variable capacity system operating at 80% demand will run continuously at 80%. Runtime would be 100% for this case.
-
To access your iComfort® S30 performance report on demand:
- Login to your iComfort® S30 account using the web portal (https://www.lennoxicomfort.com/account/login). Make sure to already have an iComfort® S30 user account and have added your thermostat. For instructions on how to do this, please refer to the related questions section below.
- Select your home and/or system in the "my homes" screen.
- Once you are in the home screen, make sure your system is online and not in Away/Smart Away (otherwise the menu button is not available). Tap on the menu button on the top right.
- Click on Performance Report.
- Login to your iComfort® S30 account using the web portal (https://www.lennoxicomfort.com/account/login). Make sure to already have an iComfort® S30 user account and have added your thermostat. For instructions on how to do this, please refer to the related questions section below.
-
Your thermostat maintains comfort by automatically adjusting how hard your HVAC system works and for how long it operates. Your monthly summary report displays the average demand for each component in your system. Demand is a number from 0 - 100%, where 100% is the maximum heating or cooling your system can provide. For example, a system running at 50% cooling demand is delivering 1/2 (or 50%) of its maximum cooling capacity.
Demand provides better insight than runtime alone because it factors in what level of heating or cooling the system was operating. This is important for multi-stage and variable capacity systems that use multiple levels of heating or cooling to save energy. These efficient systems operate at the lowest level of heating or cooling whenever possible and only use the higher levels on those really hot or cold days. Using lower levels of heating or cooling can result in longer runtimes, but it is more efficient.
Heating demand will increase as the outdoor temperature drops. As you transition from Fall into winter, you will typically see your heating demand increase. Similarly, in the Spring heating demand will decrease as the weather warms up. Your report includes the average outdoor temperature for each month, enabling you to compare your change in heating demand to the change in temperature.
Cooling demand will increase as the outdoor temperature increases. Cooling demand will be the highest in the peak of Summer and drop off as temperatures decrease. Increasing cooling demand without a corresponding increase in outdoor temperature may indicate a problem with your system.
Examples:
Single Stage
Single stage systems have only one operating capacity, on at 100%. Therefore the thermostat simply adjusts demand by changing runtime.So a single stage system operating at 50% demand, runs 50% of the time.
Two Stage
Two stage systems have two operating capacities, typically 50% and 100%. The thermostat will first attempt to maintain comfort by operating only the lower (50%) stage, since it is more efficient. When the system cannot maintain comfort with the lower stage, it will begin to operate the second stage.
- A two stage system operating at 25% demand will run the first stage 50% of the time. Runtime would be 50% for this case.
- A two stage system operating at 50% demand runs first stage 100% of the time. Runtime would be 100% for this case.
- A two stage system operating at 75% demand run first stage 50% of the time and second stage 50% of the time. Runtime would be 100% for this case.
- A two stage system operating at 100% demand runs second stage 100% of the time. Runtime would be 100% for this case.
Variable capacity systems continuously adjust the heating or cooling capacity from 40%-100% of maximum capacity. The thermostat will maintain comfort by continuously adjusting the capacity of the system. When the demand is below the minimum capacity of the variable capacity system, the system will cycle on and off while running at the minimum capacity.
- A variable capacity system operating at 80% demand will run continuously at 80%. Runtime would be 100% for this case.
- A variable capacity system operating at 40% demand will run continuously at 40%. Runtime would be 100% for this case.
- A variable capacity system operating at 20% demand will run at the minimum capacity of 40% for 50% of the time. Runtime would be 50% for this case.
- A two stage system operating at 25% demand will run the first stage 50% of the time. Runtime would be 50% for this case.
-
Runtime shows you how long your iComfort® S30 equipment was in “On” mode. It does not take into account how hard your system worked (percent demand) which depends on whether you have a low efficiency 1-stage, mid efficiency 2-stage, or high efficiency variable capacity system and other factors. Runtime can be analogous to how much distance a car ran without accounting for its fuel efficiency. If you want to understand how efficiently your equipment ran see “How Hard Did the System Work? “
For furnace and A/C systems the following Runtime parameters are displayed
1. Heating
2. Cooling
3. Fan
For Heat Pump (HP) and air-handler systems the following Runtime parameters are displayed
1. Heat Pump + Electric Heat
2. Electric Heat only
3. Heat Pump Only
4. Cooling
5. Fan
A duel fuel system (Heat Pump with an indoor furnace unit) will have the following Parameters
1. Heat Pump + Electric Heat
2. Electric Heat only
3. Heat Pump Only
4. Heating
5. Cooling
6. Fan
When cooling or heating, the fan is running. Fan values runtime represent when the fan ran alone without heating or cooling. This includes when Fan circulation is manually set to “On” and when allergen defender is on.
Electric Heat only runtime includes time in defrost mode, Auxiliary heat, Emergency heat setting or if the heat pump is unavailable.
Most S30 thermostats operate with Lennox communicating equipment that sends serial communication regarding the Runtime.
You can view runtime information for your system in the web portal for iComfort® S30 under menu >performance report, or in the monthly email performance report. In the web portal, you can select to view runtime according to a day (in the last 10 days) or a time in the last 24 hours. Runtime for a day is in hours, while runtime for an hour is in minutes. In the monthly report, you only get runtime values for the previous month. -
Demand varies with the outdoor weather. As the weather becomes more extreme, you can expect your HVAC system demand to increase. Your use of your home can also cause demand to change. For example, having extra guests visiting could increase cooling or heating demand depending on your setting. Alternatively, going on vacation could reduce demand if you set your system to Away mode or if you are using Smart Away.
-
Here are some pointers to reduce cooling or heating demand in your iComfort® S30 system:
1) When in cooling, raise your cooling set-point to the highest temperature which you can be comfortable. Program your thermostat to set the cooling set-point even higher when you will not be home. Similarly, when in heating, lower your heating set-point to the lowest temperature which you can be comfortable. Program your thermostat to set the heating set-point even lower when you will not be home. You can utilize the Smart Away feature on the iComfort® S30 thermostat to do this automatically.
2) Change your filters.
3) Keep your doors and windows closed.
-
To stop receiving a monthly email containing the performance report of your iComfort® S30 system, you can follow these steps:
On the web portal:
1. Log in to the iComfort® S30 web portal.
2. Click on your account / email address at the top.
3. In the "account info" dialog, turn off "monthly performance report".
On the iComfort® S30 Thermostat, you can go to menu > settings > account, scroll to the bottom of the screen and you should see the monthly performance report option. -
Interruption in Wi-Fi connectivity or a faulty outdoor air sensor.
This error may be the result of a faulty outdoor temperature sensor (if installed) or interruptions in connectivity. If an outdoor air sensor is installed, check your thermostat display for the temperature reading or for error notifications. If there is no temperature displayed, contact your Dealer. If you do not have an outdoor air sensor, check your Wi-Fi connection.
-
-
-
The Lennox Home App is available in the iTunes App Store and Google Play.


-
The iComfort app is compatible with Apple smart phones and tablets and Android smart phones and tablets.
The versions that are currently supported are:
• Latest iOS + the 2 previous versions
• Latest Android + the 3 previous versions
Older versions are available, however, they will not be supported and/or updated. You can use these versions at your own risk.
-
-
-
Here are the different types of alerts and what they mean:
- Service Urgent - An alert that notifies you that your HVAC system is in a no heat, no cool or no ventilation status. As a result, your system is not heating or cooling your home. These alerts require service by a licensed HVAC Contractor within 24 hours to fix the issue.
- Service Soon - An alert that notifies you that your HVAC system is in a partial heat, partial cool or partial ventilation status. As a result, your system is still heating or cooling your home. However, it is not running properly and could mean that your system is not meeting the temperature set point or your desired level of comfort. These alerts require service by a licensed HVAC Contractor within 24 - 48 hours to fix the issue.
- Maintenance - A notification your HVAC Contractor sets in your thermostat for planned maintenance or service intervals. These notifications can be for replacing a filter or UV bulb, for a 'tune–up’ or for cleaning a piece of your HVAC system.
-
-
-
Runtime shows you how long your iComfort® S30 equipment was in “On” mode. It does not take into account how hard your system worked (percent demand) which depends on whether you have a low efficiency 1-stage, mid efficiency 2-stage, or high efficiency variable capacity system and other factors. Runtime can be analogous to how much distance a car ran without accounting for its fuel efficiency. If you want to understand how efficiently your equipment ran see “How Hard Did the System Work? “
For furnace and A/C systems the following Runtime parameters are displayed
1. Heating
2. Cooling
3. Fan
For Heat Pump (HP) and air-handler systems the following Runtime parameters are displayed
1. Heat Pump + Electric Heat
2. Electric Heat only
3. Heat Pump Only
4. Cooling
5. Fan
A duel fuel system (Heat Pump with an indoor furnace unit) will have the following Parameters
1. Heat Pump + Electric Heat
2. Electric Heat only
3. Heat Pump Only
4. Heating
5. Cooling
6. Fan
When cooling or heating, the fan is running. Fan values runtime represent when the fan ran alone without heating or cooling. This includes when Fan circulation is manually set to “On” and when allergen defender is on.
Electric Heat only runtime includes time in defrost mode, Auxiliary heat, Emergency heat setting or if the heat pump is unavailable.
Most S30 thermostats operate with Lennox communicating equipment that sends serial communication regarding the Runtime.
You can view runtime information for your system in the web portal for iComfort® S30 under menu >performance report, or in the monthly email performance report. In the web portal, you can select to view runtime according to a day (in the last 10 days) or a time in the last 24 hours. Runtime for a day is in hours, while runtime for an hour is in minutes. In the monthly report, you only get runtime values for the previous month. -
Your thermostat maintains comfort by automatically adjusting how hard your HVAC system works and for how long it operates. Your monthly summary report displays the average demand for each component in your system.
Demand is a number from 0 – 100%, where 100% is the maximum heating or cooling your system can provide. For example, a system running at 50% cooling demand is delivering half of its maximum cooling capacity. Demand provides better insight than runtime alone because it factors in what level of heating or cooling the system was operating. This is important for multistage and variable capacity systems that use multiple levels of heating or cooling. Using lower levels of heating or cooling can result in longer runtimes, but it is more efficient. ? Heating demand can usually increase as the outdoor temperature drops. As you transition from fall into winter, you will typically see your heating demand increase. Similarly, in the spring heating demand will typically decrease as the weather warms up. Your report includes the average outdoor temperature for each month, enabling you to compare your change in heating demand to the change in temperature.
Cooling demand will typically increase as the outdoor temperature increases. Cooling demand will usually be the highest in the peak of Summer and drop off as temperatures decrease.
Single Stage
Single stage systems have only one operating capacity, on at 100%. Therefore the thermostat simply adjusts demand by changing runtime.
Two Stage
Two stage systems have two operating stages. The thermostat will first attempt to maintain comfort by operating only the lower stage. When the system cannot maintain comfort with the lower stage, it will begin to operate the higher stage.
Variable Capacity
Variable capacity systems continuously adjust the heating or cooling capacity from its minimum to its maximum capacity. The thermostat will maintain comfort by continuously adjusting the capacity of the system.
Electric Heat and Fan Demand calculations always assumes 100% capacity when on. -
To access your iComfort® S30 performance report on demand:
1. Login to your iComfort® S30 account using the web portal (https://www.lennoxicomfort.com/account/login). Make sure to already have an iComfort® S30 user account and have added your thermostat. For instructions on how to do this, please refer to the related questions section below.
2. Select your home and/or system in the "my homes" screen.
3. Once you are in the home screen, make sure your system is online and not in Away/Smart Away (otherwise the menu button is not available). Tap on the menu button on the top right.
4. Click on Performance Report. -
To enable/stop receiving a monthly email containing the performance report of your iComfort® S30 system, you can follow these steps:
On the web portal:
1. Log in to the iComfort® S30 web portal.
2. Click on your account / email address at the top.
3. In the "account info" dialog, turn on/off "monthly performance report".
On the iComfort® S30 Thermostat, you can go to menu > settings > account, scroll to the bottom of the screen and you should see the monthly performance report option. -
The performance report display on-demand performance data from your iComfort® S30 system for the last 10 days. It is divided into 3 sections:
1. The all-in-one graph
2. The table below
3. The hide/show panel on the right
The graph displays the variables that are turned on in the hide/show panel. The table below the graph displays the details for the day/hour selected in the graph. In order to customize the data that you see, you can:
1. Select day or hour at the top
2. Choose which variables to display on the graph by turning them on/off on the hide/show panel
3. Move the knob to view a specific day / hour
The temperature and humidity values represent the average for the day / hour. When hour is selected, the system mode and fan mode are those at the beginning of the hour. If the hide/show panel is not displaying in your web browser view, you are instead getting the menu button on the top right. If you tap on it, the hide/show panel will display. This is because your window size is not wide enough.
What variables can I turn on/off in the hide/show panel?
The variables you can control depend on the equipment that you have installed and the current operation of your system. For example, only customers that have electric heat will see electric demand as a variable. Here is a list of all the possible variables for an iComfort® S30 system:
If the system is having issues obtaining data for a variable, it is not displayed on the graph, and instead it shows in this panel with a warning icon.
Please refer to the related questions below for the meaning of "demand" and "runtime".
Video URL: https://youtu.be/ss2ZdDUKGy4 -
Here are some pointers to reduce cooling or heating demand in your iComfort® S30 system:
1) When in cooling, raise your cooling set-point to the highest temperature which you can be comfortable. Program your thermostat to set the cooling set-point even higher when you will not be home. Similarly, when in heating, lower your heating set-point to the lowest temperature which you can be comfortable. Program your thermostat to set the heating set-point even lower when you will not be home. You can utilize the Smart Away feature on the iComfort® S30 thermostat to do this automatically.
2) Change your filters.
3) Keep your doors and windows closed.
-
The monthly performance report contains a summary of how hard the system worked (runtime and demand) for the past month and compares it to the previous month. Please refer to the related questions below for the meaning of runtime and percent demand. The report also contains other helpful information such as how much time your system spent on away mode, your home's average indoor temp., the average outdoor temperature for your zip code, and when your next filter replacement is due.
-
Demand varies with the outdoor weather. As the weather becomes more extreme, you can expect your HVAC system demand to increase. Your use of your home can also cause demand to change. For example, having extra guests visiting could increase cooling or heating demand depending on your setting. Alternatively, going on vacation could reduce demand if you set your system to Away mode or if you are using Smart Away.
-
-
-
Alexa will control your iComfort® a little differently when it’s in ‘Heat and Cool’ mode, which can automatically switch between heating and cooling as needed.
For instance, if you ask Alexa to set the temperature to 70°F (21.0°C), your thermostat will use this as a midpoint temperature between the heat and cool setpoints,setting the Heat temperature to 69°F (20.5°C) and Cool temperature to 72°F (22.0°C)”. (By default your thermostat’s temperature deadband range is 3°F )
Alexa will confirm your request, saying “Thermostat is in auto mode, aiming for 70°F (21.0°C)”. -
Here’s what you can try:
- 1. Check if the iComfort® skill is enabled on the Alexa app
- 2. Check if the iComfort® system is powered on and is connected to the Internet.
- 3. Check if the Echo/Echo Dot is powered on and is connected to the Internet.
- 4. Check to confirm that your iComfort® system is registered to the iComfort® account you are logging in with.
-
5. Disable the iComfort® skill and re-enable it.
- a. Discover devices again from Alexa.
- a. Discover devices again from Alexa.
- 6. If you have multiple homes, confirm that the systems are in the first home.
- 1. Check if the iComfort® skill is enabled on the Alexa app
-
Why does Alexa say “I’m sorry I couldn’t find a device or group name (device name)"?
Back to QuestionsHere’s what you can try:
-
1. Check “Your Smart Home Devices” list on the Alexa app to confirm that the iComfort® thermostats have been discovered.
- a. If not, disable the iComfort® skill and re-enable it.
- b. Discover devices again from Alexa.
- a. If not, disable the iComfort® skill and re-enable it.
-
2. Check “Your Smart Home Devices” list on the Alexa app to confirm that you are using the correct ‘device names’.
- a. For a non-zoned system, if the thermostat name displays the default “System” then it will be called “Thermostat” in Alexa. If you have changed the system name to a custom name other than “System”, then that custom name will be used for Alexa.
- b. For a zoned system, the device names will be names of your individual zone names as you have set on your thermostat.
- a. For a non-zoned system, if the thermostat name displays the default “System” then it will be called “Thermostat” in Alexa. If you have changed the system name to a custom name other than “System”, then that custom name will be used for Alexa.
- 3. Make sure your thermostat/zone name is easy to understand. Please do NOT use any numbers in the name like “Bedroom3”. Simple location based names like Upstairs, Downstairs, Hallway, Living Room, etc. will work the best.
- 4. If you have changed your system/zone name(s), discover devices again from Alexa.
-
1. Check “Your Smart Home Devices” list on the Alexa app to confirm that the iComfort® thermostats have been discovered.
-
Why does Alexa say “(thermostat name) is in a mode that doesn’t support requests, please change the mode”?
Back to QuestionsHere’s what you can try:
- 1. If your thermostat is in Away or (active) Smart Away, cancel it from the thermostat, app or portal.
-
Here’s what you can try:
- 1. Your system is in the OFF mode. Change it to one of the other modes.
-
Here’s what you can try:
- 1. Make sure that the requested temperature is within the supported range of the iComfort® thermostat.
- 2. Make sure that the Echo device is set to the correct temperature unit (Fahrenheit or Celsius)
- 1. Make sure that the requested temperature is within the supported range of the iComfort® thermostat.
-
Here’s what you can try:
- 1. Check if the iComfort® system is powered on and is connected to the Internet.
-
While enabling the iComfort® Skill from Alexa app, why does it displays a “An error occurred while attempting to link Alexa.” message?
Back to QuestionsHere’s what you can try:
- 1. Try again after a few minutes.
-
Why is Alexa not able to discover a new system I added to my existing iComfort® account?
Back to QuestionsHere’s what you can try:
-
1. Disable the iComfort® skill and re-enable it.
- a. Discover devices again from Alexa.
-
1. Disable the iComfort® skill and re-enable it.
-
If I have multiple homes under my iComfort® account, can I use Alexa to control all my homes?
Back to QuestionsHere’s what you can try:
- Currently, you can use Alexa to control only one home under your iComfort® account. Alexa will automatically link to the first home that was added to your iComfort® account.
-
-
-
- 1. Currently, the iComfort® S30 models are compatible with Apple HomeKit. You can check your iComfort® model from the thermostat menu > settings > general > about > “thermostat model number”.
- 2. Your iOS device i.e. iPhone / iPad / iPod Touch should be running the latest iOS version.
-
3. On your iOS device:
- - Sign in to iCloud with your Apple ID and turn on iCloud Keychain
- - Under settings, Turn on Home to edit home users and use accessories on all of your iOS devices
- - Two Factor authentication should be enabled for your iCloud account : https://support.apple.com/en-us/HT204915
- - To set up accessories and automation, allow Home to use your location.
- - Sign in to iCloud with your Apple ID and turn on iCloud Keychain
- 4. To control iComfort via HomeKit when away from home, you will need to setup a home hub which can be HomePod, Apple TV 4K, Apple TV (4th generation), or iPad. For the software versions please refer: https://support.apple.com/en-us/HT207057
- 1. Currently, the iComfort® S30 models are compatible with Apple HomeKit. You can check your iComfort® model from the thermostat menu > settings > general > about > “thermostat model number”.
-
- 1. The WAC process allows you to transfer your home wifi network settings from your iOS device directly to your iComfort® thermostat. (without having to manual enter password on your thermostat)
- 2. This is the first step in order to pair and add your iComfort® thermostat to HomeKit.
-
3. Once you complete the WAC successfully, your iOS device will be able to discover your iComfort® thermostat during HomeKit pairing process i.e. when you “Add Accessory”.
- 1. The WAC process allows you to transfer your home wifi network settings from your iOS device directly to your iComfort® thermostat. (without having to manual enter password on your thermostat)
-
How do I setup WiFi configuration (WAC) for my iComfort® thermostat using my iOS device?
Back to Questions- 1. On your iComfort® thermostat go to Menu > Settings > HomeKit > select “enter WAC mode”
- 2. On your iOS device go to the Wi-Fi Settings and under “Setup New Device” look for your iComfort® device and select it. ( e.g. ‘iComfort® S30 e0fc37’ )
-
3. Follow the prompts on your iOS device to finish configuring the Wi-Fi connection for your iComfort®
- 1. On your iComfort® thermostat go to Menu > Settings > HomeKit > select “enter WAC mode”
-
How do I troubleshoot the “WAC Failed”/ “Network Not Configured” error during WiFi setup using my iOS device?
Back to Questions- 1. Make sure your home wifi network is up and has internet connection.
- 2. Please check on your iOS device if the Wi-Fi network is correctly configured and connected.
(You can try to “forget network” on your iOS device and then reconnect it to make sure it is setup correctly) - 3. Do NOT use a guest WiFi account
- 4. Do NOT use any portable WiFi hotspots
- 5. Make sure your iComfort® thermostat does not have any pending software updates. You will see a red bubble if it’s the case. Go to thermostat menu > settings > HomeKit > apply firmware update now.
- 6. You can retry the WAC procedure by manually invoking WAC mode on your iComfort® thermostat. Go to thermostat menu > settings > HomeKit > enter WAC mode
- 1. Make sure your home wifi network is up and has internet connection.
-
- 1. Make sure your iOS device is connected to the same home wifi network as your iComfort® accessory.
- 2. Make sure you have performed the WiFi configuration (WAC) for your iComfort® thermostat. Follow steps here:
- 3. Try re-configuring your iComfort®’s wifi using WAC procedure.
- 4. If possible, reset your iComfort® HomeKit configuration from your iComfort® thermostat. Go to thermostat menu > settings > HomeKit > HomeKit Factory Reset. You will then have to re-configure WiFi from your iOS device and pair your iComfort® again.
- 1. Make sure your iOS device is connected to the same home wifi network as your iComfort® accessory.
-
- 1. Make sure your iOS device is connected to the same home wifi network as your iComfort® accessory.
- 2. Try re-configuring your iComfort®’s wifi using WAC procedure.
- 3. If possible, reset your iComfort® HomeKit configuration from your iComfort® thermostat. Go to thermostat menu > settings > HomeKit > HomeKit Factory Reset. You will then have to re-configure WiFi from your iOS device and pair your iComfort® again.
- 4. Make sure your iComfort® thermostat does not have any pending software updates. You will see a red bubble if it’s the case. Go to thermostat menu > settings > HomeKit > apply firmware update now.
- 1. Make sure your iOS device is connected to the same home wifi network as your iComfort® accessory.
-
How can I remotely control my iComfort® (away from home) via the Home app or iComfort®Home app?
Back to Questions- 1. To be able to control your iComfort® when you are away from home i.e. remotely, you must setup a Home Hub.
- 2. Please follow instructions on Apple’s support site to setup your Home Hub: https://support.apple.com/en-us/HT207057
-
3. The device you set up as a home hub must:
- - remain in your home and always powered on,
- - stay connected to the same home Wi-Fi network as your iComfort®,
- - Signed in to iCloud with the same Apple ID with two-factor authentication enabled
- - remain in your home and always powered on,
- 4. You can set up your HomePod, Apple TV 4K, Apple TV (4th generation), or iPad as a home hub.
For the software versions please refer: https://support.apple.com/en-us/HT207057
- 1. To be able to control your iComfort® when you are away from home i.e. remotely, you must setup a Home Hub.
-
- Scenes let you control multiple accessories at the same time. For example, you can create a scene called "Arrive home" to set multiple iComfort thermostats in your home to desired setpoints.
Learn more at: https://support.apple.com/en-us/HT204893#scene
- Scenes let you control multiple accessories at the same time. For example, you can create a scene called "Arrive home" to set multiple iComfort thermostats in your home to desired setpoints.
-
- After you set up a home hub, you can automate your accessories and scenes to automatically turn on and perform actions. For example, every night at 10 p.m. set your iComfort® thermostat to desired setpoints and mode.
You can setup automations using the Apple Home app.
Learn more on how to automate at: https://support.apple.com/en-us/HT207057#create
- After you set up a home hub, you can automate your accessories and scenes to automatically turn on and perform actions. For example, every night at 10 p.m. set your iComfort® thermostat to desired setpoints and mode.
-
- Once you have added your iComfort® thermostat as an accessory to your HomeKit home, you can use Siri voice commands to control your thermostat.
You can setup automations using the Apple Home app.
For example, you can say: “Hey Siri, set Bedroom temperature to 68 degrees” OR “Hey Siri, what is the temperature in the Bedroom?”
Learn more details about using Siri at: https://support.apple.com/en-us/HT208280
- Once you have added your iComfort® thermostat as an accessory to your HomeKit home, you can use Siri voice commands to control your thermostat.
-
How can I invite other people to access and control my iComfort® homekit accessory?
Back to Questions- 1. You can invite your family members or others to control your iComfort® accessory via the iComfort®Home app or the Apple Home app.
- 2. To invite via Apple Home app , please refer: https://support.apple.com/en-us/HT204893#share
-
3. To invite via iComfort®Home app: From top right corner Menu, go to Home Settings > select your home > Manage Users > Invite People
- 4. Note: You can only share an entire “Home” with others i.e. they will have access to all the accessories under that Home. You CANNOT share access to individual accessories.
- 5. Learn how to set up a home hub to allow remote access and edit permissions for people you invite.
- 1. You can invite your family members or others to control your iComfort® accessory via the iComfort®Home app or the Apple Home app.
-
- 1. If you are accessing remotely i.e. iOS device not connected to your home wifi network, please ensure you have setup a home hub for remote access. Refer: here
- 2. Make sure your home wifi network is up and has internet connection
-
3. Make sure your iComfort® thermostat is connected to your home wifi network.
- 4. Make sure your AppleTV / iPad / HomePod is setup as a home hub and running the latest firmware.
- 5. In your Apple Home app, under Home settings check if at least one of your home hub shows as “Connected”.
- 6. Make sure your home hub is powered on and connected to the same home wifi network.
- 1. If you are accessing remotely i.e. iOS device not connected to your home wifi network, please ensure you have setup a home hub for remote access. Refer: here
-
You can remove your iComfort®-HomeKit pairing by either of the following ways:
-
1. Via your iComfort® thermostat: Go to thermostat menu > settings > HomeKit > HomeKit User Reset. This will remove your iComfort® accessory from your homekit home on all paired iOS devices.
If you wish to remove even your thermostat WiFi settings (WAC) you can choose “HomeKit Factory Reset”. This will erase all homekit and WAC settings from your iComfort® thermostat and allow you to setup your thermostat as a new accessory again.
- 2. Via the iComfort®Home App: Navigate to the desired thermostat accessory. From top right menu go to Thermostat Settings > “Remove Thermostat”. This will remove your iComfort® accessory from your homekit home on all paired iOS devices.
-
3. Via the Apple Home App: https://support.apple.com/en-us/HT204893#delete-reset
-
1. Via your iComfort® thermostat: Go to thermostat menu > settings > HomeKit > HomeKit User Reset. This will remove your iComfort® accessory from your homekit home on all paired iOS devices.
-
- Please refer Apple Support pages or Contact Apple Support for any issues relating to your iCloud account, Home hub setup or Apple Home app syncing issues on your iOS devices.
- Please refer Apple Support pages or Contact Apple Support for any issues relating to your iCloud account, Home hub setup or Apple Home app syncing issues on your iOS devices.
-
-
-
- From Home screen go to menu (top right of home screen), select settings, then scroll down to display tab on left of screen and select, then turn off PureAir S life.
-
- From home screen go to menu (top right of home screen), select settings, then scroll down to notifications and select, then select PureAir maintenance, then select calendar, run time or disabled.
-
- Filter life is measured by sensing the pressure differential between incoming and outlet air. Purifier (lamp and catalyst) life is measured by a time-based algorithm.
-
- PureAir UVA lamp and catalyst.
-
- From home screen go to menu (top right of home screen), select settings, then select Advanced Settings, select View Dealer Control Center, select Proceed, select Equipment, and select PureAir S. Then scroll down to the bottom and select either reset purifier (will reset just the lamp life) or reset filter (this will reset just the filter). Once you have made your selection a pop up will appear and to cancel or confirm your choice.
-
- Your lamp should still be on but its intensity is reduced to a level that will not provide the activation to the PureAir insert to achieve proper VOC destruction rates.
-
- Contact your Lennox Dealer. To find the contact information for your installing dealer, press the PureAir S icon on the home screen, then press the dealer contact button on the lower right corner. If you need to find a new Lennox dealer go to the dealer locator on www.lennox.com.
-
- Installed filter may have a higher air resistance across the filter than the system is designed for.
-
- The PureAir S system is taking pressure readings to determine current filter life. As the filter loads (gets dirty), the air resistance increases and the remaining filter life shows a corresponding decrease.
-
- System has not run long enough to get the pressure readings that the system uses to reduce the life of filter or lamp or the contaminant level in the purified air has not been high enough to decrease life by 10%.
-
-
-
-
Why does my Perfect Temp or Schedule Mode function not work with Google Assistant?
Back to QuestionsRaising or lowering the temperature is not supported when using a Perfect Temp or Schedule mode. When attempting to change the temperature while in either mode, Google Assistant will respond "mode not supported".
-
Google Assistant supports heat / cool mode temperature adjustments, but it will do so only by maintaining the currently established temperature ranged. For example, if you set your heat set point to 60ºF and your cooling set point to 80ºF at the thermostat itself, then you have established a temperature range of 20 degrees. Any adjustment using Google Assistant, either through the app or by voice will maintain a 20 degree range differential as well.
-
-
-
Log into either www.lennoxicomfort.com or your Lennox Home App and select your applicable thermostat if more than one exists.
- Select the menu icon and then select “upload photo”.
- A photo upload screen will appear that will let you browse for a photo on your computer or mobile device. Navigate to the desired photo and select it. Then select Upload.
- NOTE: It may take a few minutes depending of the photo size to upload to your thermostat. The following are approximate upload times, depending on your Internet access speeds, times may vary.
-
Download the Lennox Home App to upload a picture.


-
Log into either www.lennoxicomfort.com or your Lennox Home App and select your applicable thermostat if more than one exists.
-
The minimal required size is 640 x 400 and can be up to 1280 x 800 pixel resolution is supported.
Maximum file size is 20MB. -
Photo formats supported are PNG (recommended), JPG, GIF and BMP.
-
Pictures can be uploaded from your computer or smart phone.
-
For best results, make sure you’re connected to Wi-Fi prior to uploading a picture. Upload times will vary based on size of the image you are trying to upload. Pictures can take up to three minutes to load.
-
At this time the iComfort S30 and E30 can upload one picture.
-
- Return to the thermostat and go to menu > settings > display > screen saver.
- Select photo and a screen will appear asking you to either accept or reject the photo.
- Accept it to make the photo your screen saver image.
- Repeat the above procedures for any additional E30 or S30 thermostats available through your web portal or Lennox Home App
-
- Return to the thermostat and go to menu > settings > display > screen saver.
- Select photo and a screen will appear asking you to either accept or reject/delete the photo.
- Select reject/delete
-
- Return to the thermostat and go to menu > settings > display > screen saver.
- Select photo and the new photo will appear and you will be prompted to reject /delete, or accept.
- Select accept
-
If photo option is selected for screen saver but no photo is uploaded or has been deleted, then the system will display the Lennox logo.
-
-
-
Selections are ASHRAE 6.2, or timed. This selection will be made for you by your Lennox dealer. Once the ventilation setting is selected a home owner can control the ventilation.
- On the iComfort thermostat go home page/ menu/ ventilation. Selections are timed, on, off, and ventilate now.
-
ASHRAE 62.2 is a national standard that provides methods for achieving acceptable indoor air quality in typical residences. It was developed and is maintained by the American Society of Heating and Air-Conditioning Engineers (ASHRAE). One of the standard three main components is Whole House Ventilation which is exhausting stale indoor air and replacing it with fresh outdoor air.
-
When ventilation is running the ventilation icon
 will appear on the home screen.
-
-
-
The Lennox iComfort® implementation of demand response, referred to as “Peak Monitoring”, is compliant with the State of California’s Title 24, and other utility providers supporting Open Automated Demand Response (ADR). Check with your local utility provider to see if they have a demand response program.
-
Demand response allows you to play a role in reducing or shifting your electricity usage during maximum or peak periods. These peak periods are represented in the time of energy use (peak load) or with dynamic pricing (peak price). Often these peak times and dynamic pricing rates are in the afternoon, early evening and summertime.
-
Signing up for a demand response program with your utility provider could provide the following benefits:
- Save money on your utility bill during maximum or peak timeframes.
- Save power during maximum or peak times of energy usage in your area.
-
- Sign up with your utility provider.
- Make sure you have a compatible Lennox thermostat (such as the iComfort® S30, E30 or M30).
- Go to your iComfort® thermostat and select Menu > Settings > Peak Monitoring. Then you will be prompted through the enrollment process on your thermostat.
-
The iComfort® S30, E30 and M30 support Peak Monitoring.
-
How do I know my thermostat is enrolled in my utility provider’s demand response program?
Back to QuestionsYou will receive a message on your thermostat when successfully enrolled in your utility provider’s program.
-
Yes, you can cancel a Peak Monitoring event at anytime, before or during the event.
-
You can un-enroll your thermostat from your provider’s demand response program by selecting Menu > Settings > Peak Monitoring > Peak Monitoring Settings > Factory Reset Peak Monitoring Settings.
-
-
-
Control4 is a leading control and automation platform which works with thousands of smart devices integrating audio, video, lighting, security, intercom, and of course climate control into a seamless customer experience. Control4 gives the customer an easy-to-use interface to control the iComfort thermostat.
For more information about Control4 products and services,visit www.control4.com
Control4 is a registered trademark of Control4 Corporation. All rights reserved.
-
Control4 provides a professionally installed, personalized smart home experience that gives your family intuitive control of nearly every smart device in your home. You'll enjoy a seamless, fluid way to manage your temperature, lights, locks, entertainment equipment, security, and more from one single system.
For more information about Control4 products and services, visit www.control4.com to find a Control4 Smart Home Pro near you to unlock your home's potential.
-
What are the pre-requisites for integration of my iComfort thermostat with my Control4 platform?
Back to Questions-
Supported thermostats:
- iComfort S30, iComfort E30 – firmware version 3.7 and later
- iComfort M30 – firmware version 3.0 and later
- Lennox iComfort account configured to access the supported thermostat (https://www.lennoxicomfort.com/account/login)
- Control4 System OS version 2.10.6 or later
- Control4 customer.control4.com account credentials
-
Supported thermostats:
-
For integration with iComfort thermostats, you must contact your Control4 dealer directly to download and install the necessary driver for your operating system.
-
Settings include:
Display all systems in the home and select a system
Display all zones in the system and select a zone
Turn system/zone ON/OFF
Change manual modes
Change set-points for each zone/system
Change fan mode
For more information about using your Control4 thermostat visit Using your thermostat (control4.com)
-
-


